
Account & Billing Documentation
One church, one account, one password. Tracker, Prayer, Connections and Discipleship all sit on top of it. This guide covers the parts that belong to no single app: signing up, signing in, who can open what, and what you are paying for.
The pages for Tracker, Prayer and Connections describe what each app does. This page describes the account underneath them.
How do I…?
Creating Your Church Account
Moving Between the Apps
Adding People to Your Account
Getting Help
1. Creating Your Church Account
One person signs the church up, and that person becomes its first administrator. Everyone else is added afterwards from inside the product. There is no separate organisation to create and no invitation code to wait for.
What the form asks for
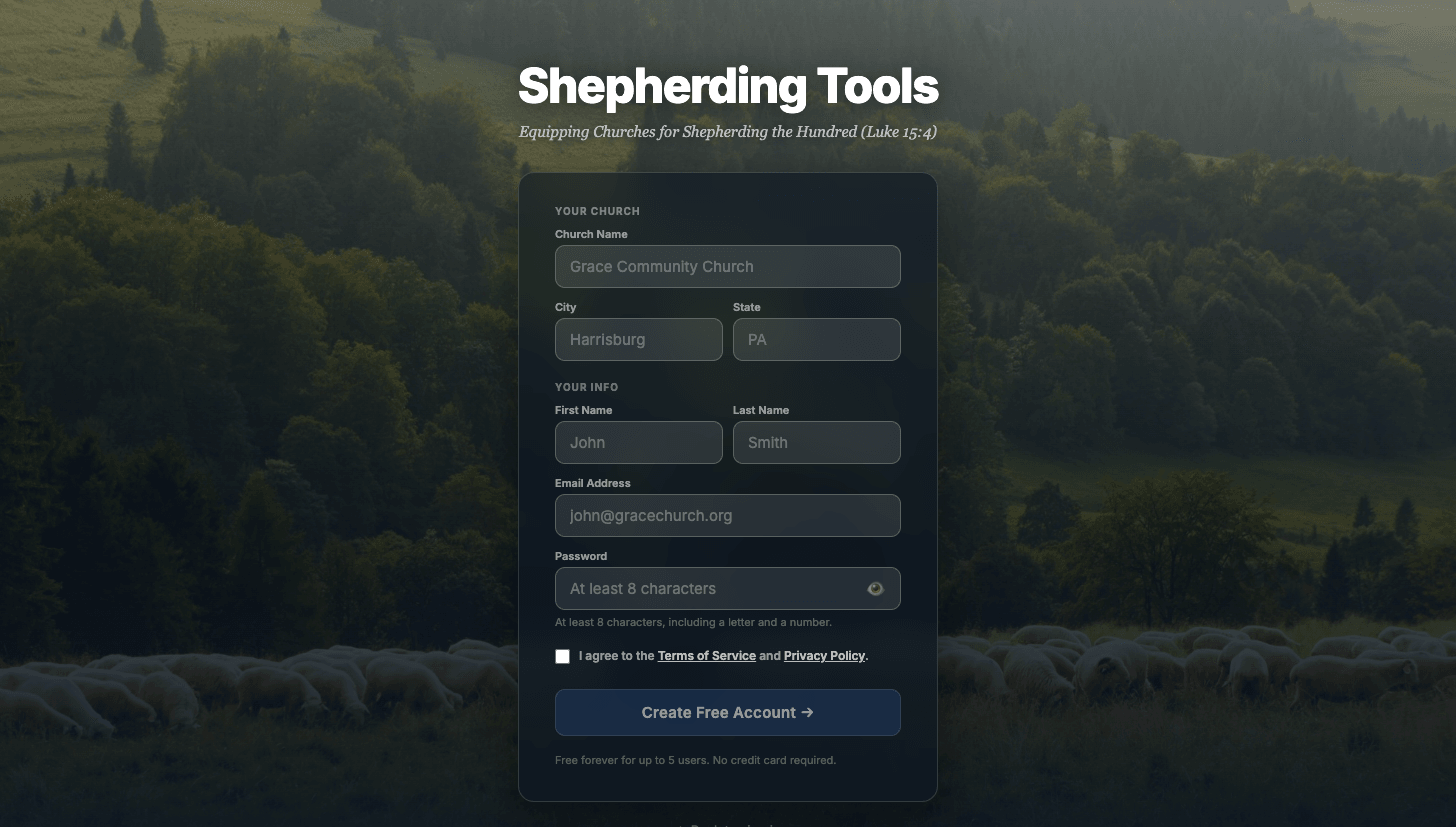
It asks for two things about your church and four about you.
- Go to shepherdingtools.com/signup.
- Fill in Church Name, City, and State (two-letter abbreviation).
- Fill in First Name, Last Name, Email Address, and Password (at least 8 characters, one letter, one number).
- Tick the box agreeing to the Terms of Service and Privacy Policy.
- Click Create Free Account →. If the box in step 4 isn’t ticked, a message under the form says so.
Your Church and Your Info are the two field groups on the form; nothing here asks for a card.
Verify your email before you sign in
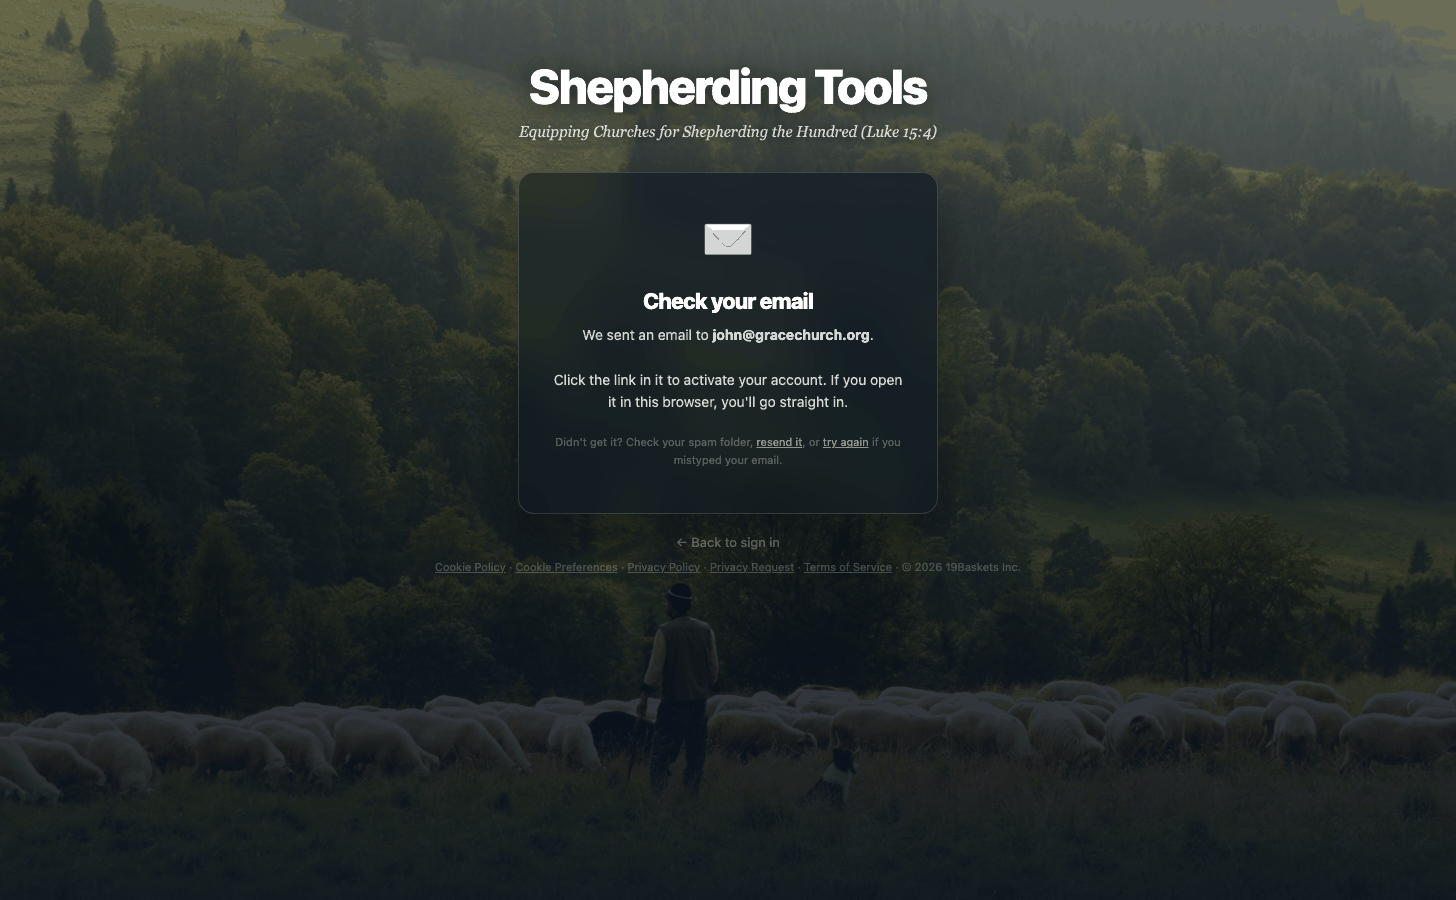
Submitting the form does not finish the job. We send a verification link to the address you entered, and the account stays switched off until you click it.
- Open the email and click the verification link. It is good for seven days.
- If you open it in the browser you signed up in, within a day, you go straight into your account.
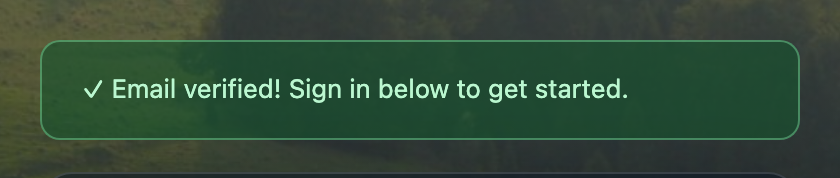
- Otherwise you land on the sign-in page with a green confirmation. Sign in with the password you chose during sign-up.
If you try to sign in before clicking that link, you are told your email or password is wrong. Nothing is wrong with either. The account is simply not switched on yet. Check your spam folder for the verification email, or use resend it on the confirmation screen.
If the link has expired, sign up again with the same address. That issues a fresh link rather than a second church.
Looking around first, without signing up
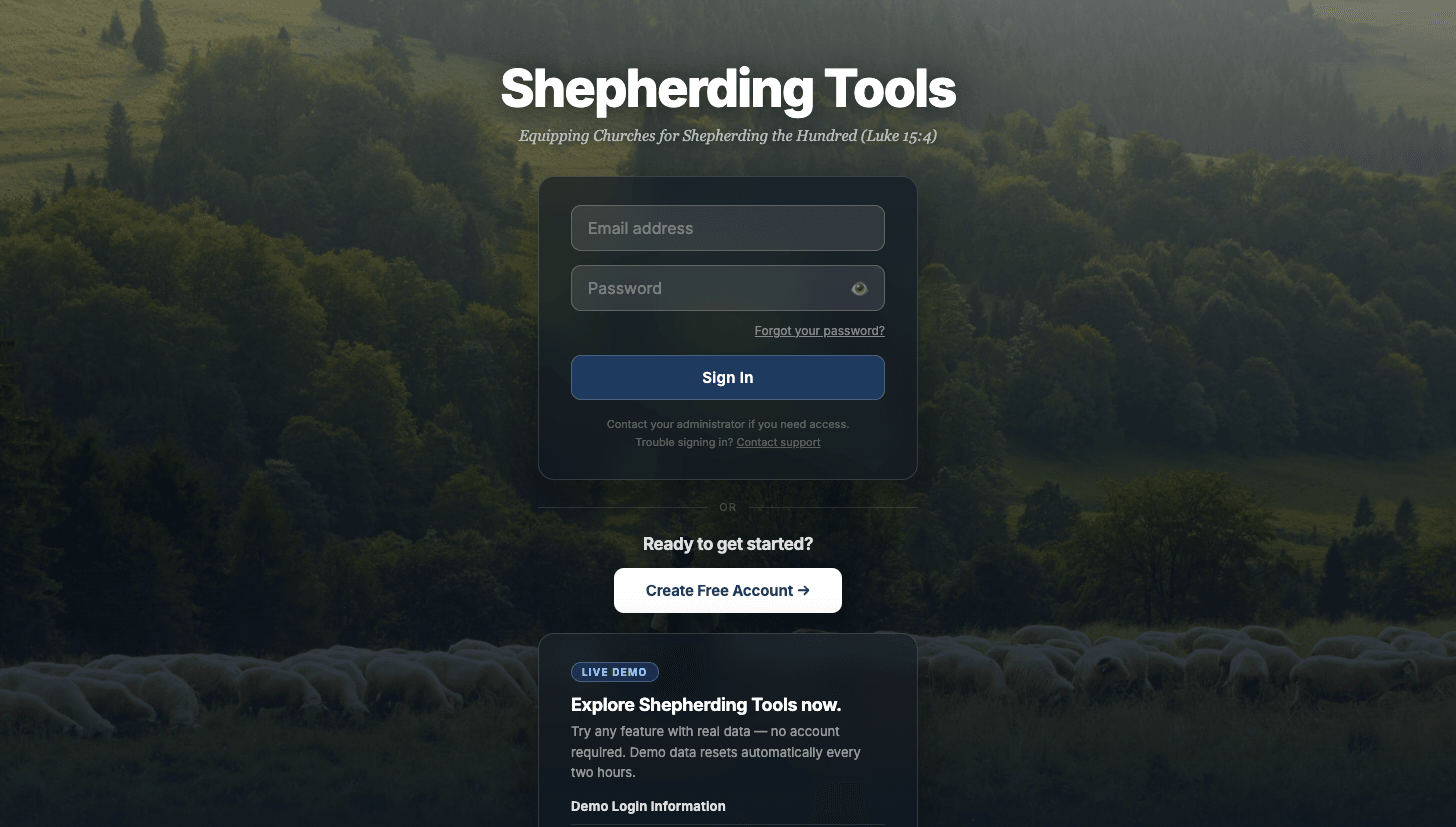
The sign-in page carries a Live Demo card with the demo logins printed on it. It is a real church full of invented families, so you can log a contact, build a prayer plan and print a report without creating anything. The demo data resets every two hours, which means nothing you do there survives and nothing you do there matters.
2. Signing In
One address for every app
- Go to shepherdingtools.com/login.
- Enter your Email address and Password.
- Click Sign In.
Your account opens whichever apps it has been given, so there is no separate Prayer password or Connections password. You land on Tracker if you have it, and on the first app you do have if you do not — no second sign-in for other apps.
A sign-in lasts a week in that browser. After that, or after signing out, you enter your password again.
Forgotten password
- On the sign-in page, click Forgot your password?
- Enter your email address and click Send reset link.
- Open the email and click the link. It expires one hour after it is sent.
- Type a new password twice, then click Set new password.
- Sign in with the new one.
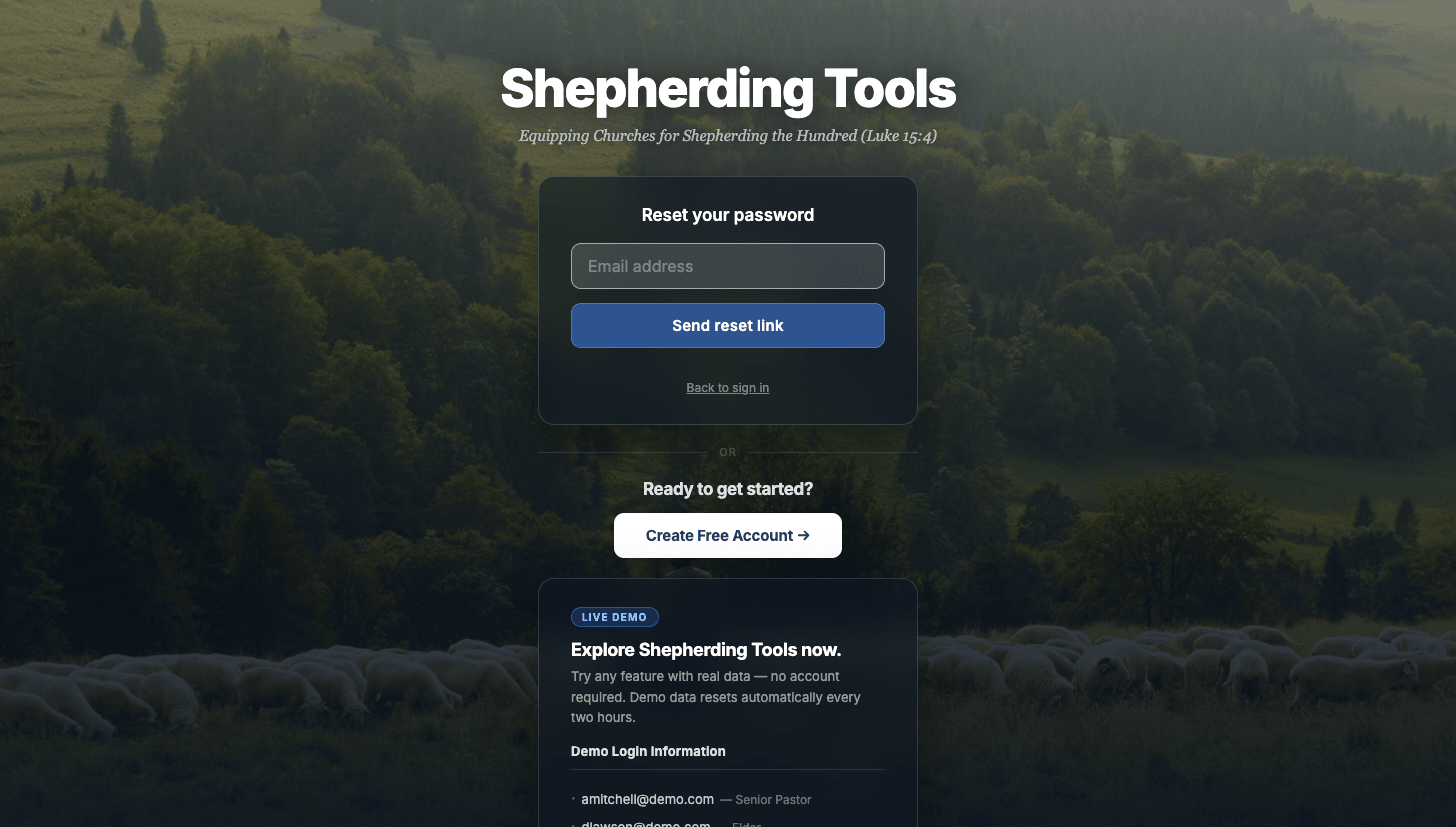
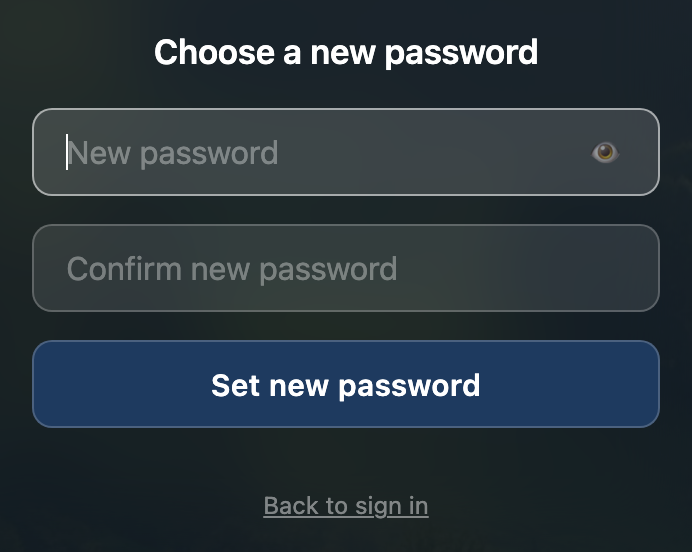
The screen always says a link has been sent, whether or not the address is on file. That is deliberate: it stops a stranger using the form to find out who has an account. So if no email arrives, the likeliest reason is that we hold a different address for you. Ask your administrator which address your login uses.
A reset link works once. If you request two, only the newer one opens the form. Your new password also has to differ from your current one, which is what stops a reset link from quietly becoming a permanent spare key.
When sign-in keeps failing
The message reads Invalid email or password in every case, so work through the causes in order:
- The account has not been verified yet. See above.
- An administrator deactivated the account. Ask him to open Admin > Users and click Reactivate.
- You are typing a different address from the one on your login. Your login email and your personal email can differ.
- After ten failed attempts you are locked out of the form for fifteen minutes. Waiting is the fix.
3. Moving Between the Apps
- Look at the top-left corner, under Shepherding Tools — the current app’s name (Tracker, Prayer, Connections or Discipleship).
- If a chevron sits beside it, click it to open Switch Product.
- Click the app you want — no second sign-in.
On a phone, in Tracker, Prayer and Connections, the same menu is in the drawer near the bottom, under the same Switch Product heading.
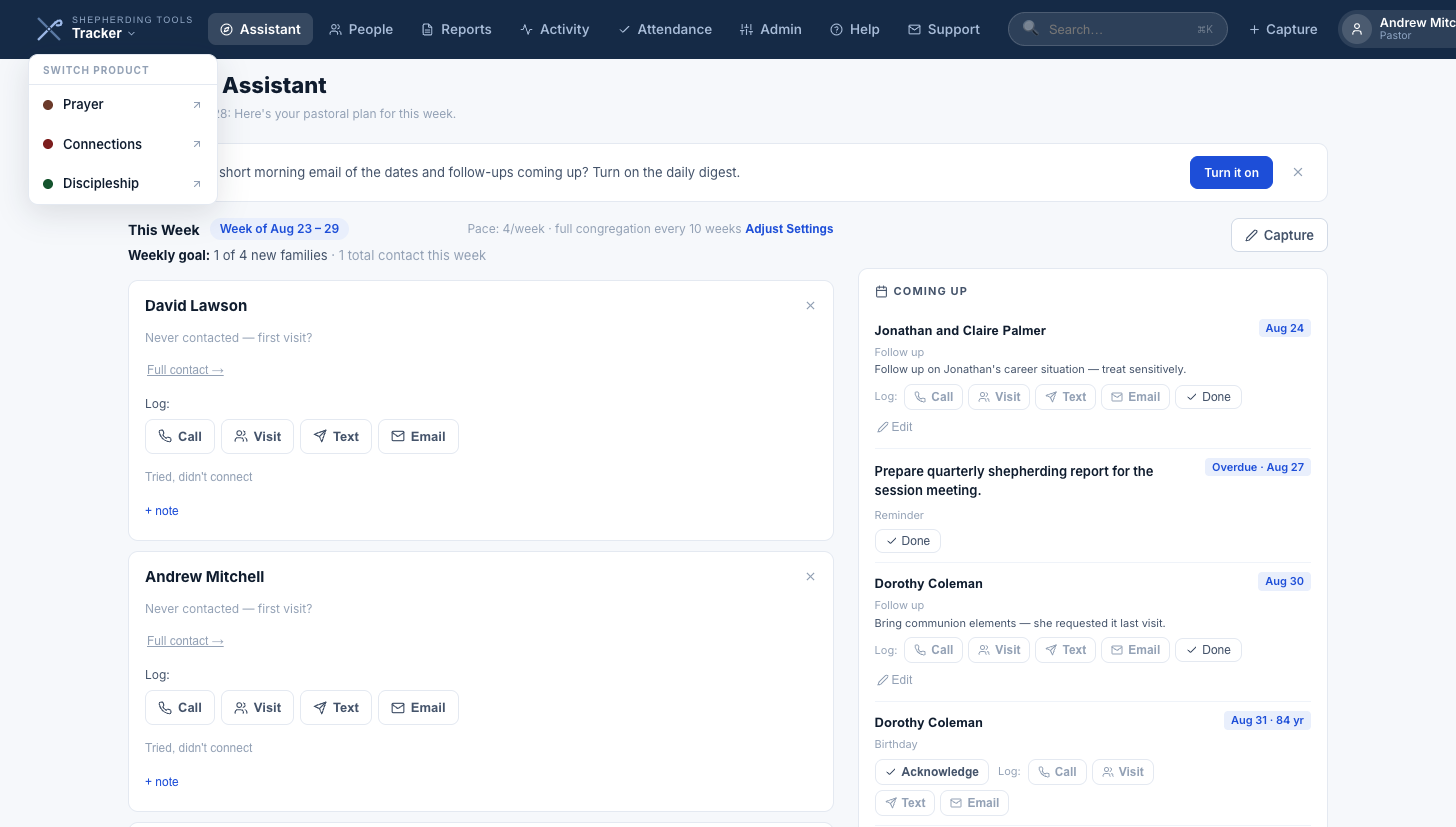
No chevron means the menu has nothing to show: your account has been given exactly one app. That is a setting, not a fault. An administrator can change it under Admin > Users, described in App Access below.
4. My Settings
My Settings is yours alone. Nothing on it changes what anybody else sees. It holds your name, your contact details, what we are allowed to email or text you, and your password.
Finding it
- If your top bar reads Admin: click it, then click My Settings at the foot of the left-hand list.
- If your top bar reads Settings (non-administrators): click it — it opens directly on My Settings.
Either way it is the same screen.
My Settings lives in Tracker, so an account that has not been given Tracker cannot reach it. If that is you, change your password through Forgot your password? on the sign-in page, and ask an administrator for anything else on this screen.
Profile
Your Display Name is the name other officers see beside the contacts you log. Role is greyed out here because your office is an administrator’s to set. Below that, Contact Information holds a personal email and a phone number, both optional and neither used to sign in.
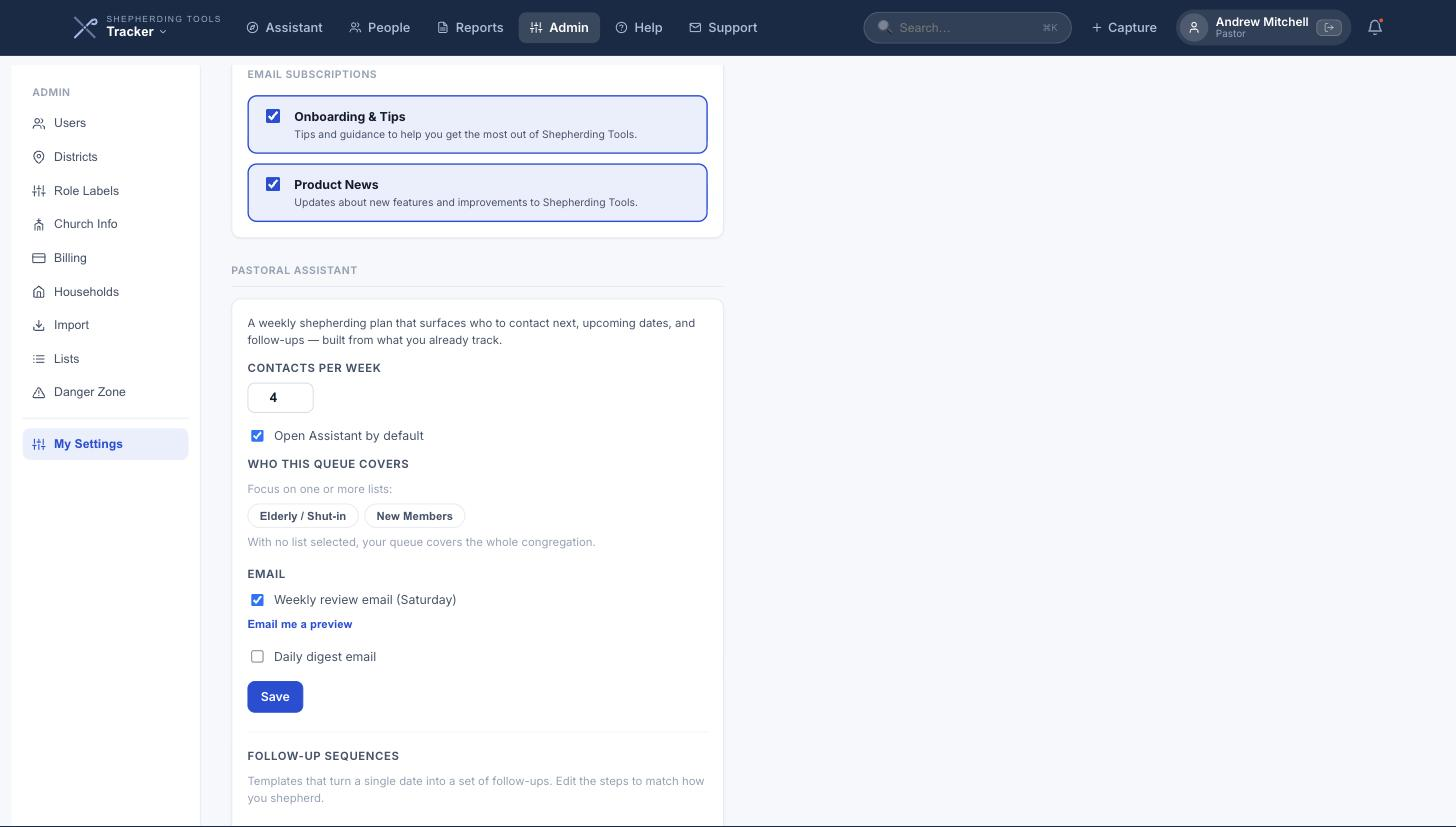
This section also shows Your BCC Logging Address, a private address you can BCC on a shepherding email to have it logged for you automatically. Regenerate address issues a new one and stops the old one working, so use it if the address gets out.
Choose how you’re notified, and how the People page opens for you
Eight checkboxes, in the Notifications card.
- Email Alerts — notifications and to-do assignments by email.
- Push Notifications — alerts on your phone: a to-do assigned to you, a contact logged, an urgent prayer request, your daily prayer list, and a message from a Connections contact you are assigned to. Separate from email: turning one off leaves the other on.
- Text Alerts — a text when an urgent prayer request needs your approval. These use the church’s texting credits.
- Show names in Connections text alerts — on by default. When someone texts the church, this is what shows who it’s from on your lock screen. It has no effect on prayer, task, or contact notifications, which never show a name or any other detail.
- New households in your district — the label uses your church’s own word for a district. Emails you when a household is added to a district you serve. Off by default.
- Show all districts in filter — adds every district as an option in the dashboard filter dropdown.
- Default to My Last Contacts — starts the dashboard showing your personal contact history instead of the whole team’s.
- Default sort A–Z — starts the dashboard sorted alphabetically instead of by urgency.
Click Save.
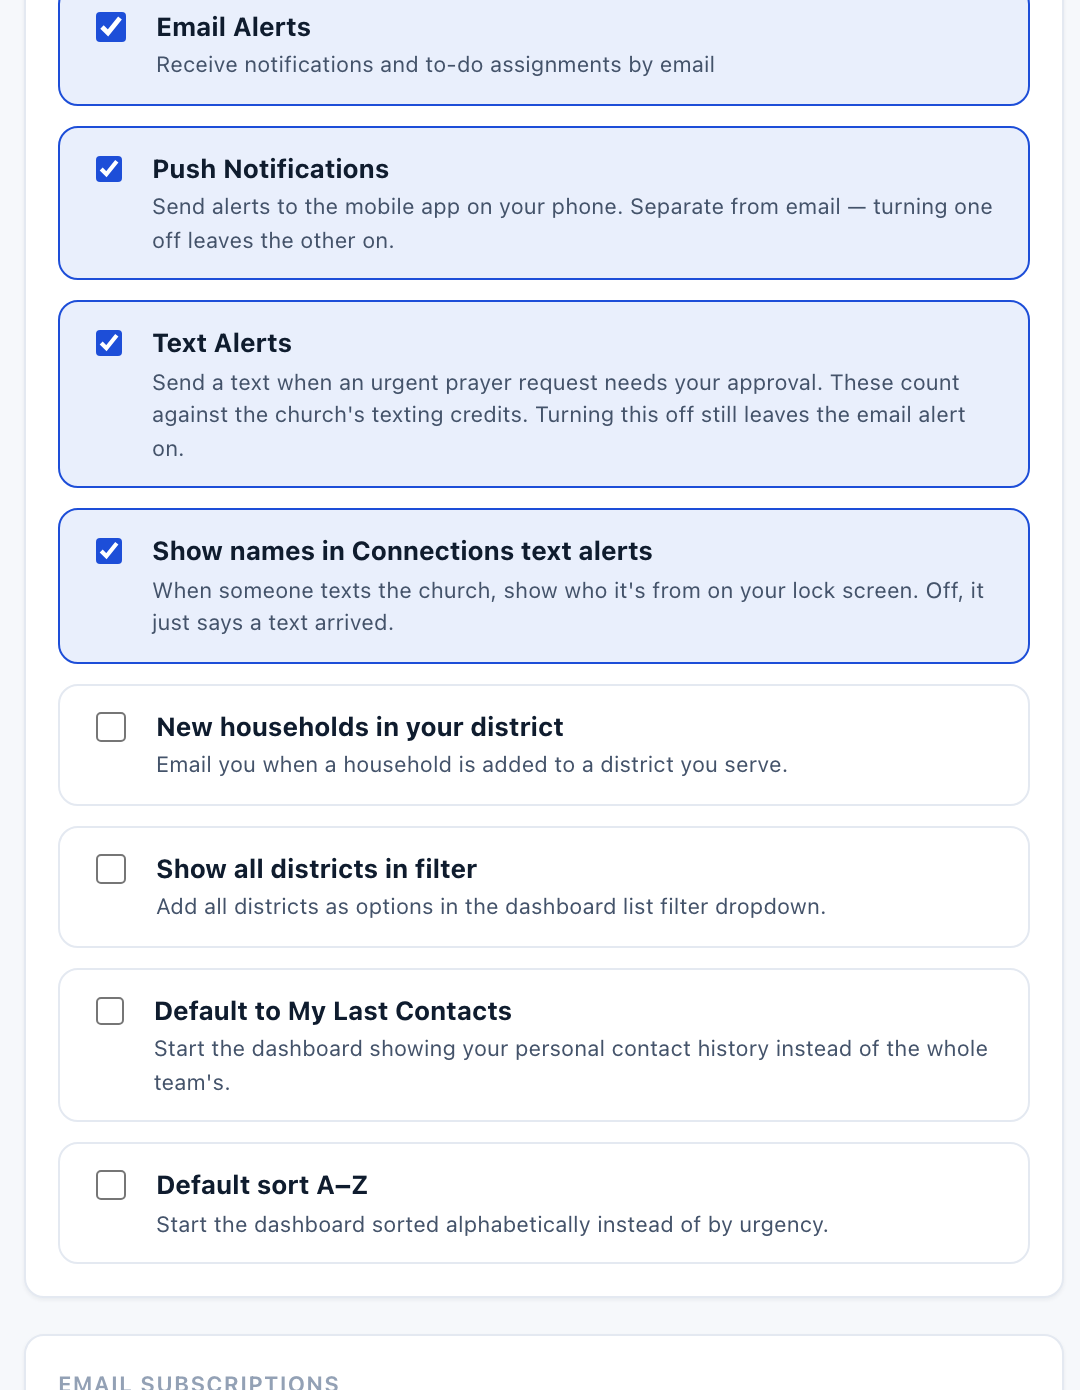
Item 5’s label is generated from whatever your church calls a district (Role Labels), so it may read differently in your account than the generic wording above.
Email Subscriptions
Two boxes, and they govern email from us rather than from your church: Onboarding & Tips and Product News. Clearing both leaves every alert about your own congregation untouched.
Pastoral Assistant
If you have not turned the Assistant on, this section is one button: Enable Pastoral Assistant. Once it is on, its own settings appear here instead.
Away & Pauses
Going on holiday should take one entry, not two.
- Open My Settings > Away & Pauses.
- In the Time Off card, enter your first day away and the day you’re back.
- Tick what to pause: Pastoral Assistant (pauses the weekly review and digest emails, holds your coverage cycle) and/or Daily prayer email (pauses the email, holds your prayer cycle).
- Click Save. (Clear removes the dates.)
- Separately, under Daily Prayer Email, click any weekday buttons you always want off.
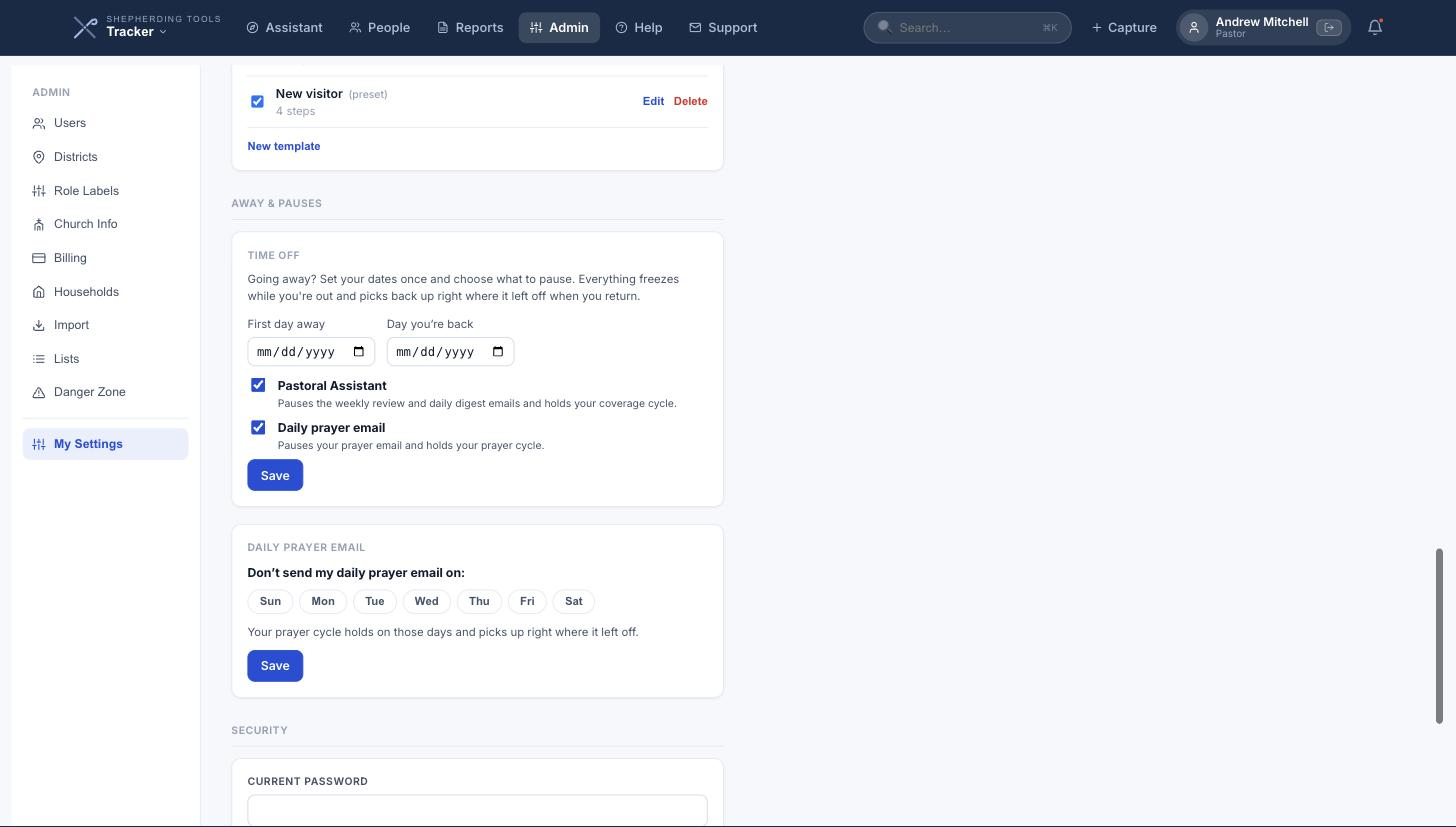
Nothing is skipped while you are out. The cycle picks up where it stopped. Set both dates or neither, and make the return date later than the first day away, or the Save button stays disabled.
Daily Prayer Email, headed Don’t send my daily prayer email on:, works the same way one day at a time: no email that day, and the cycle holds rather than skipping ahead. Selecting all seven pauses the email indefinitely.
Changing your password
- Open the Security section.
- Enter your current password, then the new one twice.
- Click Change Password.
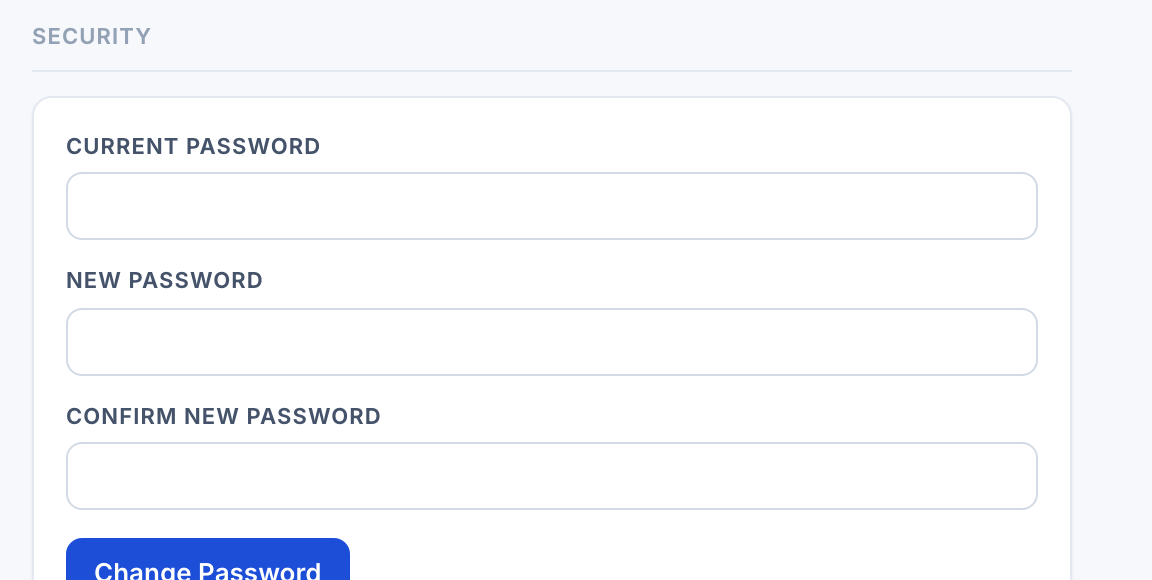
The same rule applies as at sign-up: at least 8 characters with a letter and a number. On the web you stay signed in afterwards. In the mobile app you are asked to sign in again with the new password, and the screen tells you so before you save.
Changing your password signs the mobile app out everywhere it was signed in. If a phone goes missing, that is the fastest way to shut it out.
5. Adding People to Your Account
Users live under Admin > Users, on a page headed Ministry Leaders. Adding someone, editing him, deactivating him and removing his login all need full admin access, the Add / Remove Users permission, or Manage Admin Settings. What Add / Remove Users cannot do on its own is hand out authority: it cannot set somebody’s role, tick his permissions, or make him a full administrator. On somebody who already has admin access, it also cannot change the login email or set a new password. Those stay with full admin access and Manage Admin Settings. The line under the heading tells you how many of your plan’s user places are taken.
Adding someone
- Click + Add Person.
- Search the congregation for him by name and pick him from the list. If he is not in the directory, click Person not in directory — add as new and type his name.
- Enter his Login Email. This is the address he signs in with, and it must be unique.
- Choose his Church Office, and tick Full admin access if he should run the software.
- For an elder or a deacon, choose his Assigned District.
- Click Save. A temporary password is emailed to the login address.
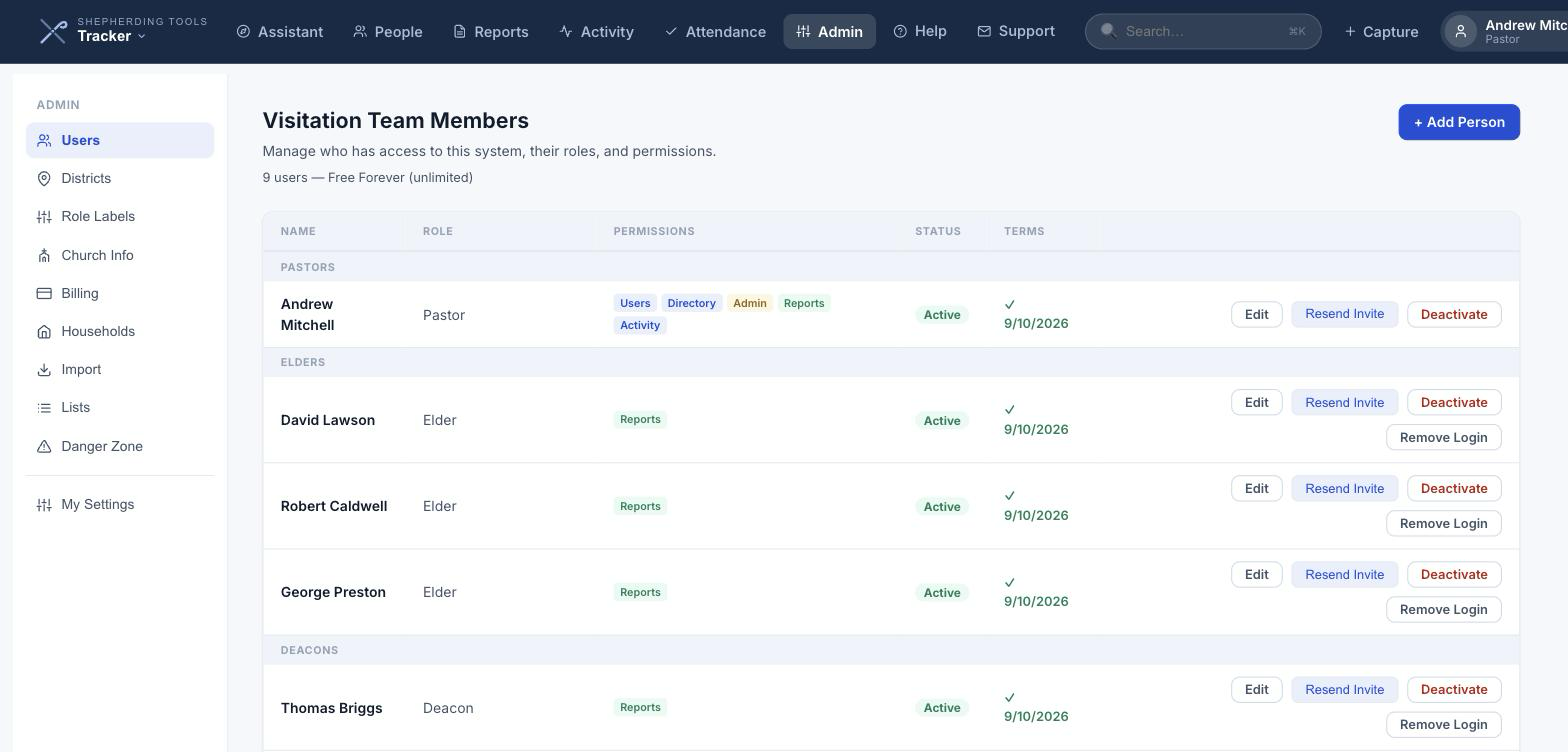
Search the directory before adding somebody new. Picking the existing member links his login to the record his household is already on. Adding him fresh creates a second record for the same man. If the email address already belongs to someone at another church, the save is refused. Contact [email protected] to sort it out.
What the new person sees
He signs in at the usual address with the temporary password from his email, and meets two screens before he reaches anything else:
- Set Your Password — the temporary one, then a permanent one twice.
- Terms of Service & Privacy Policy — one box to tick, then Agree & Continue.
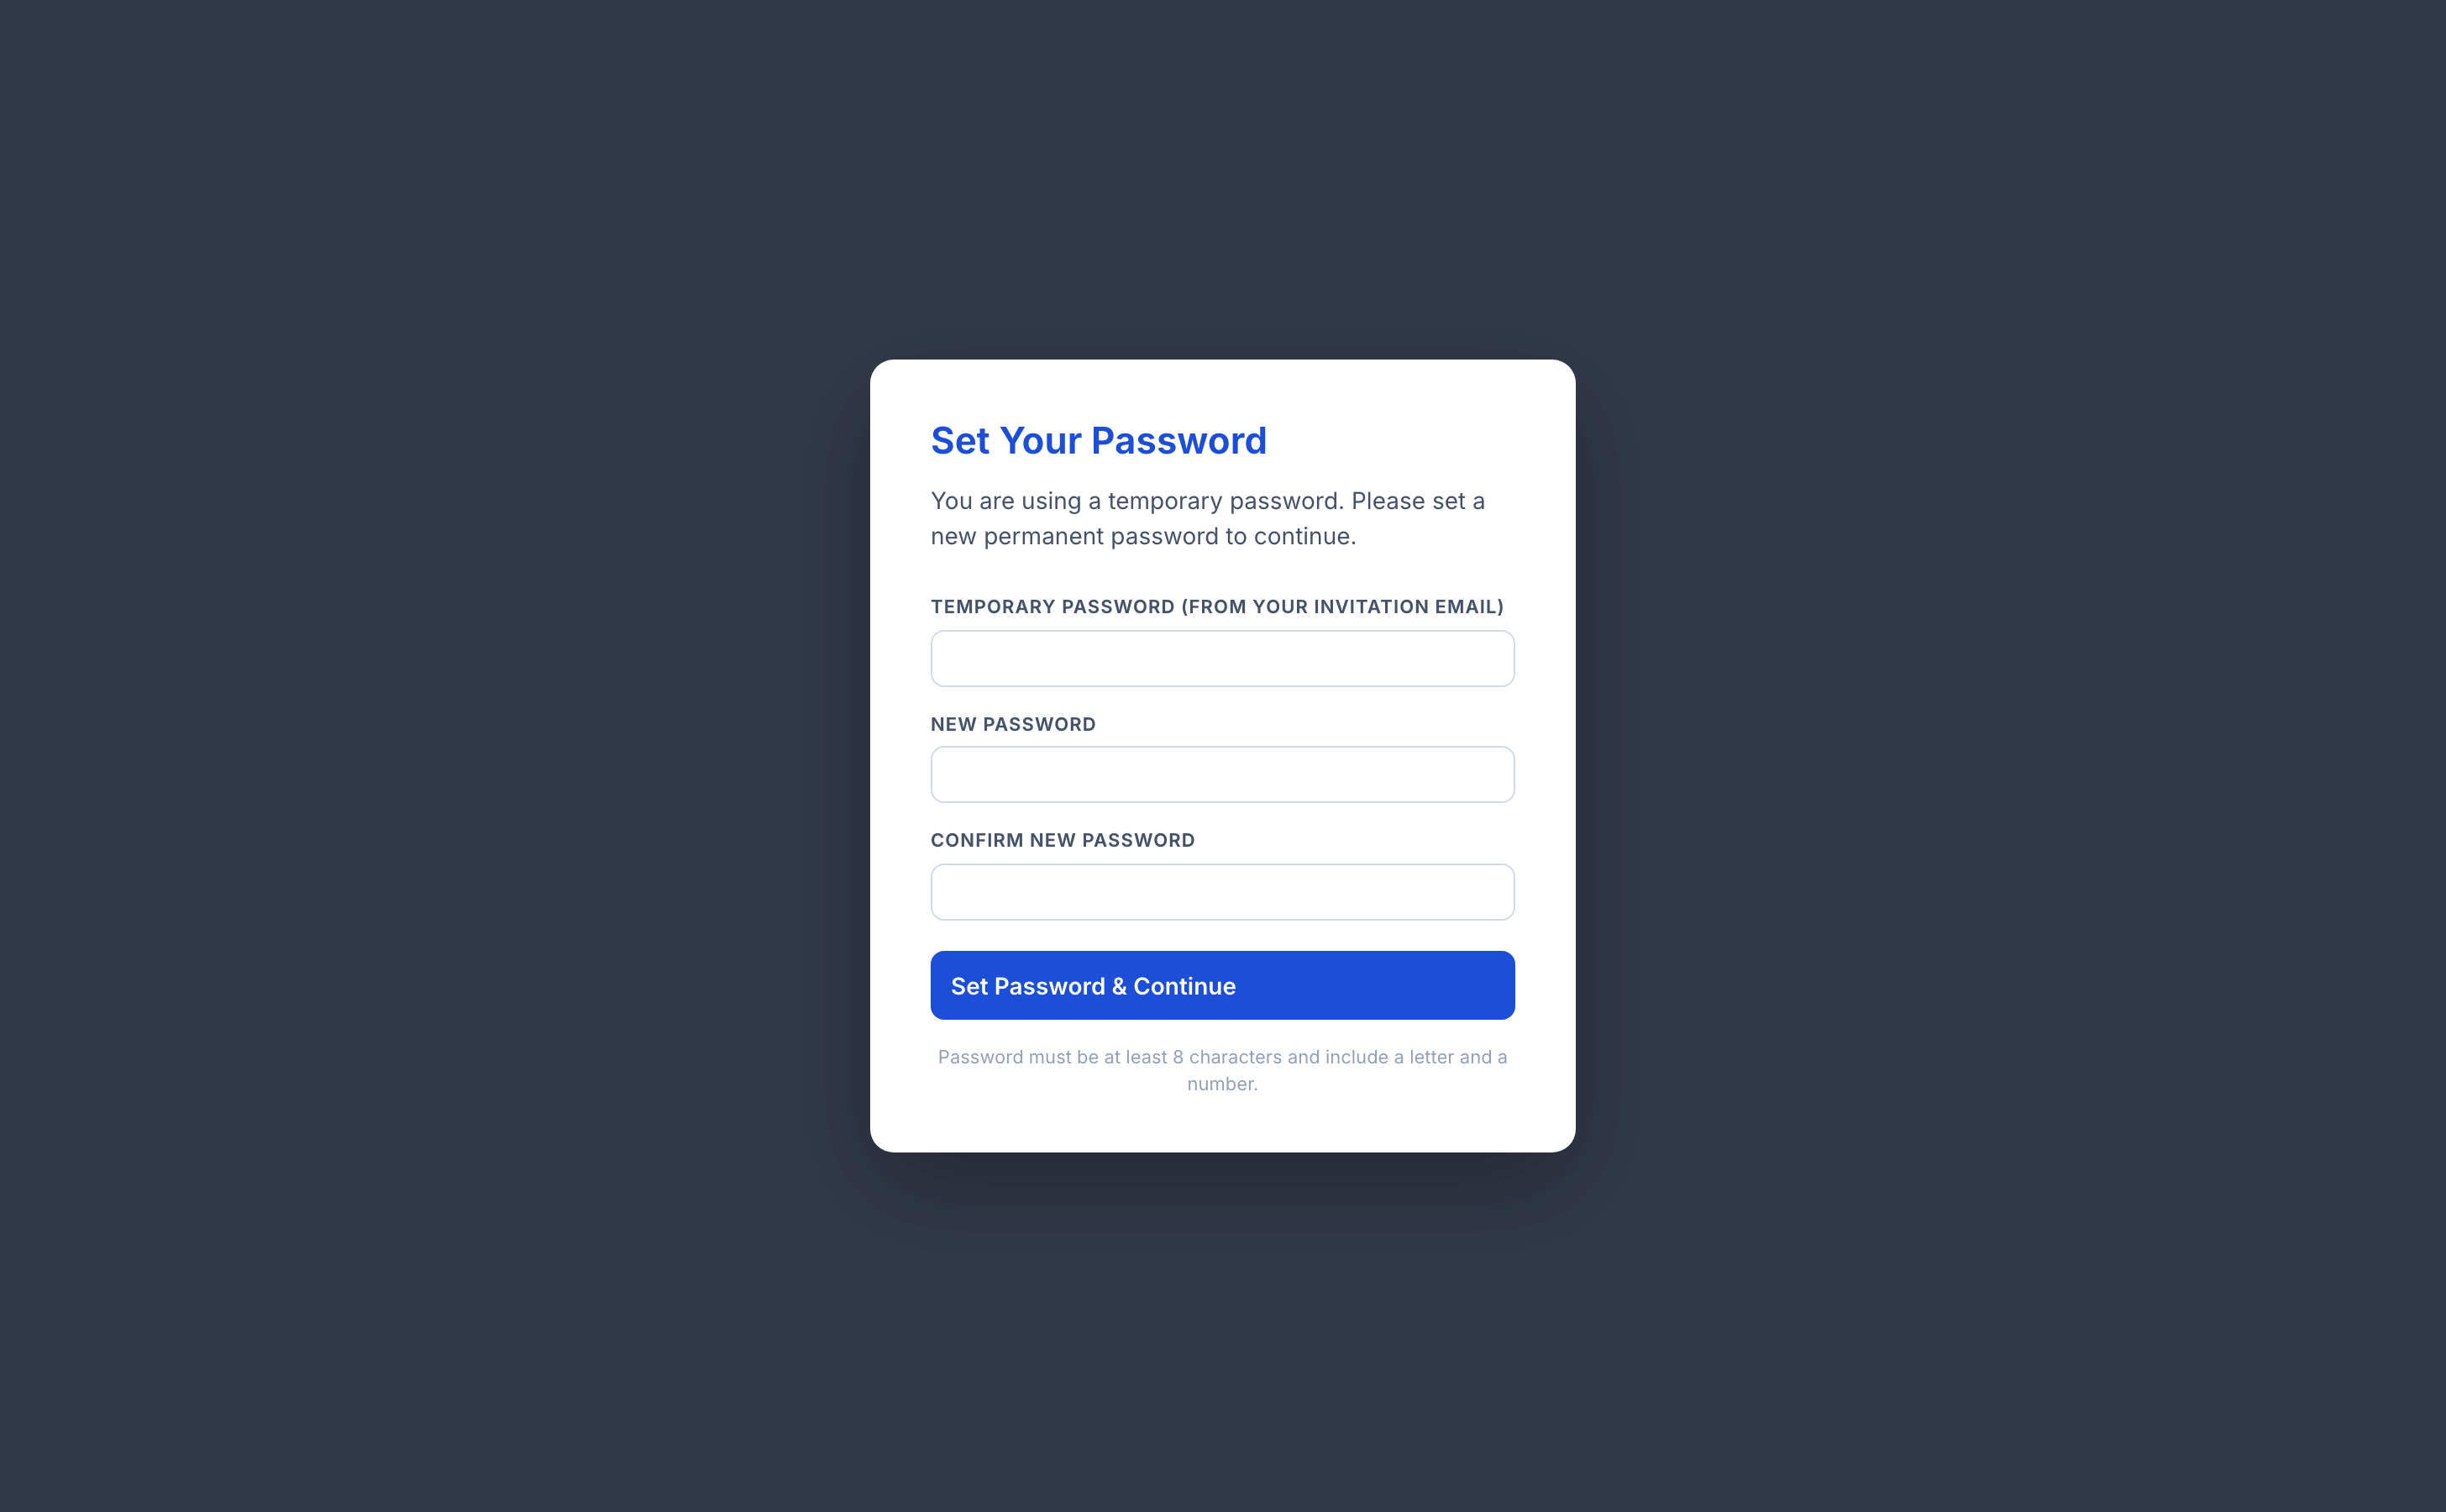
The Terms column on the Ministry Leaders table is how you check that from your side. It shows the date he accepted, or Pending if he has not signed in yet.
Resend Invite
Resend Invite issues a new temporary password and replaces the old one. Press it for somebody who never got his invitation, or who is locked out. Do not press it on a working account to be helpful: it will lock that person out of the password he already set.
Church Office and full admin access
These two are unrelated, and confusing them is the commonest mistake on this screen. Church Office is who a man is in the church: Pastor, Elder, Deacon, Ministry Leader, Secretary, or one of the role names your church has defined. Full admin access is a software setting. It lets someone manage users, billing, districts and church information. A secretary can hold it. An elder can be without it.
The office you choose sets a sensible starting set of permissions for a new person. It does not lock them: adjust the checkboxes underneath afterwards.
Permissions
Everybody can log contacts. The seven checkboxes grant abilities beyond that:
- Add / Remove Users — create accounts, edit them, deactivate and reactivate them, and remove somebody’s login. It cannot set a role, tick these permissions, or make anybody a full administrator. On somebody who already has admin access, it cannot change the login email or set a new password either. The Change Password box does not appear on his row at all.
- Edit Household Info — add, edit and permanently delete households and members.
- Manage Admin Settings — church info, districts, role labels and public lists.
- View Reports — open Reports and print them. Elders and deacons get this by default.
- View Activity Feed — the church-wide day-by-day feed.
- Log Contacts for Others — record a contact on somebody else’s behalf.
- Approve Prayer Requests — release requests submitted by members and through the public form. It grants no extra sight of anything.
Tick Full admin access and the list disappears, because an administrator has all of it. One box stays visible even then: View Activity Feed, which is off for administrators too until somebody switches it on.
Unticking Approve Prayer Requests for the last person who holds it will warn you, on the spot, how many requests are sitting unreleased. The save still goes through. Nobody will be able to release those requests until somebody is given the permission again.
App Access
Four checkboxes — Tracker, Connections, Prayer, Discipleship — decide which apps this person can open, and therefore what his Switch Product menu offers. A new account starts with all four.
- Open Admin > Users, and make sure the person already exists (App Access only appears after Save).
- Click Edit on his row.
- Under App Access, tick or untick Tracker, Connections, Prayer, Discipleship.
- Click Save.
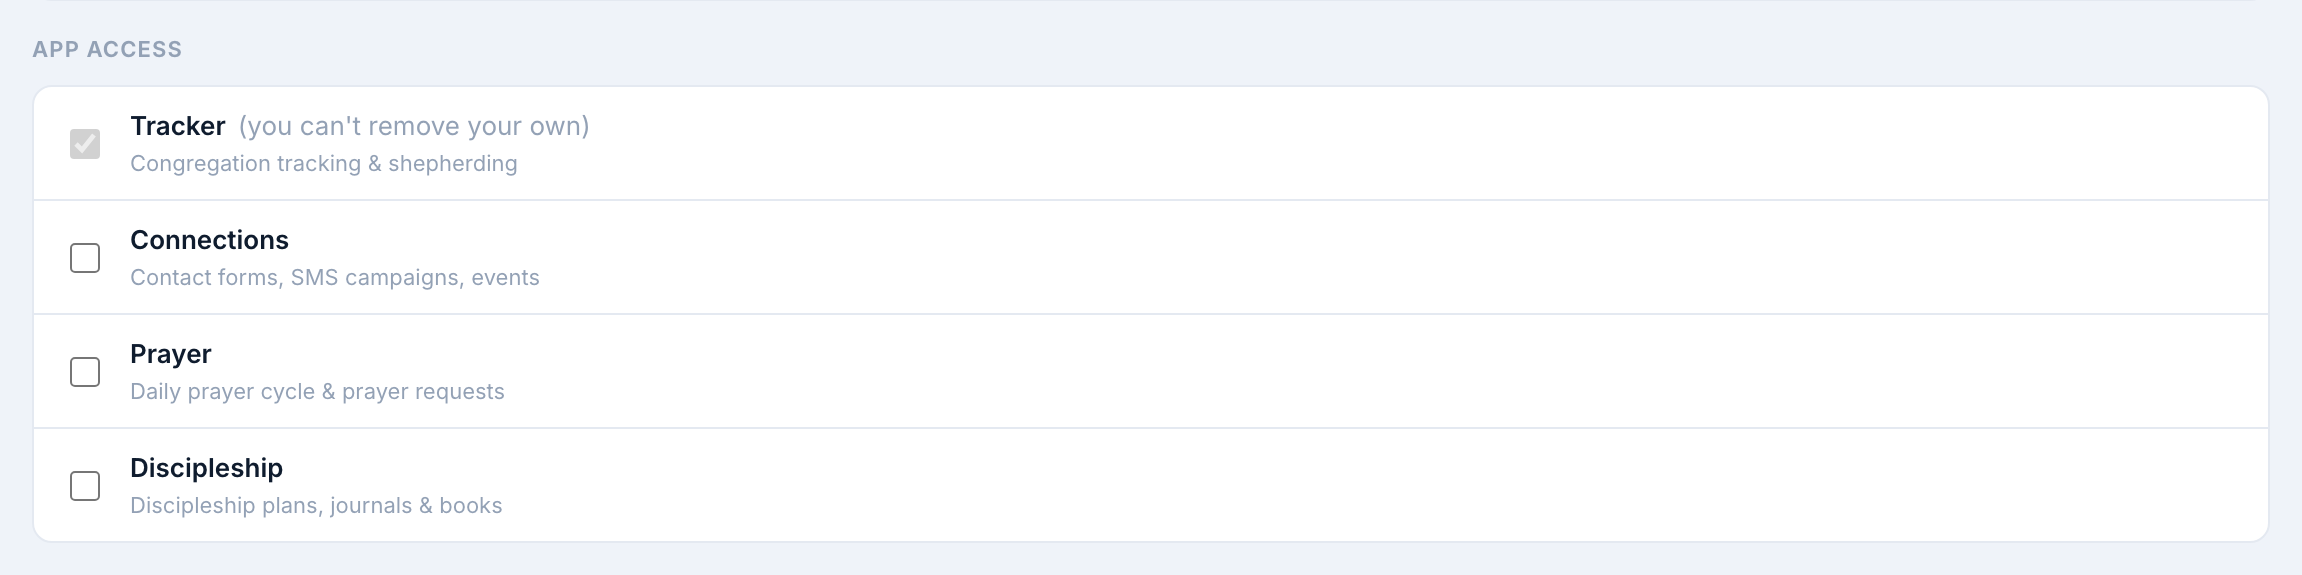
You cannot remove your own Tracker access, which is what stops a church locking itself out of the only screen that could put it back.
Removing Tracker from an outreach volunteer removes Prayer with it, unless Prayer is ticked in its own right. Prayer reads the congregation directory, so leaving it on would hand back most of what taking Tracker away was meant to withhold.
Change someone’s login email
The login email is the address a person types on the sign-in page. It can only be changed from Admin > Users, not from My Settings. A full administrator can change his own here too.
- Open Admin > Users.
- Click Edit on his row.
- Under Basic Info, replace the address in Login Email.
- Click Save.
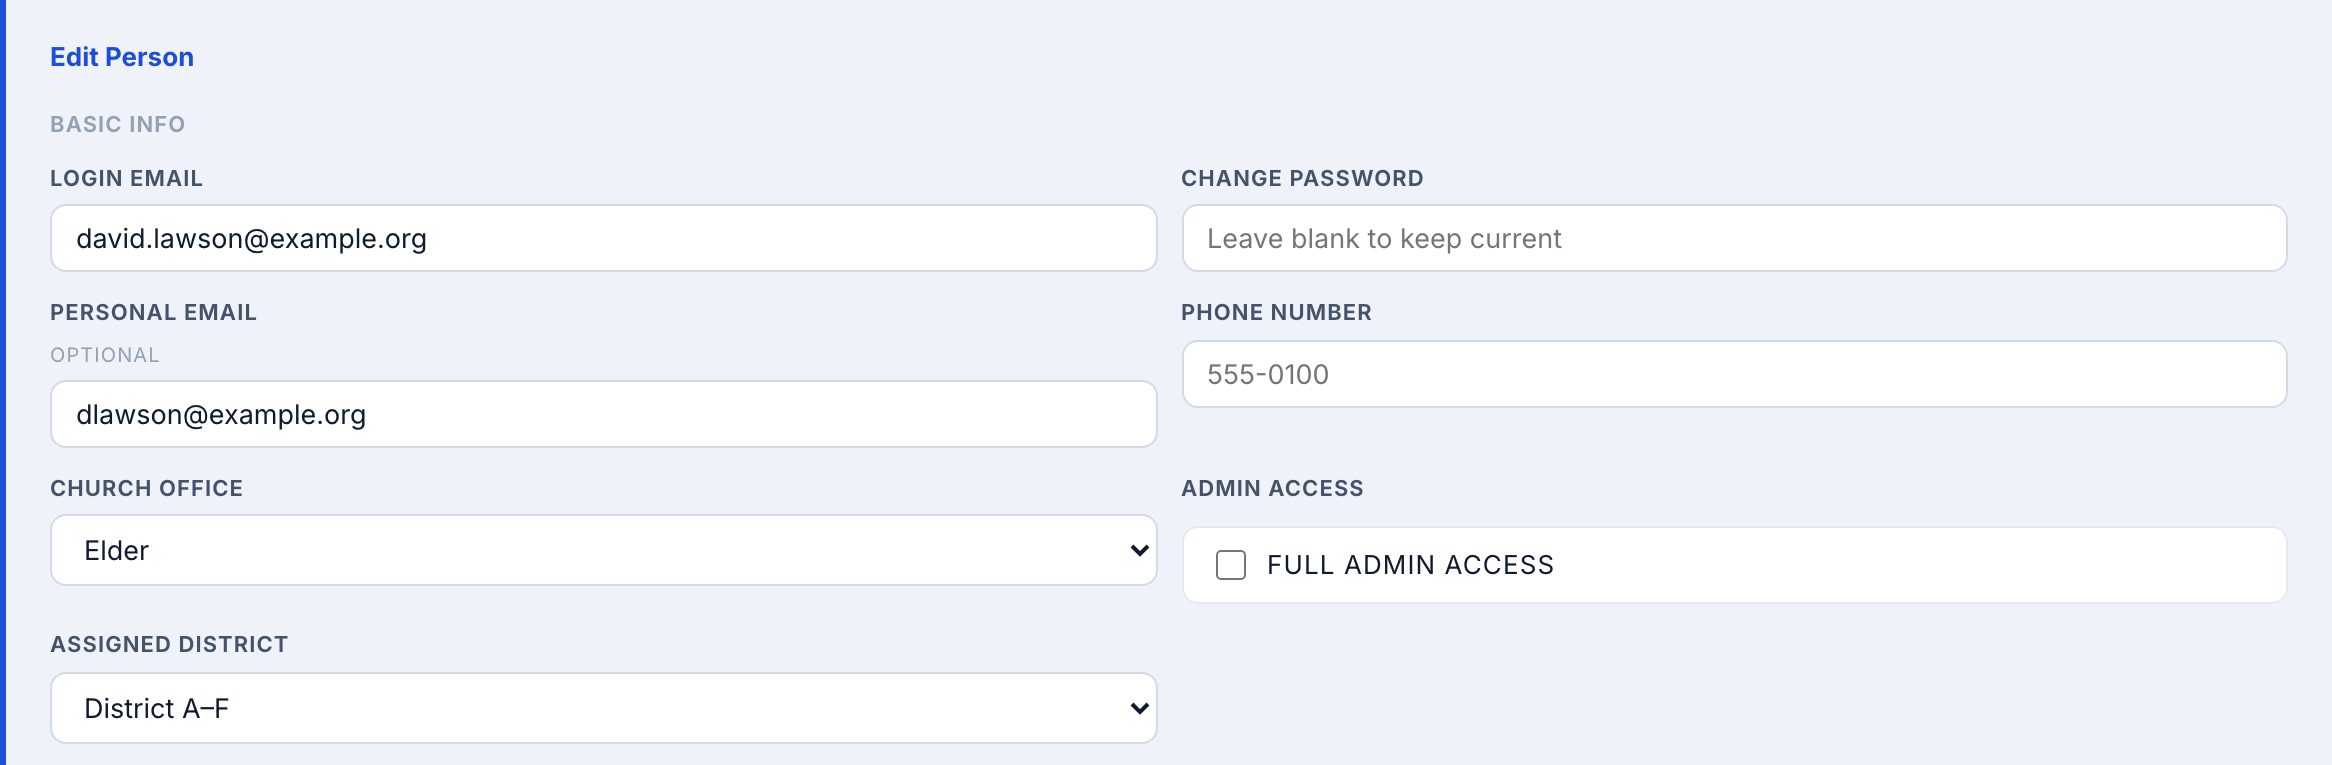
From then on he signs in with the new address and the same password. The old address stops working straight away. Nothing is emailed to him about the change, so tell him yourself. If someone else in your church already signs in with that address, Save is refused and the message names who has it.
The Personal Email on this form, which is the same address he sees under Contact Information in My Settings, is never used to sign in. Changing it leaves his login alone. And on somebody who already has admin access, only a full administrator or Manage Admin Settings can change the login email; Add / Remove Users on its own cannot.
Deactivate, Reactivate, Remove Login
Three buttons on each row, and they are not interchangeable.
- Open Admin > Users.
- Find the person’s row.
- Click Deactivate to lock him out (reversible — Reactivate undoes it in one click, e.g. for an elder rotating off for a year), or click Remove Login to erase his login for good (a confirmation modal asks you to confirm).
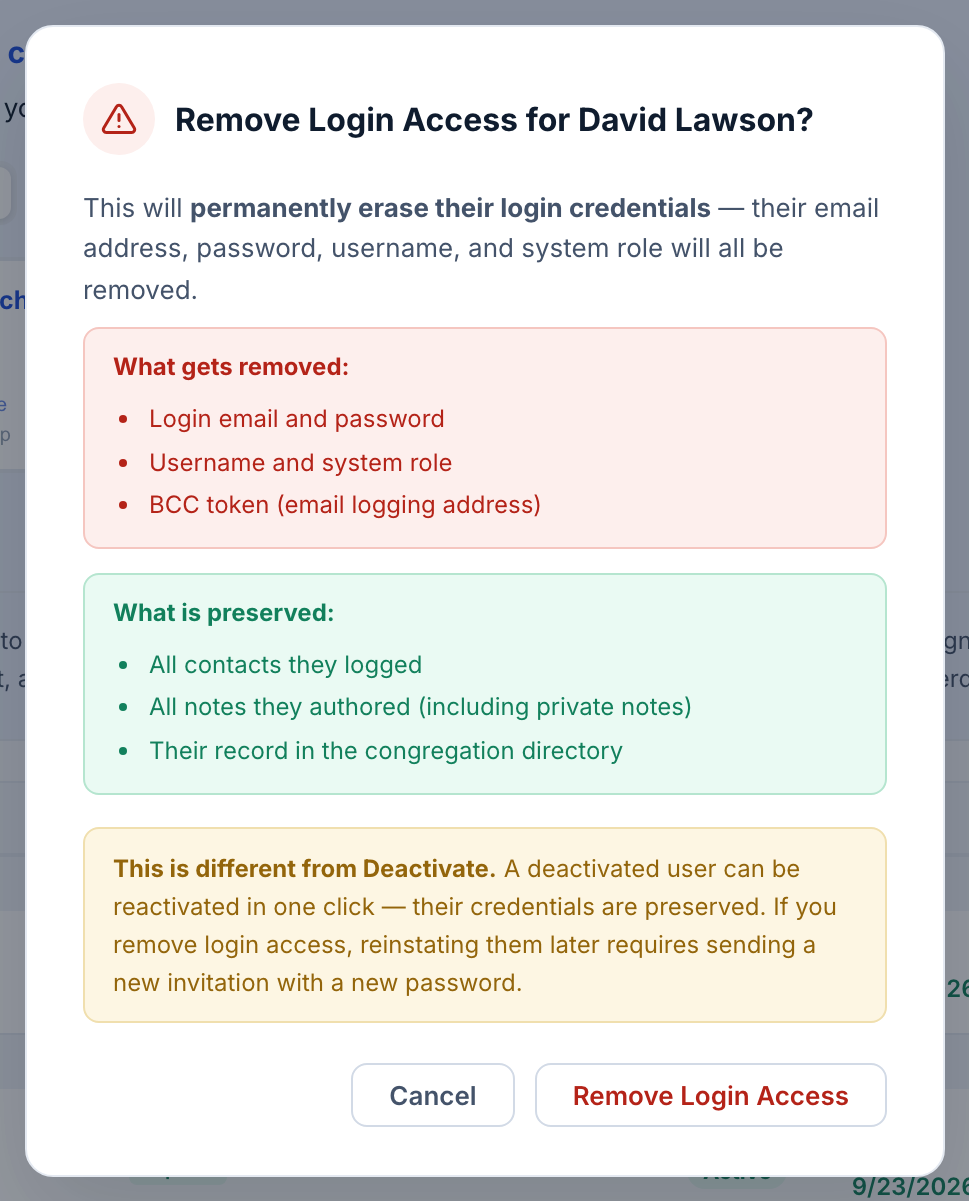
The row’s status updates immediately either way. Neither one deletes his work. The contacts he logged, the notes he wrote — including private ones — and his own record in the congregation directory all stay exactly where they are. You also cannot remove your own login, so an administrator can always get back in.
6. Plans and Billing
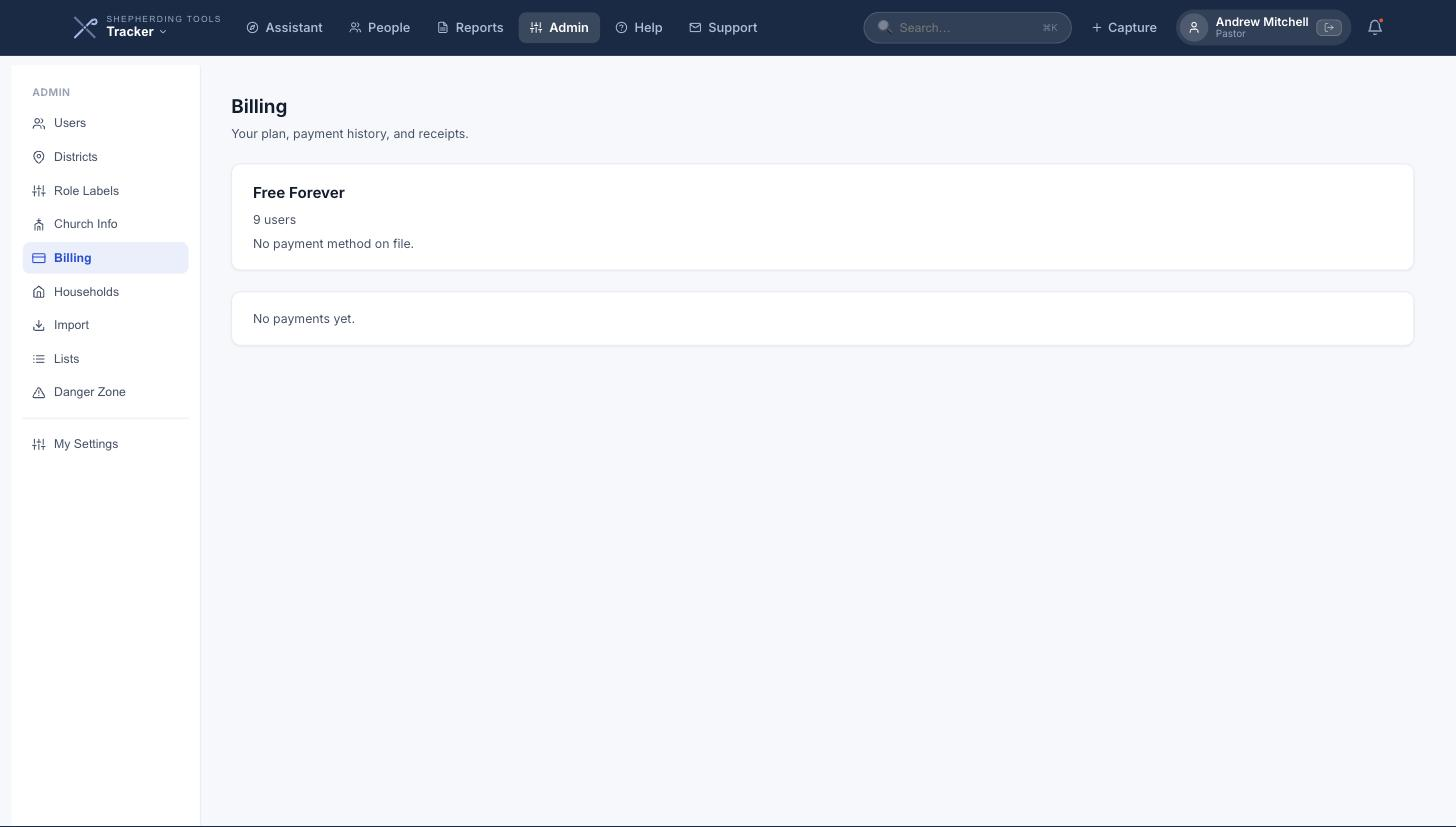
Billing lives under Admin > Billing, and only an administrator can open it. It shows your plan, how many user places are in use, when the subscription renews, the card on file, and every invoice you have paid.
What the plan governs
Mostly one thing: how many people can sign in. Which apps a person can open is not set by the plan at all. It is set account by account, under App Access. The plan itself gates two things: text messaging in Connections, which the free plan cannot send, and the Prayer Chain. The tiers, their prices and what each includes are on the pricing page.
The count is of active accounts that can sign in. Deactivating somebody frees his place. The people in your congregation directory are not counted at all, so a church of six hundred can run on the free plan as long as no more than five men are signing in.
The free plan
Free Forever is where a new church starts, and it is not a trial. It does not expire, no card is asked for, and there is no countdown to anything. It allows up to five users. Text messaging in Connections needs a paid plan, but contact management there does not.
Reaching the user limit
When every place is taken, Admin > Users marks the count Limit reached, greys out + Add Person, and shows the plans underneath. Nobody already signing in is affected. Only adding a new person is blocked.
Upgrading
- Open Admin > Users or Admin > Billing.
- Choose Monthly or Annual. Annual is priced at ten months, so two are free.
- Click the plan you want.
- Click Upgrade to … and pay on the checkout page that opens.
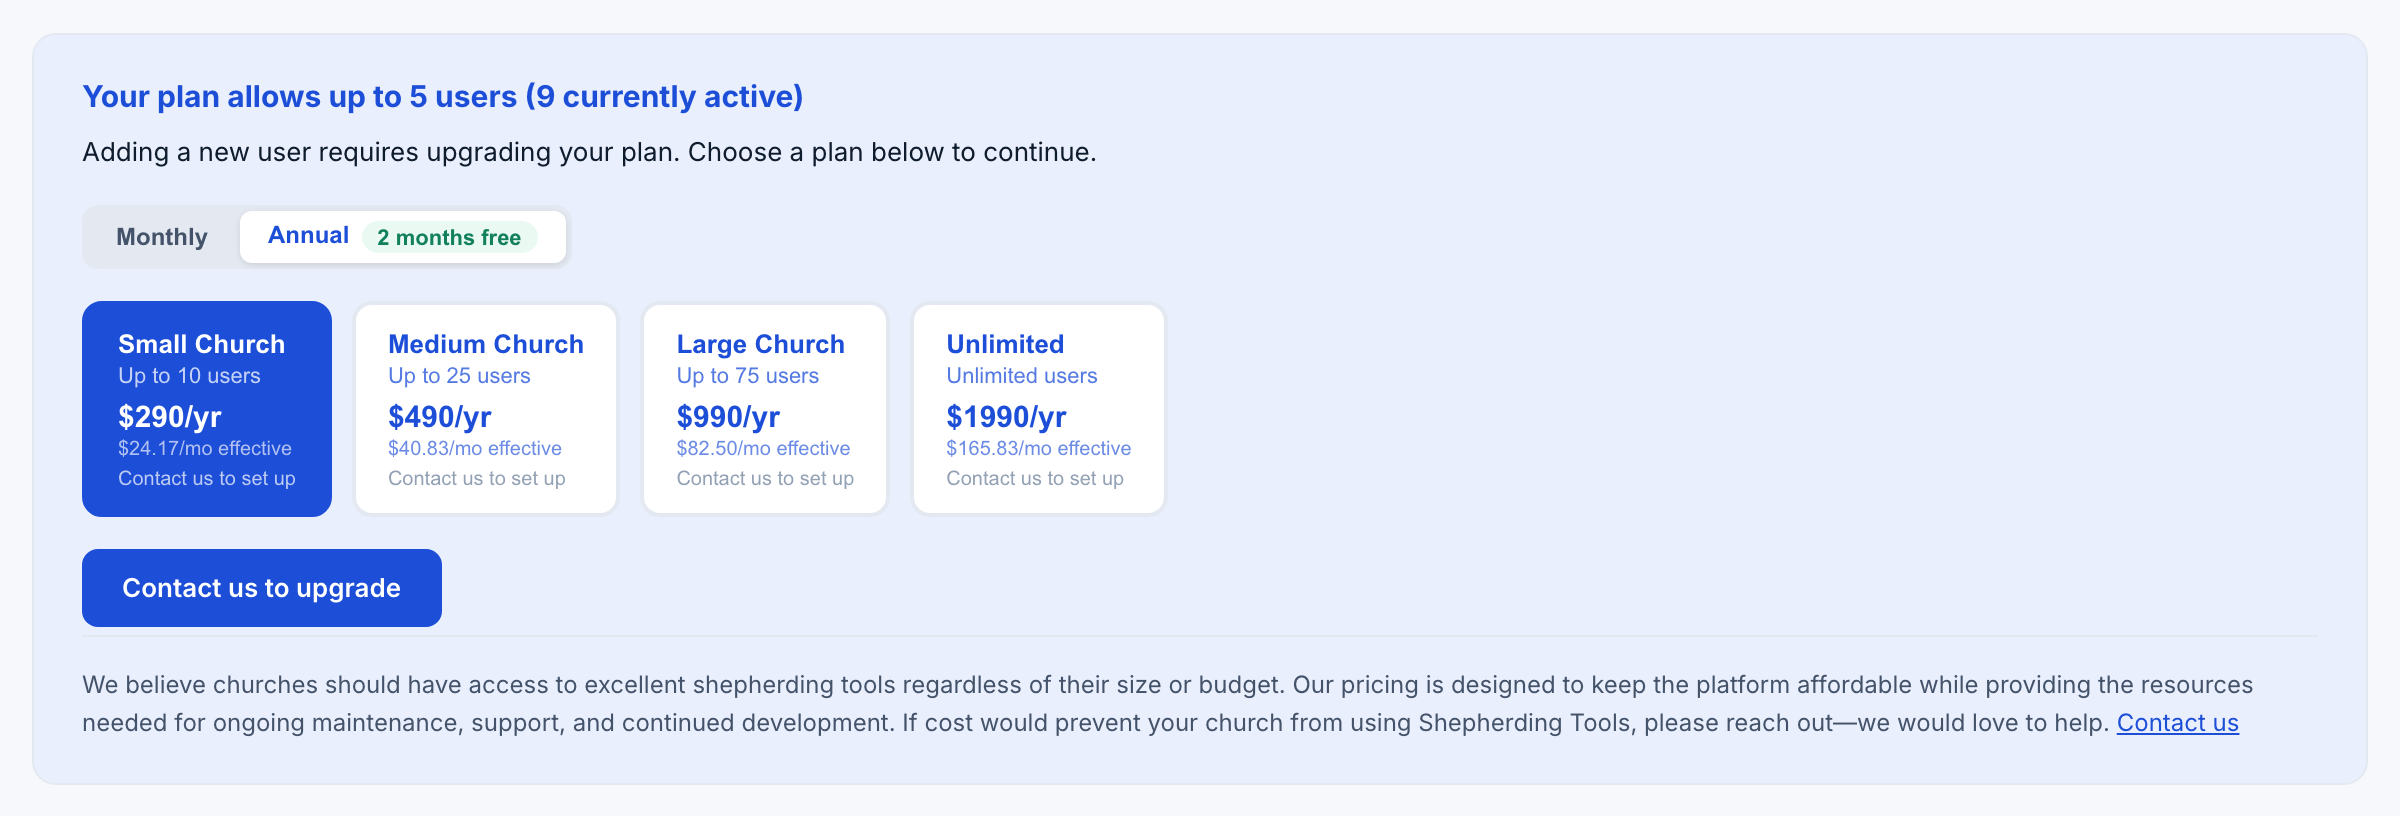
The new limit applies as soon as the payment goes through. Payment is handled by Stripe, on Stripe’s own pages. We never see your card number.
If the cost is what stands between your church and using this, write to us. We would rather find an arrangement than lose you over the price.
Changing or cancelling
- Open Admin > Billing.
- Click Manage Subscription.
- You’re redirected to Stripe’s own portal — change plan, update the card, or cancel there.
Cancel and the plan runs to the end of the period you have paid for, and Billing shows Cancelling with that date. You are not cut off on the day you click it.
Already on a subscription? Change plans through the portal rather than starting a second checkout, which would set up a second subscription alongside the first.
Receipts and invoices
- Open Admin > Billing.
- Find the payment in the table.
- Click Receipt (PDF) to download our own receipt (web only), or click Invoice ↗ to open Stripe’s copy of the same charge.
Every payment is listed with its date, plan, amount and status.
If a payment fails or a plan ends
- Payment failed — a charge did not go through. Update the card through Manage Subscription.
- Subscription ended — the church is back on the free plan. Everyone who can sign in keeps signing in, even above five. What you cannot do is add anybody new until you are back under the limit or on a paid plan again.
Refer a church
- From the People page: look for the “Invite another pastor” banner and click Copy your link — or —
- From Admin > Billing: scroll to the Refer a church card and click Copy.
- Send the link to another pastor yourself — there is no compose box or invite email built in.

The banner can be dismissed, and once it is, it stays dismissed. Your link does not go anywhere: Admin > Billing carries the same link under the Refer a church card, with how many churches you have invited and what credit you are holding.
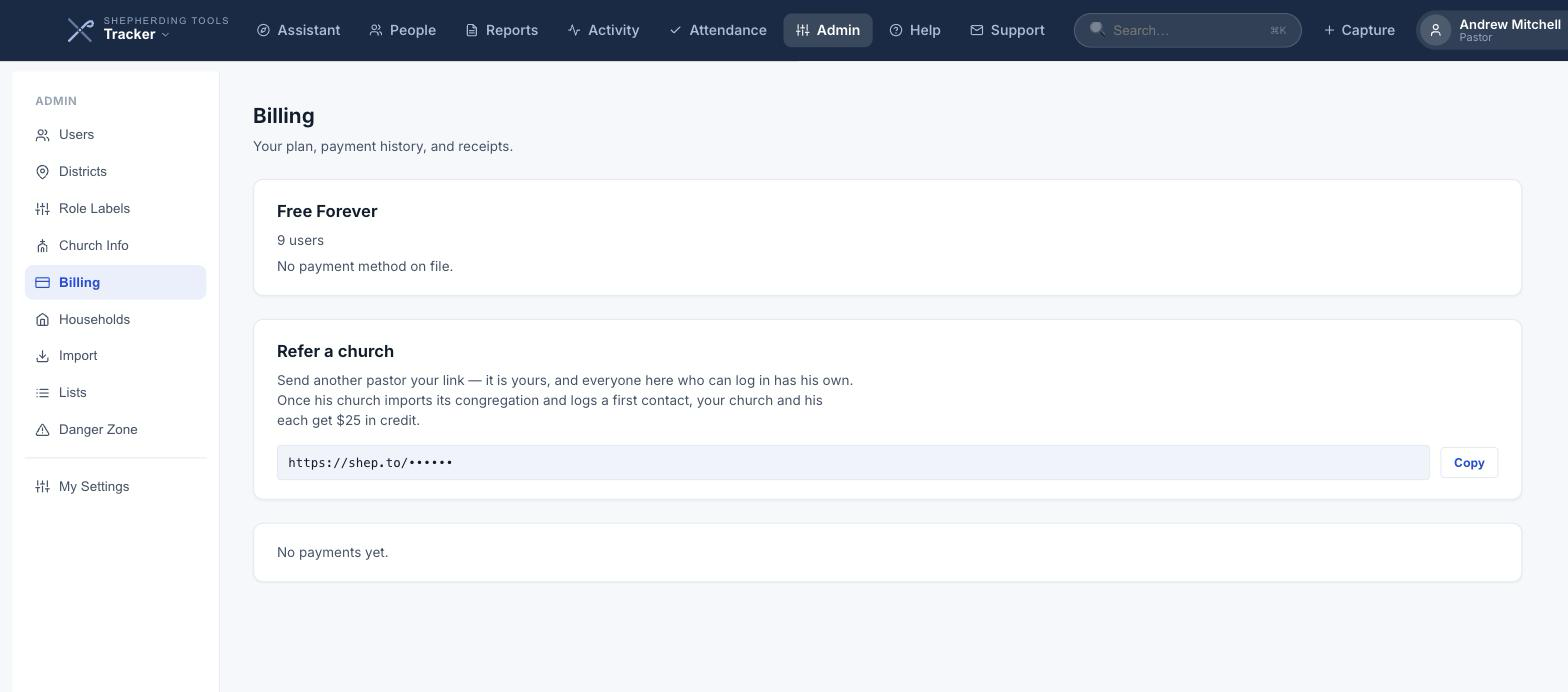
The button reads “Link copied” or “Copied” for 2 seconds.
When his church verifies its email, imports its congregation, and logs its first contact, you both get $25 in credit at the same moment. No card is needed to earn it.
See the Refer a church page for the limits and how gift codes work.
Your records are never touched by any of this. Congregation, contacts, notes, prayer requests and history all stay where they are.
7. The Mobile App
There is a Shepherding Tools app for iPhone and Android. On Android it is live on Google Play. On iPhone it is in open testing, and anyone can install it. You do not need an invitation from us, and there is no waiting list.
The links, and the one extra step Apple requires, are on the mobile app page.
You still sign up on the website
The app signs you in to an account that already exists. It does not create one. If your church is not set up yet, sign up on the website first, then install the app and sign in with the same email and password.
The iPhone app is a test build, so you may hit a rough edge. Write to [email protected], or use the support form described below, and say what you were doing and which phone you carry.
Nothing on this page depends on the app. Everything in Shepherding Tools works in a phone browser today, and your account is the same account either way.
8. Your Data
Both of these sit under Admin > Danger Zone, and both are administrator-only.
Downloading a copy
Download data export gives you a complete copy of your church’s data as a single file: congregation records, contacts, notes, prayer requests and the rest. It is there whenever you want it, and it is what satisfies your right to data portability under GDPR and CCPA.
Closing the account
Delete church account permanently removes the church and everything in it, and cancels any subscription immediately. You are asked to type your church name exactly, enter your password, and tick a box confirming you understand. It cannot be undone and we cannot undo it for you.
Export your data before you delete anything. Once the deletion runs there is no copy to give back.
9. Getting Help
Click Support in the top bar of any app, or go to shepherdingtools.com/support. Sign in first, so the form knows who you are and which church you are writing about.
- Choose what it is about: Tracker, Prayer, Connections, Discipleship, Account & billing, Signing in, or Something else.
- Write a brief summary. This one is optional.
- Describe what is happening. More detail is better than less.
- Click Send message.
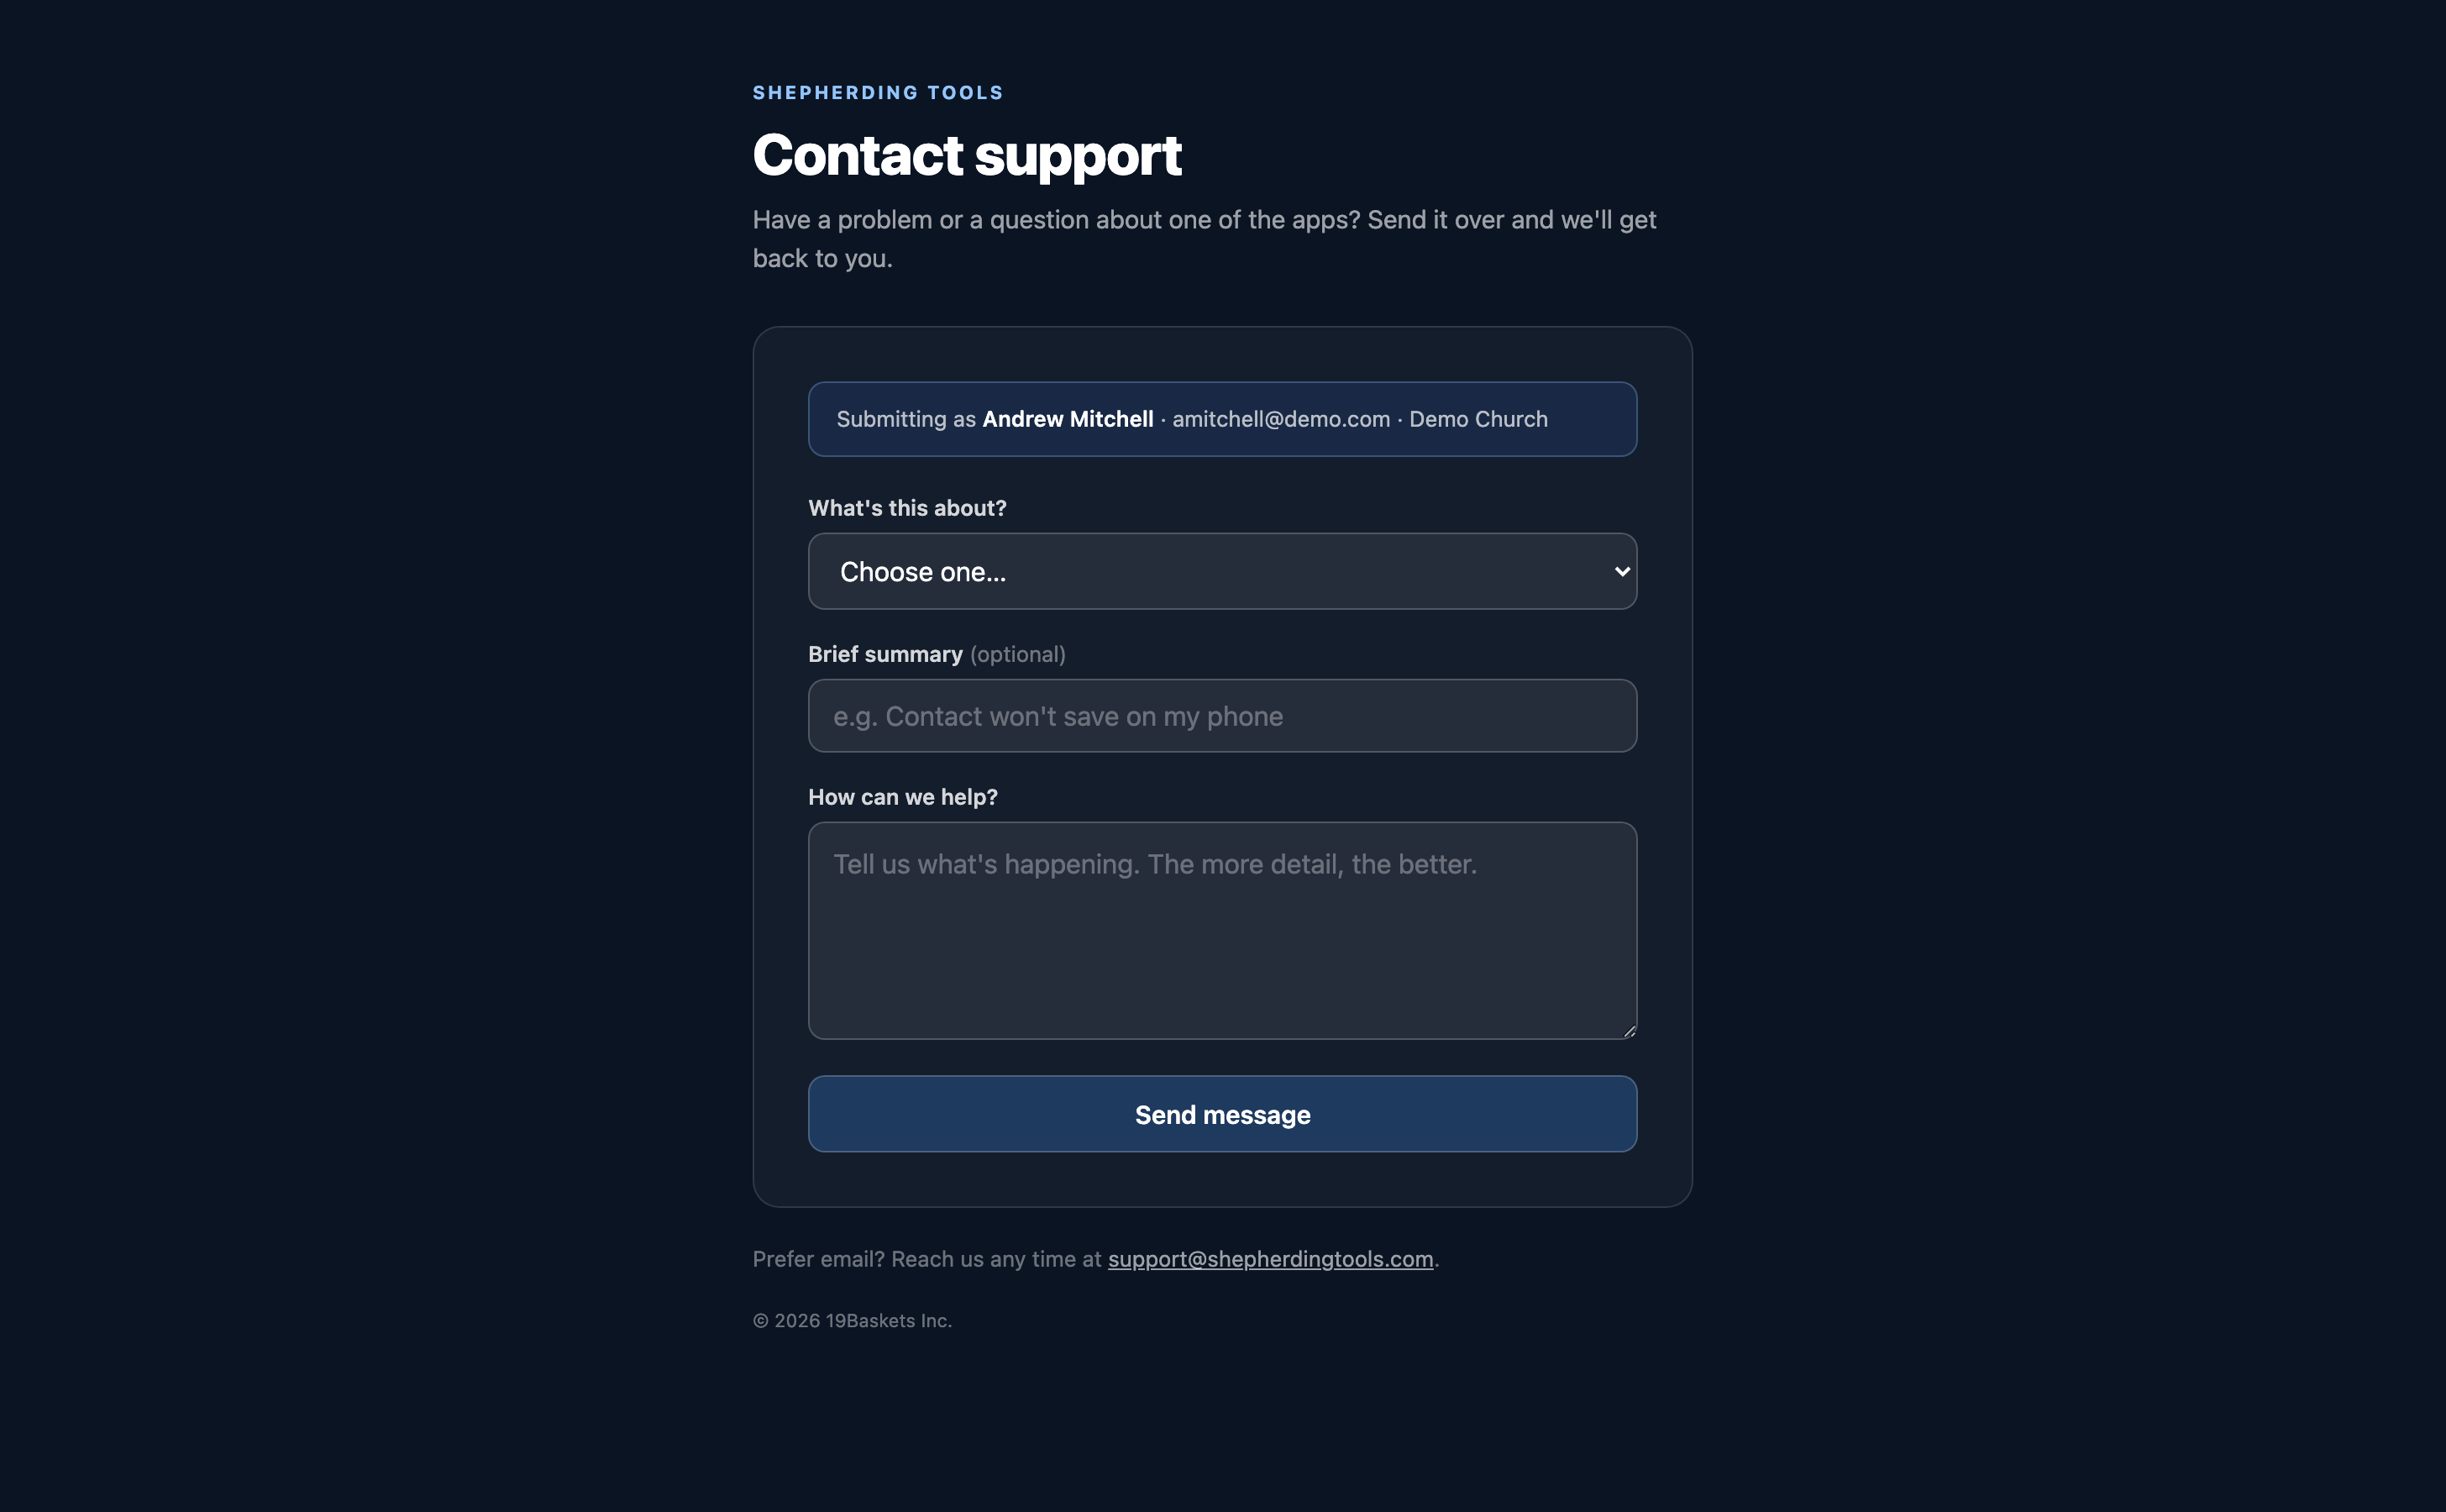
A copy arrives in your own inbox. Reply to that copy to add a screenshot, which is often the quickest way to show us what you are looking at.
Locked out and unable to sign in? Email [email protected] directly. The sign-in page carries the same address for exactly that case.
Tips & Best Practices
- Give at least two people full admin access. One administrator on holiday is one administrator too few.
- Search the congregation directory before adding a new user, so his login lands on the record his family is already on.
- Deactivate an elder who rotates off rather than removing his login. It frees a user place and takes one click to undo.
- Set your Time Off dates before you leave, not after you get back. Both products hold their cycles while you are out.
- Use Resend Invite only for somebody who never received his invitation. It replaces whatever password he has.
- Download a data export once a year and keep it with the church’s records.