
Tracker Documentation
A complete guide to every feature of Shepherding Tracker, from logging your first visit to interpreting church-wide statistics and configuring your team.
How do I…?
Getting Started
The Pastoral Assistant
The People Page
Logging Contacts
Household Profiles
Scheduling & To-Dos
Worship Attendance
Reports & Statistics
Activity Feed
Archiving Households and Members
Admin Settings
- Add and manage users who can log in
- Add a district
- Add, edit or archive a household from Admin
- Move a person to a different household, or split one in two
- Delete a member entirely
- Rename roles and districts to match your church's language
- Set your Contact Cycle Thresholds
- Handle members removed at the ChMS end
- Connect Breeze or Planning Center
- Export your data, or delete your church account
Getting Started
New to Shepherding Tracker? This section walks you through the essentials in five minutes. For deeper explanations of every feature, see the sections below.
Step 1 — Log in
Go to your church’s Tracker URL and sign in with the email and password your administrator created for you. If you haven’t received credentials, ask your pastor or admin.
Step 2 — Find your way around
The bar across the top is how you move between screens. A fully switched-on church shows:
- Assistant:Your weekly shepherding plan. Appears once you turn the Pastoral Assistant on for yourself.
- People:Every active household in the church. This is the home screen.
- Reports:Statistics and the printable contact report, in one place.
- Activity:A church-wide feed of what the whole team has logged.
- Attendance:Sunday worship attendance. Appears only if your church has switched it on.
- Admin:Settings. The button reads Admin for administrators and Settings for everyone else.
- Help:This documentation.
- Support:Our support page.
Your bar may be shorter, and that is normal. Assistant, Reports, Activity and Attendance each depend on a setting or a permission. If one is missing, either your church has not switched it on or your account has not been granted it. Ask your administrator.
Step 3 — Find your households
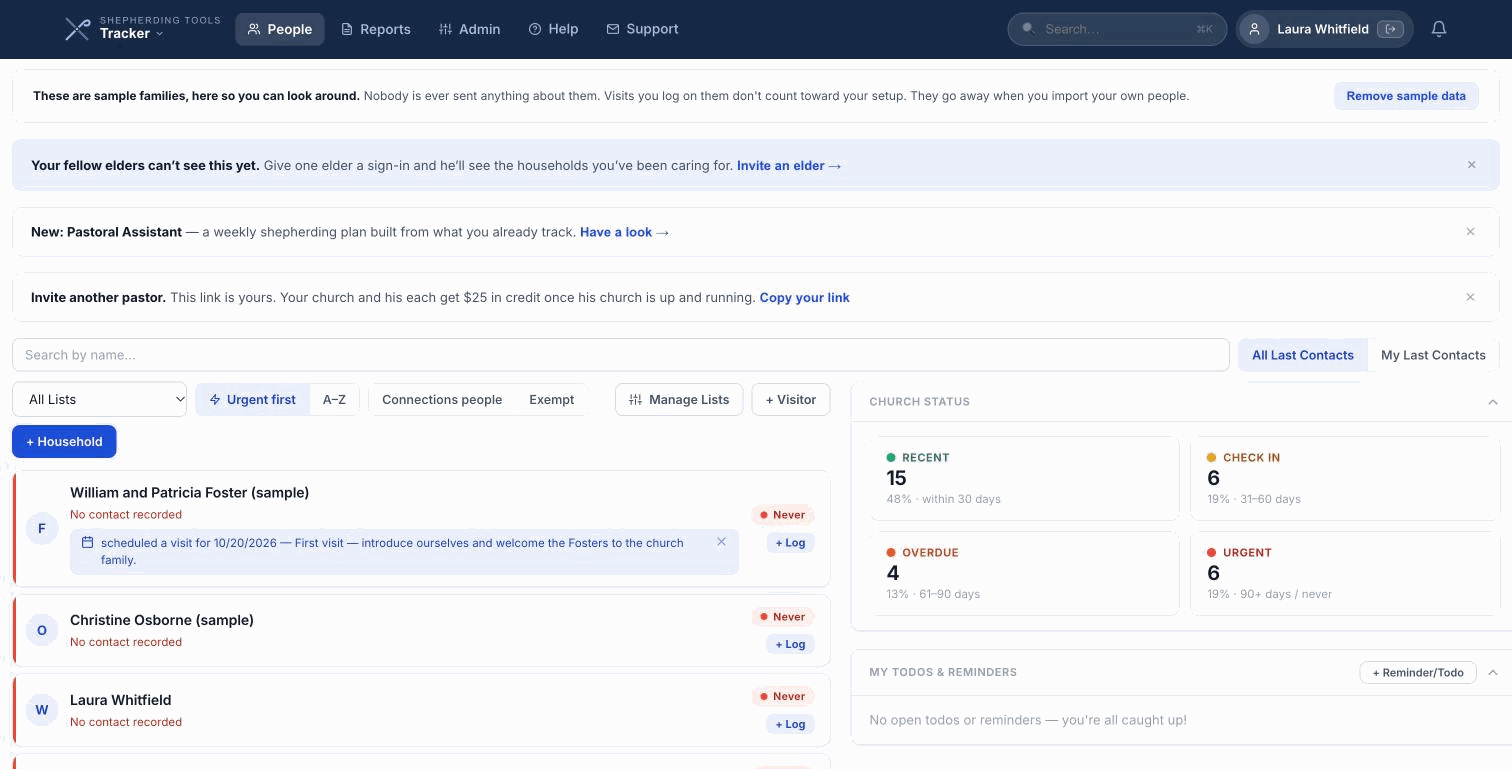
The People page opens to a list of all active households, sorted with the most overdue at the top.
- From the People page, click into the Search by name… box at the top of the list.
- Type any part of the household’s or a member’s name, an address, a phone number, or an email address.
- If you are an elder or deacon with a district, click My [District] instead (the label follows your church’s own word for a district) to narrow to your own families.

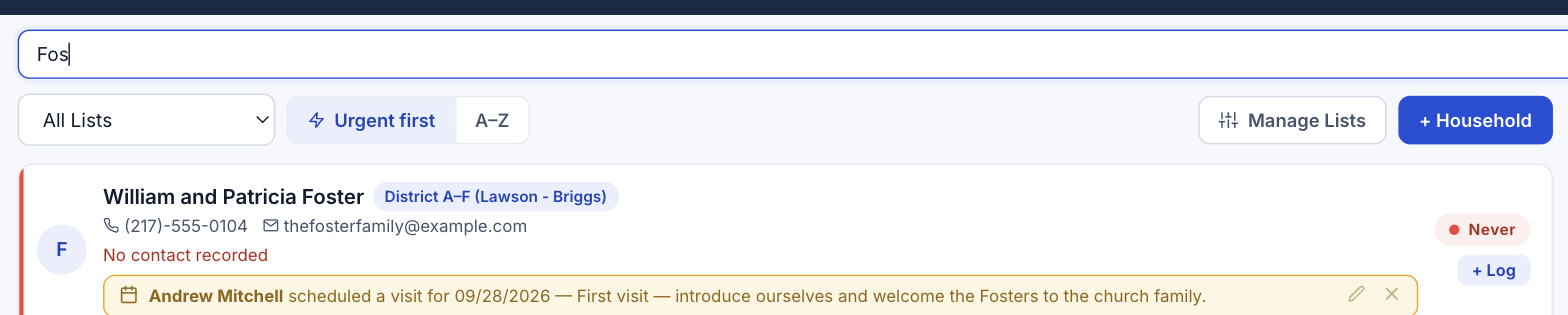
A Clear button appears once any filter, including search, is active.
Your sample families
A new church doesn’t open empty. Every sign-up starts with a set of sample families already on the People page — invented households whose names end “(sample),” so you can always tell them apart from your own congregation. Log a visit on one, try the Assistant, add a note: none of it counts toward your setup, and nobody is ever sent anything about them. They carry no email address or phone number at all.
They go away the moment you import your own people: a spreadsheet, Planning Center, Breeze, or Elvanto, in every app, not just Tracker. An administrator can remove them any time instead, with the Remove sample data button on the notice at the top of the People page.
Step 4 — Log your first contact
Click + Log on any household row. Choose a type of contact, set the date, add any notes, and save. The household’s status turns green straight away.

Step 5 — Schedule your next visit
In the same window, click the Schedule tab to plan a future visit. Enter the date and an optional note. The visit sits in your My Todos & Reminders panel until you log the contact that happened.
Step 6 — Check your list each week
The My Todos & Reminders panel on the People page holds your scheduled visits, your to-dos, and any reminders that have come due. Reviewing it at the start of each week keeps your shepherding on track. If you use the Pastoral Assistant, start there instead: it builds the week for you.
Click a status tile in the Church Status panel to filter the list to those households. Combine it with My District to see the families in your own district that need attention first.
1. The Pastoral Assistant
The Pastoral Assistant turns the whole congregation into a weekly plan. You tell it how many families you can reach in a week; it hands you that many at a time, oldest contact first, and keeps the birthdays, anniversaries and follow-ups you have recorded from slipping past. Everything it shows comes from what is already in Tracker.
Turning it on
The Assistant is per person, not per church. Each officer switches on his own.
- Open Admin (or Settings), then My Settings.
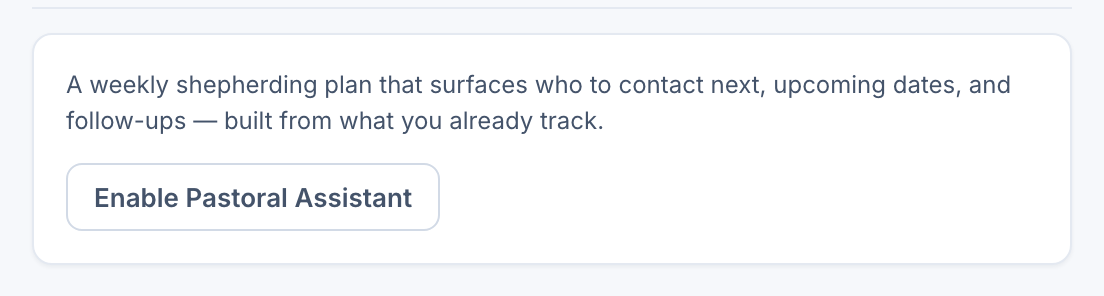
- Find Pastoral Assistant and click Enable Pastoral Assistant.
- An Assistant button appears in the top bar. Open it.
- A short setup card asks how many families a week you want to reach, and which of them the queue should cover.
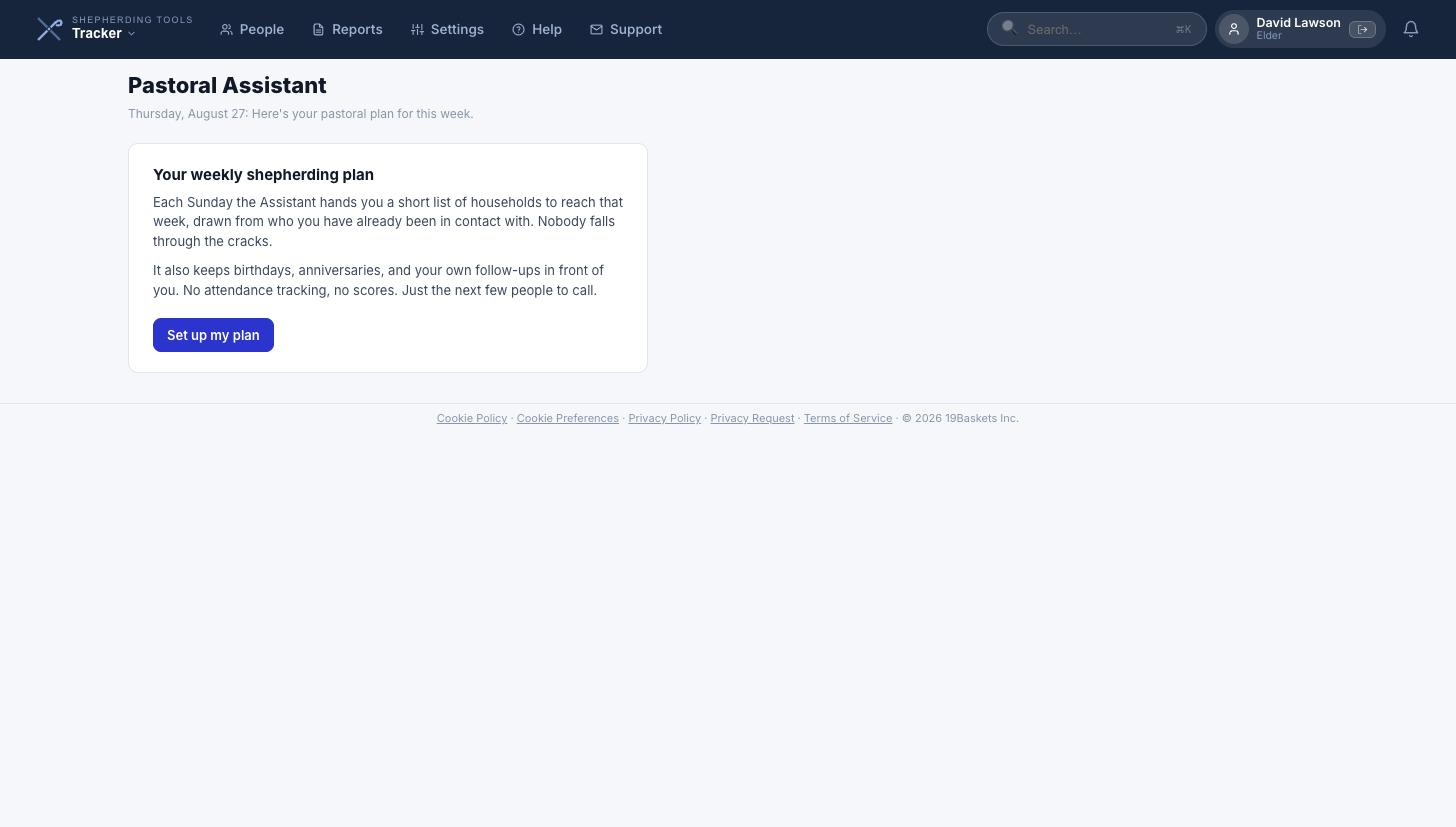
By default the Assistant covers your district if you have one. You can point it at one or more lists instead, or at both. With no district and no list selected, it covers the whole congregation. Those choices live in My Settings > Pastoral Assistant and can be changed at any time.
Tracker still opens on the People page unless you ask it not to. Tick Open Assistant by default in My Settings > Pastoral Assistant to make the Assistant your home screen.
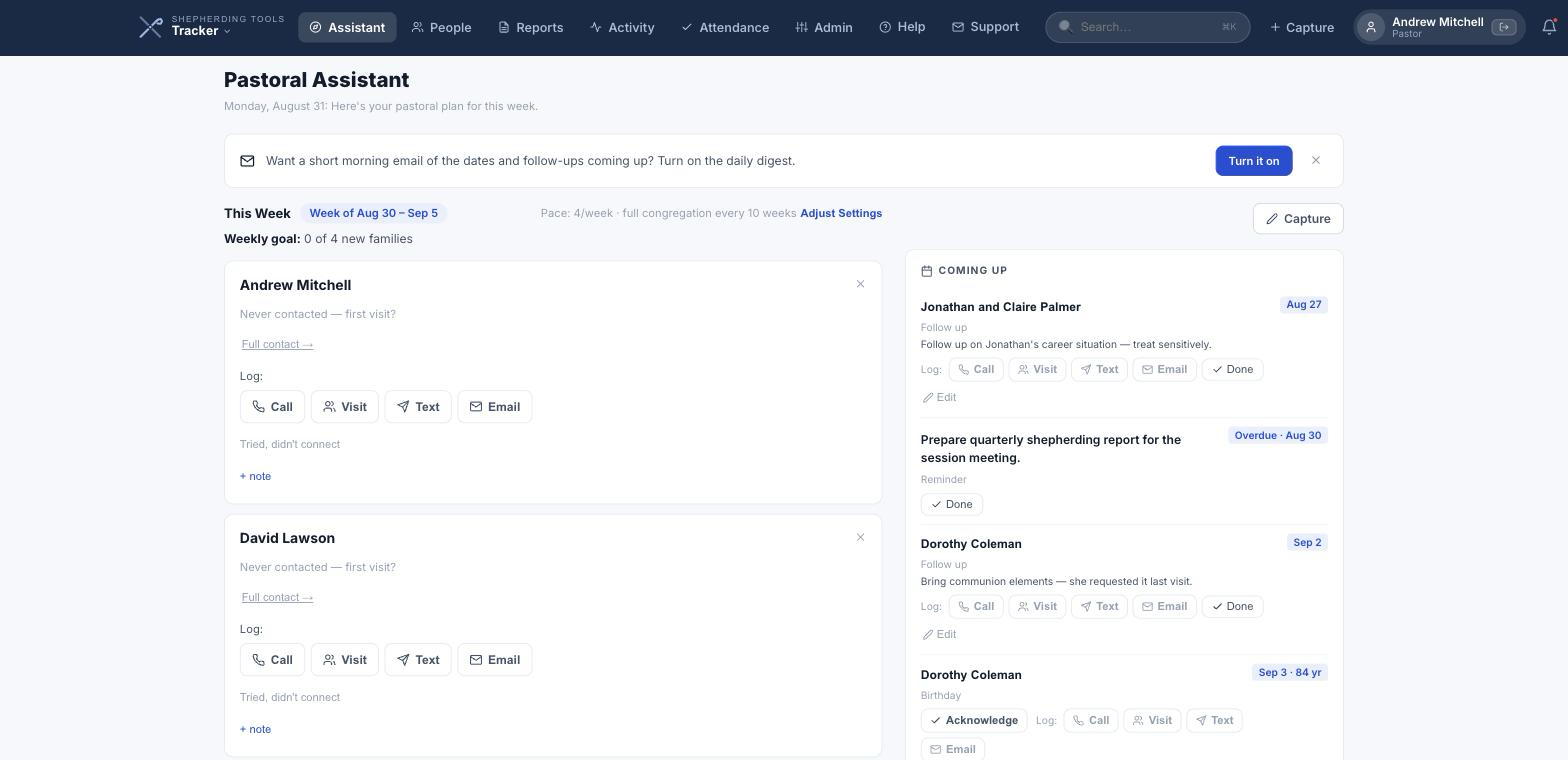
This Week
The left-hand column is the week’s work. Above the cards you see two numbers:
- Pace:How many families a week you asked for, and how long a full round of your district or list takes at that rate.
- Weekly goal:How many new families you have reached this week out of your target, plus your total contacts for the week.
Each card carries a household name and when it was last contacted and by whom.
- Open Assistant in the top bar.
- Find a household’s card in This Week.
- To log without notes, click Call, Visit, Text, or Email directly.
- To add a note first, click + note, type it, then confirm.
- For the full form (Contact For, privacy levels, a prayer request), click Full contact → instead.
The card leaves This Week once logged, and the household’s contact counts toward your Weekly goal.
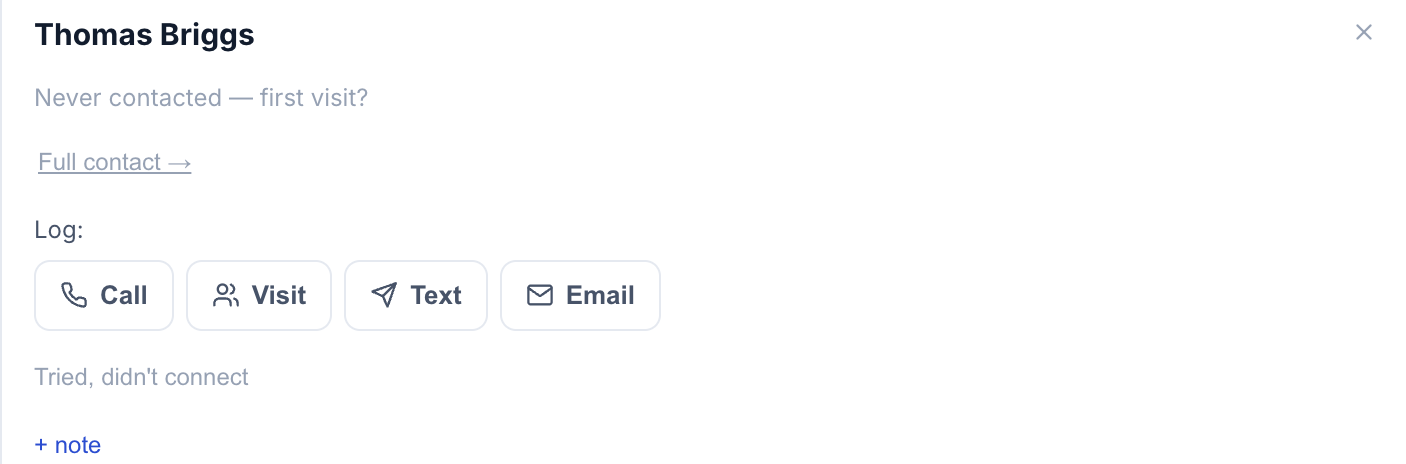
The × at the top right of a card offers two ways out. Skip this week puts the household back in line for a later week. Don’t suggest this household takes it out of your queue altogether. Anything you have set aside that way is listed under Not suggested in My Settings, with a Restore beside it.
Once you hit your goal the queue clears and offers a small extra batch if you are behind your rotation. It never shows you the whole backlog at once.
The queue only suggests households you haven’t reached in the current round. A round ends when you have reached every household in your list, however many weeks that takes. The next round then starts at the same pace, and a card at the top of the page asks whether to keep it or Set a new pace. You can give a new pace as households a week or as the number of weeks you want the round to take.

Coming Up
The right-hand panel lists everything falling in the next fourteen days:
- Birthdays, taken from the birth dates on member records.
- Significant dates recorded on a household, such as a wedding anniversary or the anniversary of a death.
- Follow-ups, including every step of a sequence you have started.
- Your own to-dos and reminders that come due in the window.
Each row can be logged directly, or marked done with a short note such as Card, Text or Called. Crossing a row off clears it from your own list only. Another officer’s Coming Up is untouched, so two men can both remember the same birthday without one of them hiding it from the other.
Recent Activity
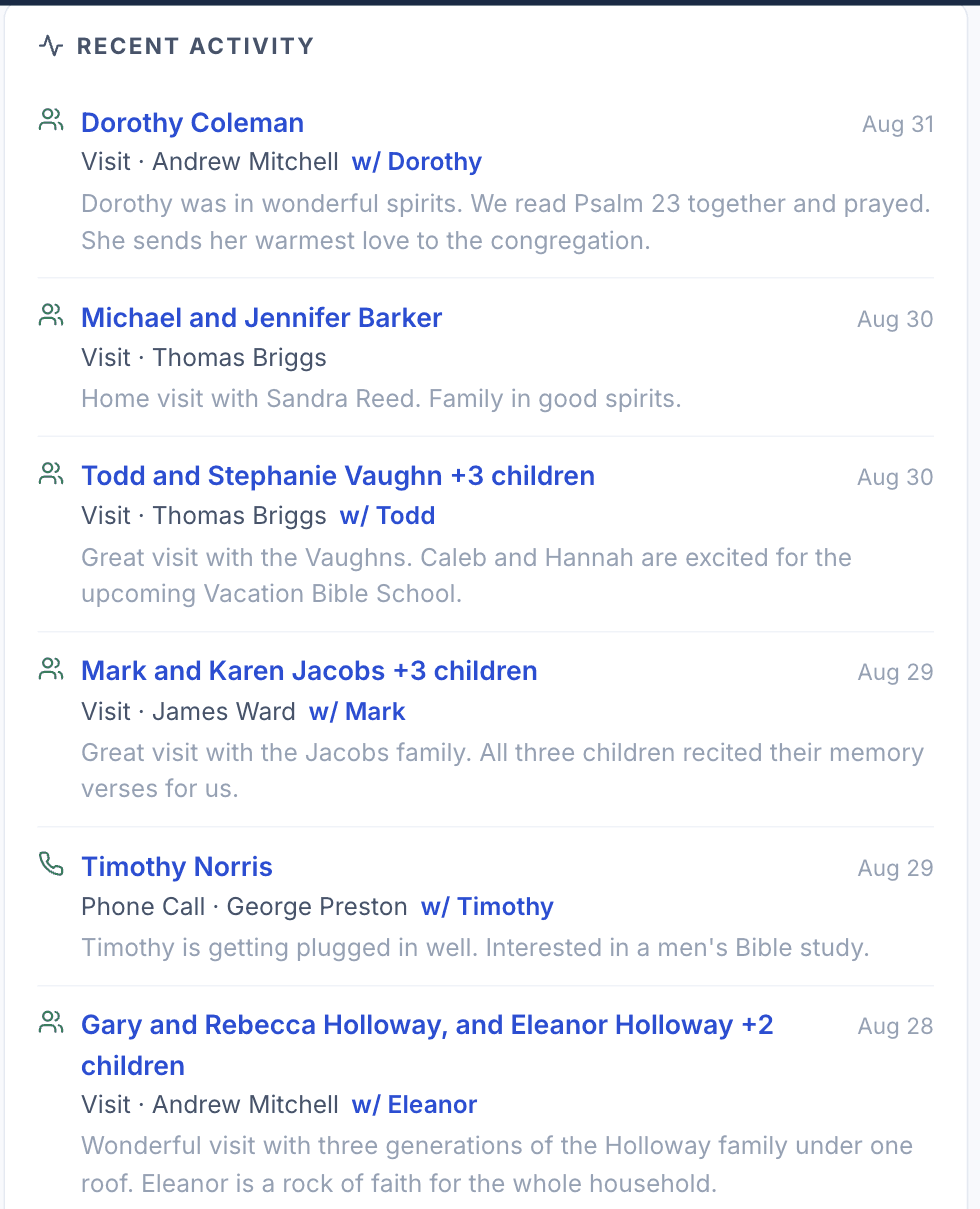
Below Coming Up, in the same right-hand column, is Recent Activity: contacts your team has actually logged, newest first. A small icon on the left marks the kind — a person for a visit, a handset for a phone call — and the date sits on the right.
The household name is the entry’s heading and a link to that household’s profile. Beneath it comes the kind of contact and who logged it, such as Visit · Andrew Mitchell or Phone Call · George Preston. When the contact was about particular people rather than the whole household, their first names follow as a tag — Visit · Andrew Mitchell w/ Dorothy. Logged for the household as a whole, there is no tag at all: Visit · Thomas Briggs under Michael and Jennifer Barker names no one else, because the visit wasn’t about any one of them in particular. The note that was logged sits below each entry.
Recent Activity only shows what is close to hand. For the whole church’s history, searchable and filterable, see Activity Feed.
Quick Capture
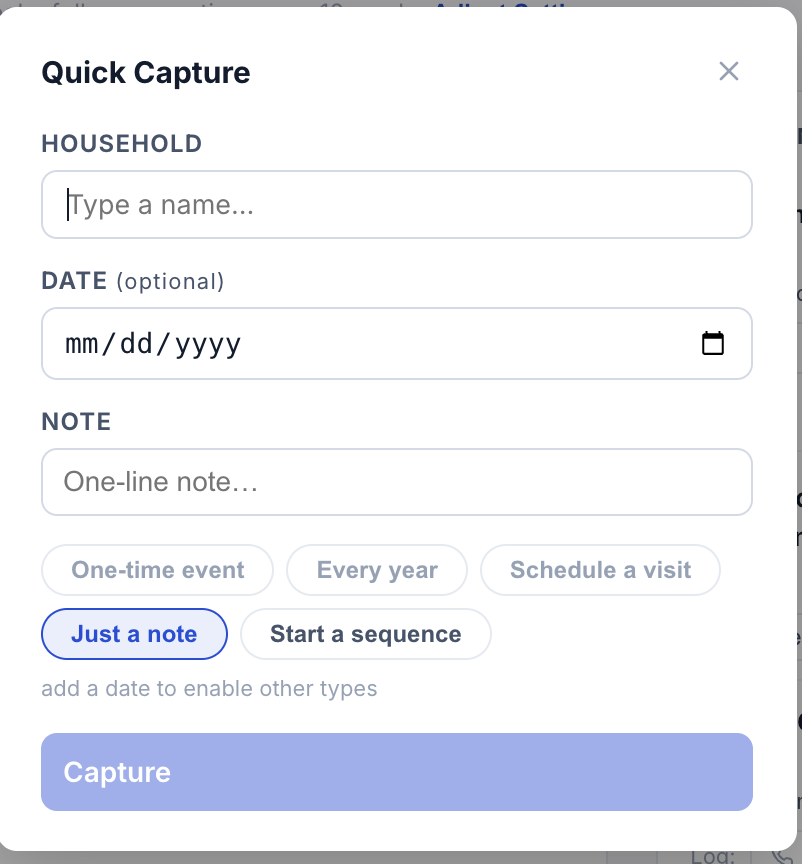
Capture sits in the top bar and on the Assistant page. It is the fast way to record something you have just heard, without opening a profile.
- Click Capture.
- Start typing a household name and pick it from the suggestions.
- Add a date if the thing has one, and a one-line note.
- Choose what it is: One-time event, Every year, Schedule a visit, Just a note, or Start a sequence.
- Click Capture.
With no date, only Just a note and Start a sequence are available. Every year asks which kind of date it is: Anniversary, Membership, Death, or Custom.
Starting a follow-up sequence
A sequence is a set of follow-ups spread over months, started from one date.
- Click Capture (top bar or Assistant page).
- Start typing the household’s name and pick it.
- Choose Start a sequence.
- Pick the sequence (Bereavement, New visitor, New baby, Hospitalization / surgery, Inactive / lapsed) and the start date.
- Click Start sequence.
Every step of the sequence is created at once as ordinary follow-ups, each editable or removable on its own afterward from Coming Up.
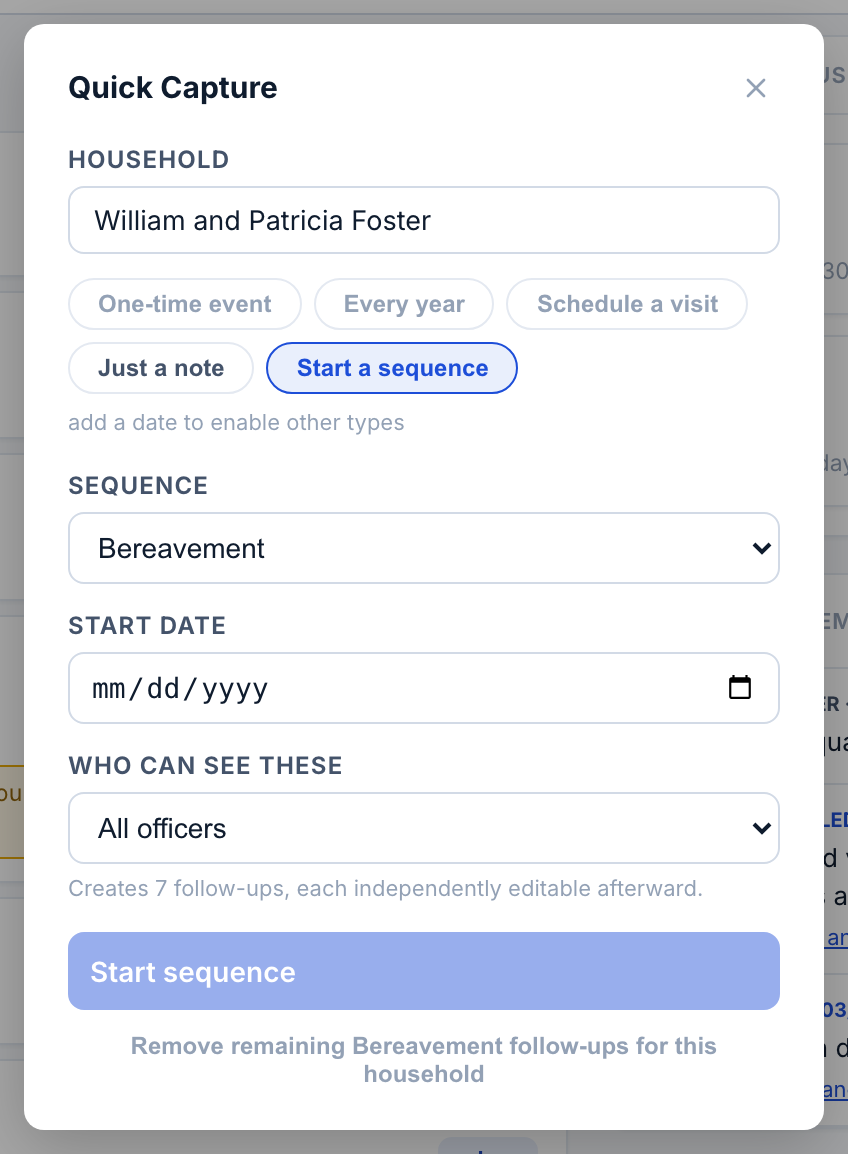
Five sequences come ready to use: Bereavement, New visitor, New baby, Hospitalization / surgery, and Inactive / lapsed. Bereavement runs from the day of the death out to the first anniversary. Edit the steps, rename them, or switch a sequence off entirely under My Settings > Pastoral Assistant.
When you archive someone with the reason Deceased, Tracker offers to start the bereavement sequence for that household. It only offers. If you have switched that sequence off, nothing appears.
Sequence steps are visible to All officers or to Pastors only, chosen when you start the sequence. Use pastors-only for a family whose situation is not general knowledge.
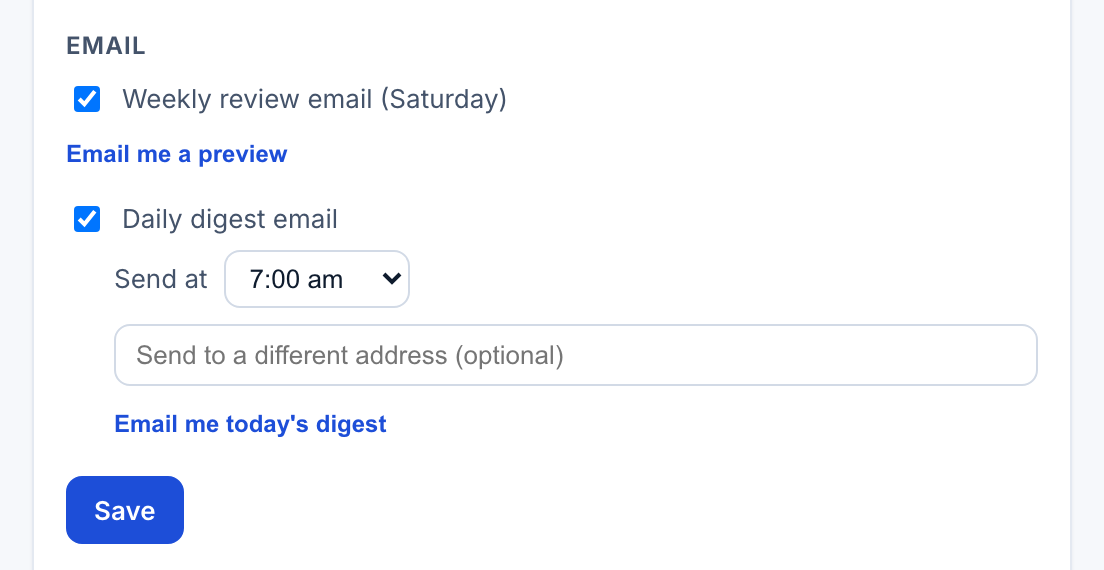
Turning on the weekly review and daily digest emails
- Open My Settings > Pastoral Assistant.
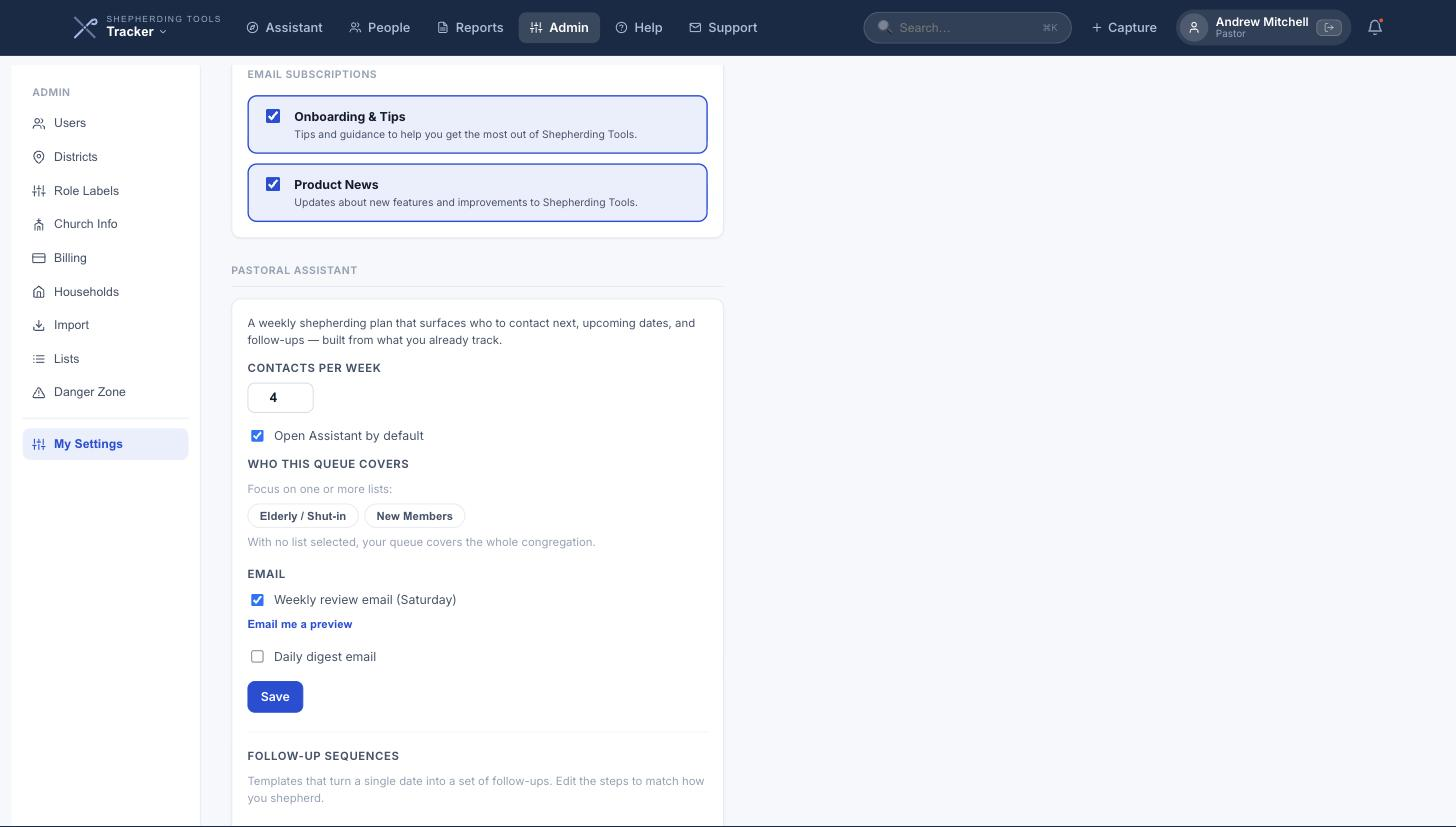
- Tick Weekly review email (Saturday) to receive it — on by default. It looks back at the week and forward to the next.
- Tick Daily digest email to receive a short morning list of what’s due — off by default. There is no Sunday edition, and a day with nothing to send sends nothing.
- If you turned on the digest, choose the hour under Send at, and optionally a different address to send it to.
- Click Save.
An Email me a preview link under the weekly review, and Email me today’s digest under the daily digest, both send a copy on the spot, so you can see what they look like before deciding.
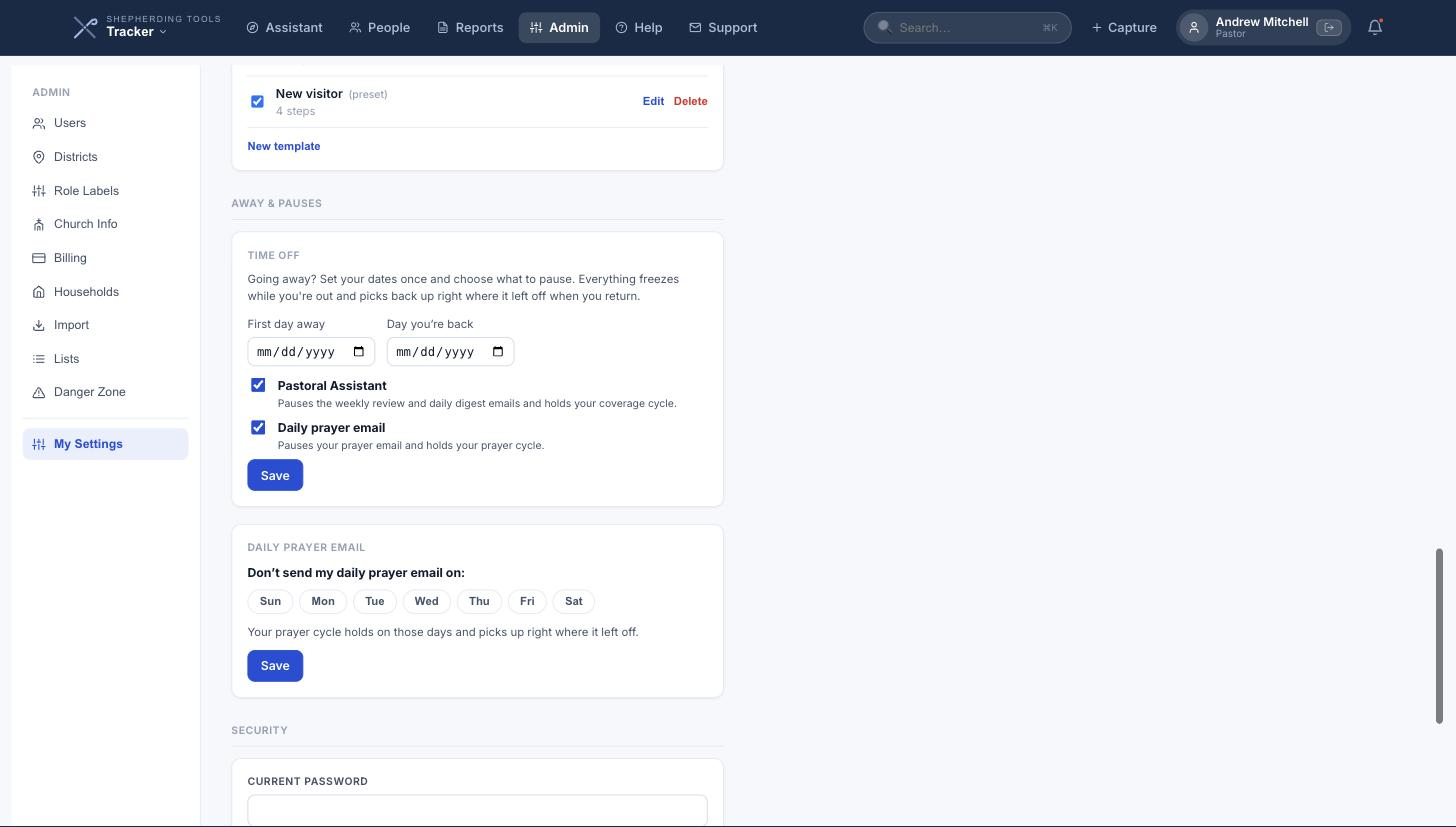
Time off
Going away?
- Open My Settings and find Time Off under Away & Pauses.
- Set the date range.
- Confirm Pastoral Assistant is ticked under what to pause — it pauses both the weekly review and daily digest emails and holds your coverage cycle.
- Click Save.
No Assistant emails arrive during that stretch, and your queue and cycle pick back up exactly where they left off when the dates pass.
The same card also carries a Daily prayer email pause checkbox. That one belongs to Shepherding Prayer, not Tracker — leave it untouched unless you also use Prayer.
2. The People Page
People is the home screen. It lists every active household in the church, colour-coded by how recently it was contacted, with the most overdue at the top.
Status colours
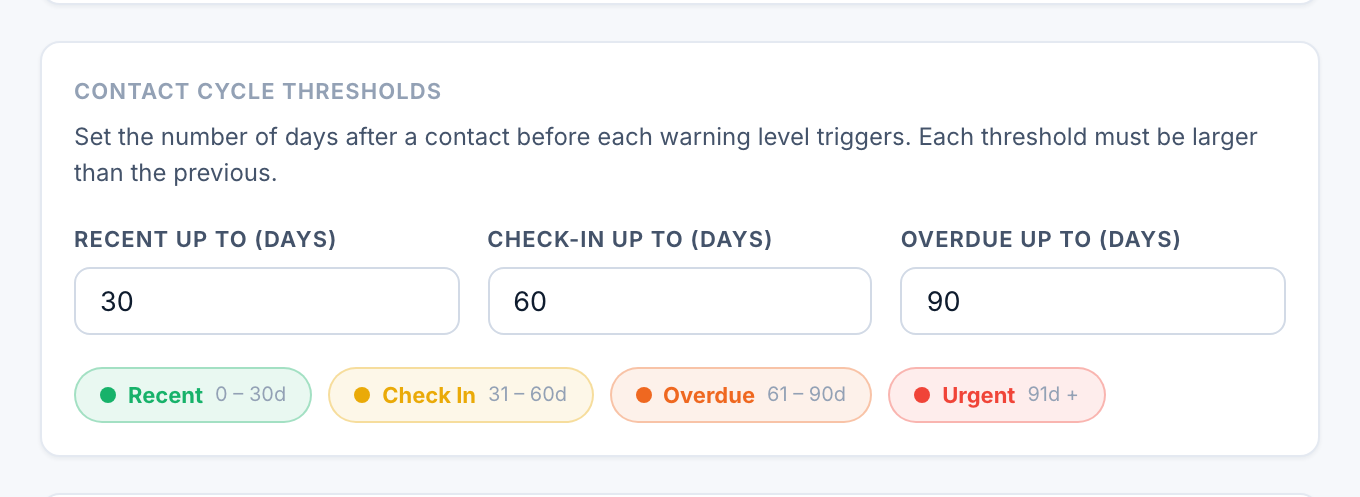
Each row carries a coloured strip and a status dot showing the time since the most recent logged contact, measured against your church's own cycle thresholds. Every church starts with these defaults:
An admin can change these day ranges for the whole church under Admin > Church Info, in the Contact Cycle Thresholds section. A church that hasn't touched that setting keeps the defaults above.
The Church Status panel
Church Status sits at the top of the side panel and holds four tiles, one per status. Each shows a count, the share of the congregation it represents, and the day range behind it.
- Click any tile (Recent, Check In, Overdue, Urgent) to filter the list to that status.
- Click the same tile again to clear just that filter.
- Click the Church Status header to collapse or expand the panel.
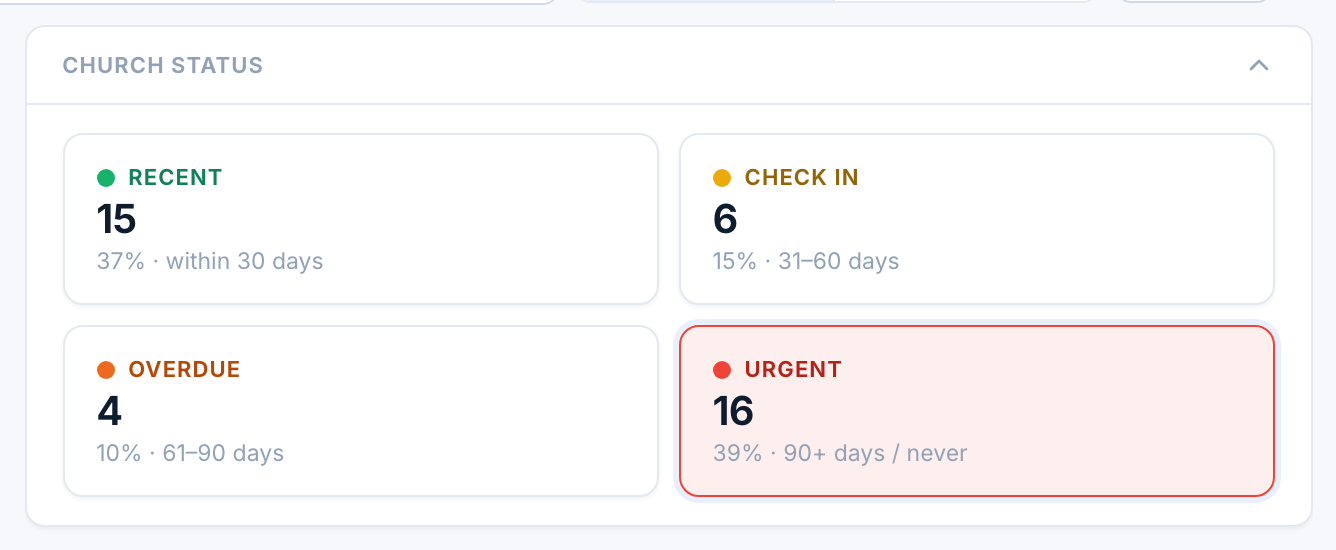
The percentages follow whatever else you have filtered on, so narrowing to a district or a list re-scores the panel for that group. Households marked exempt are left out of both the counts and the total.
Filtering the list
The controls are split across two rows. A worked example — narrowing to overdue households in your own district:
- On the People page, click My [District] (elders and deacons with a district only).
- Click the Urgent tile in Church Status to filter to overdue-or-never-contacted households.
- Click Clear to reset every filter at once when done.
The list narrows live after each click; combined filters (district + status + search) all apply at once. Here is what each control does. Above the list:
- Search:Matches a household or member name, an address, a phone number, or an email address. It does not search inside contact notes.
- All Last Contacts / My Last Contacts:Two buttons, not one switch. They swap the status colour between the whole team’s most recent contact and your own. Contacts where you were named as joining the visit count as yours.
- My District:Appears for elders and deacons who have a district. Narrows the list to your own families.
- Clear:Appears once any filter is on, and resets all of them.
Directly above the rows:
- All Lists:One dropdown holding your lists and your districts. This is where you pick a district other than your own.
- Urgent first / A–Z:Sorts by how overdue a household is, or by last name.
- Connections people / Exempt:Appears once your church has an exempt household. These chips replace the list rather than narrowing it, because an exempt household is outside the church’s numbers.
- Manage Lists:Opens the list editor. See Lists below.

Only administrators see every district in the All Lists dropdown by default. Anyone can add them by ticking Show all districts in filter at the bottom of Manage Lists.
My Todos & Reminders
The panel below Church Status holds your own queue: scheduled visits, to-dos assigned to or created by you, and reminders that have reached their date. Anything past its date is highlighted, and the header carries a count of them. Click an item to open the household. + Reminder/Todo creates a new one.

Adding a new household or an individual
This is the first thing a brand-new church needs to do. You need the Edit Household Info permission, which administrators have already.
- Click + Household at the top right of the People page. This takes you straight to the same form as the second route below.
- Fill in the Primary Individual fields (first and last name, role, phone, email, birthday, notes).
- Click + Add Another Member to add a spouse, children, and so on, as needed.
- Fill in the Household (Shared) block — street address, city, state, zip. These live on the household, not on each member.
- Click Create.
The header preview (“Dashboard will show: …”) on the form shows the name it will use before you save. The new household appears on the People page immediately.
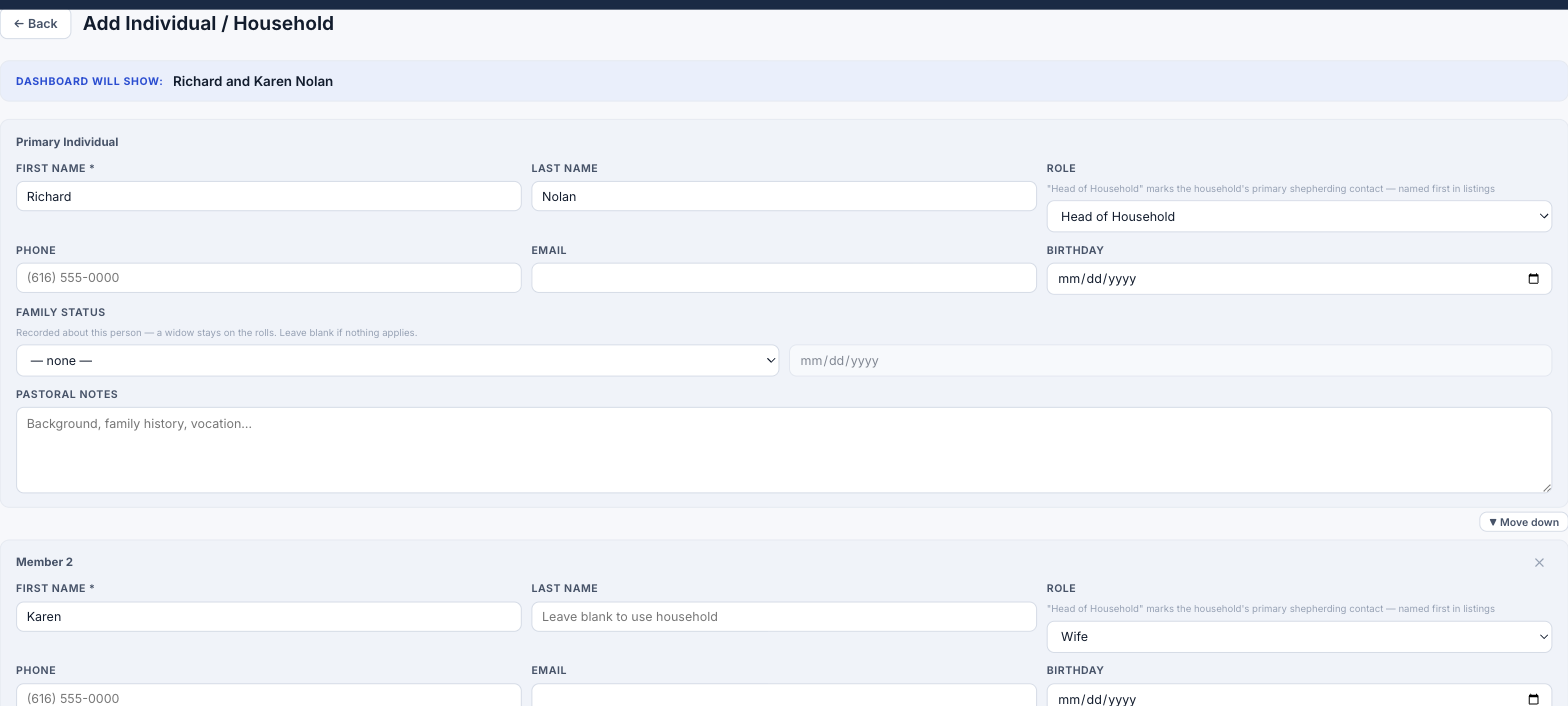
A household needs at least a Primary Individual — there is no way to create a bare address with no person. The second route in is Admin > Households, which opens the same form.
Adding a visitor
+ Visitor sits beside + Household. Anyone with the Edit Household Info permission can use it, not only administrators.
Fill in what you have: name, phone, email, address, and a note anyone using Connections can read. For each other member of the family, click + Add Another Member. If he agreed to receive texts, tick the box and record how he gave consent; a carrier needs that evidence, not just a date.
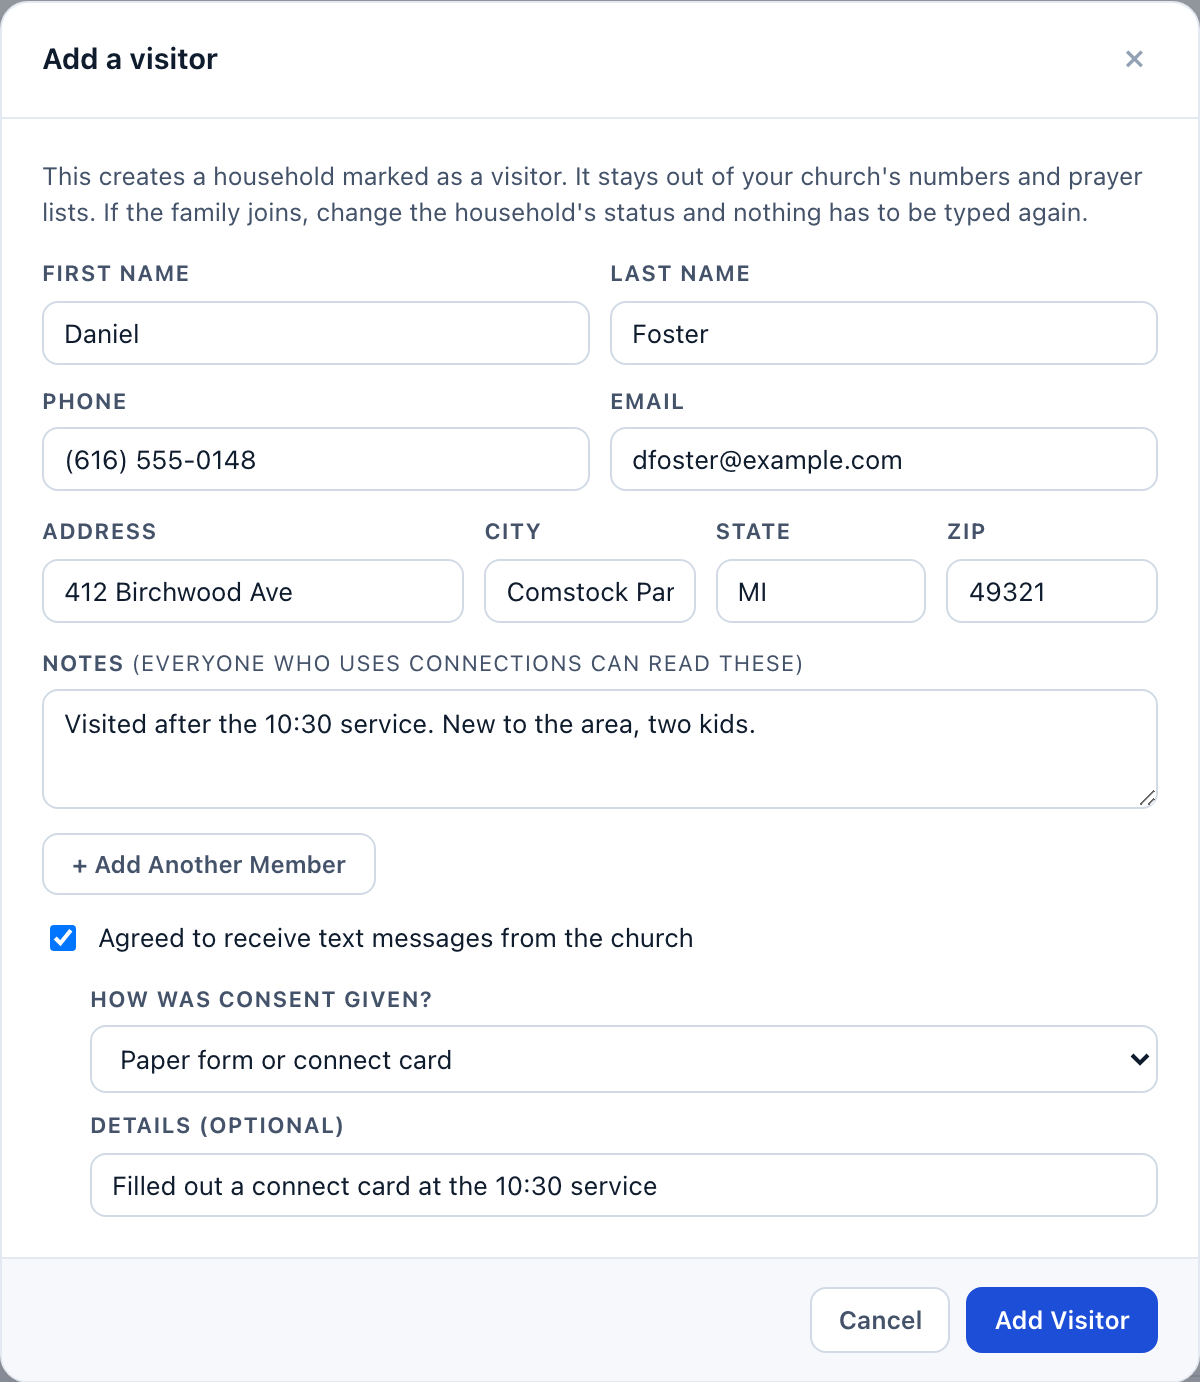
The household comes in marked visitor, so it stays out of your church’s numbers and prayer lists. He also appears in Connections with a shepherd already assigned. If the family joins, change the household’s status and nothing has to be typed again.
3. Logging Contacts
Logging a contact records that you reached a household. It updates the status colour and adds an entry to the contact history.
Logging a contact you made
- Open the contact form one of three ways: click + Log on a household row on the People page, open a household profile and click + Log Contact, or click one of a card’s four buttons on the Pastoral Assistant.
- In the Log tab, pick the Type of Contact.
- Change the Date if it wasn’t today.
- If the household has more than one member, choose who it was Contact For.
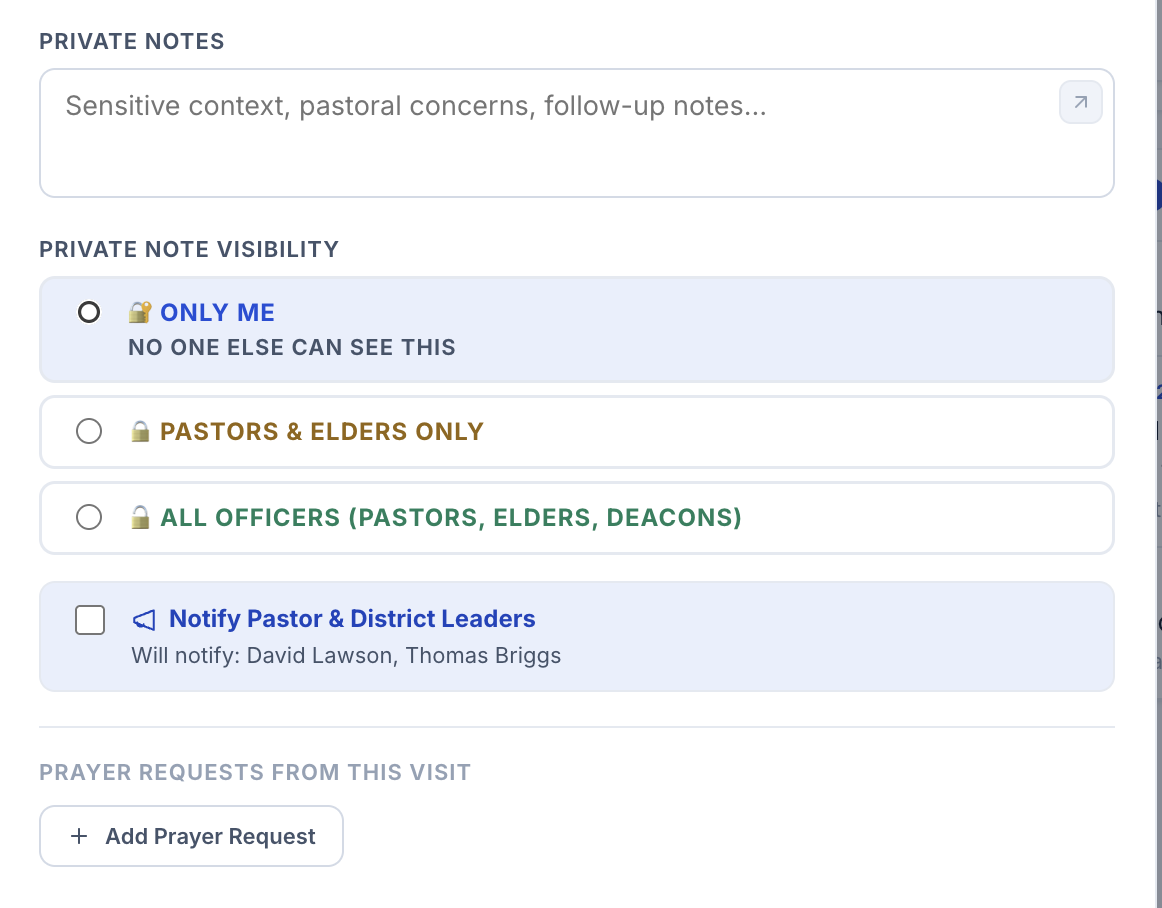
- Add Public Notes and, if needed, Private Notes.
- Tick Notify Pastor & District Leaders if the visit should trigger a notification.
- Click Save Contact.
The household’s status strip and dot turn green immediately, and the entry appears at the top of the household’s History tab.

The fields
Logged as
You, normally. With the Log Contacts for Others permission, Log for Another lets you record a contact on someone else’s behalf.
Others who joined this visit
Add the leaders who came with you. The contact then counts as theirs too under My Last Contacts.
Date
Defaults to today. Change it to backdate a contact you forgot to log.
Contact For
Appears when the household has more than one member. Whole household is the default; tap a name to log the contact against particular people instead. You can pick several.
Type of Contact
Visit, Phone Call, Card/Letter, Email, Text Message, or Other.
Tried, didn’t connect
See below.
Public Notes
Free text visible to all ministry leaders.
Private Notes
Sensitive pastoral notes, with a visibility setting of their own. See Privacy Levels below.
Notify Pastor & District Leaders
Sends a notification when you save. The names of everyone who will receive it are listed under the checkbox.
Prayer Requests from this visit
Add a prayer request without leaving the form. It is attached to the household and to this contact.
The Lists button in the header of the same window adds or removes this household from any list you can edit.
Logging a contact about one household member instead of the whole family
When a household has more than one member, the contact form asks who it was for.
- Open the contact form for a household with more than one member.
- Under Contact For, leave Whole household selected for a general visit, or tap one or more member names to log the contact against them specifically.
On the History tab and in Recent Activity, the entry then carries the first names of whoever was picked (for example “Visit · Andrew Mitchell w/ Dorothy”). Picking nobody in particular (Whole household) shows no name tag.
Tried, didn’t connect
Tick this when the call went unanswered or nobody was home.
- Open the contact form as usual.
- Fill in Type of Contact and Date as normal.
- Tick Tried, didn’t connect.
- Click Save Contact.

The attempt is saved and shows in the history, greyed out and labelled. It does not change the household’s status colour, does not reset the clock, and does not clear a scheduled visit. The work you did is on the record; the family is still waiting to be reached.

Logging a contact on someone else’s behalf
A pastor who logs contacts for the team needs the Log Contacts for Others permission.
- Open the contact form. If you hold the permission, a Log for Another toggle appears above the fields.
- Click it, then search by name in the box that appears and pick the leader.
- Fill out the rest of the form normally; the contact is recorded as logged by the person you picked, not by you.
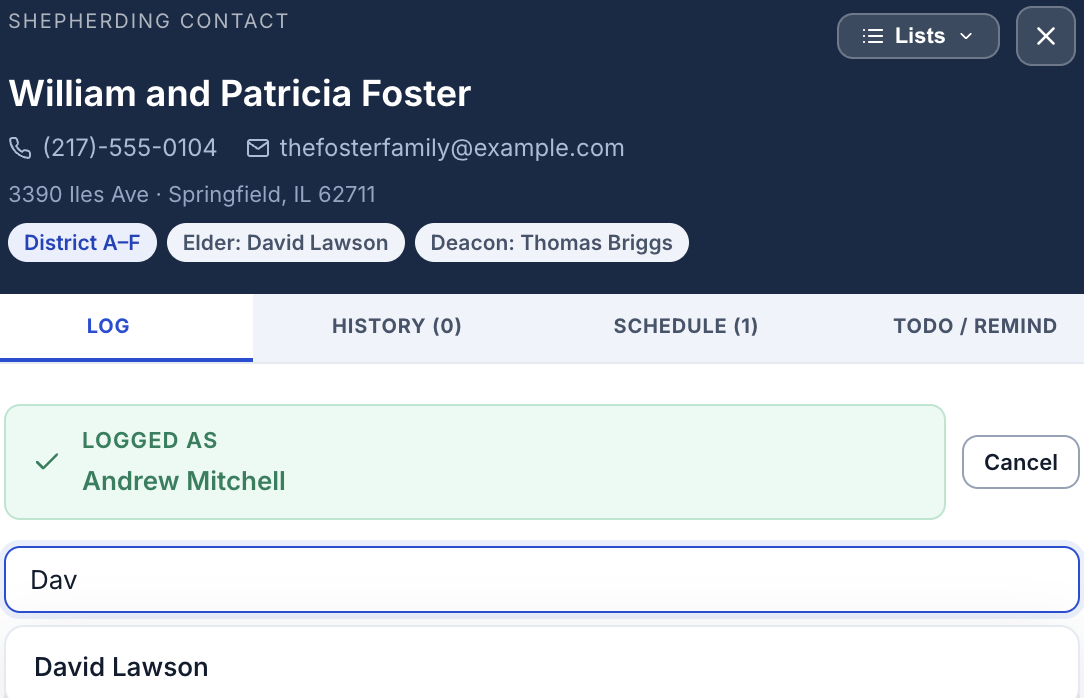
Without the permission, this control does not appear at all — no error, it is simply absent, the same pattern as the rest of the page’s role-gated buttons.
Adding a prayer request while logging a contact
It’s the fastest way in — no separate trip to the household’s Prayer tab.
- Open the contact form.
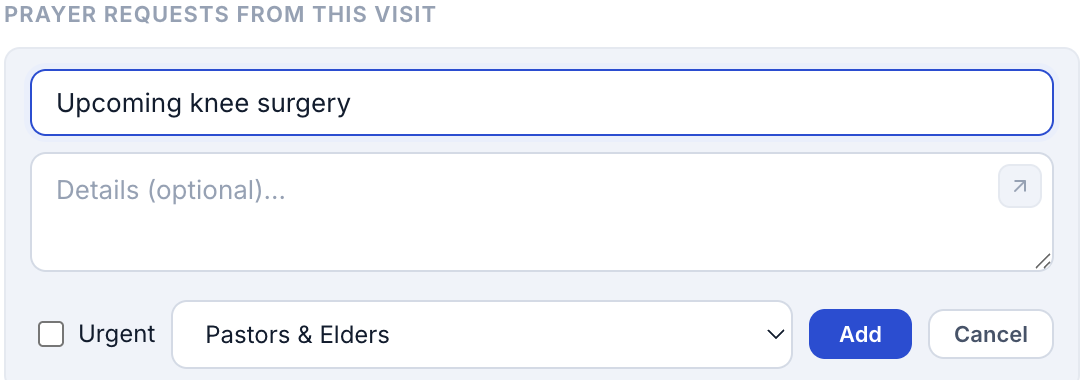
- Under Prayer Requests from this visit, click + Add Prayer Request.
- Type a title in Prayer request title… and add Details (Optional) if needed.
- Choose a visibility level, and tick Urgent if it applies.
- Click Add, then save the contact as normal — the prayer request is attached to both the household and this contact entry.
Privacy levels for private notes
When you add a private note, you choose who can read it:
Logging emails by BCC
Every account has its own BCC address. Put it in the BCC field of a shepherding email and Tracker logs the email against the households you wrote to.
- Open Admin (or Settings), then My Settings.
- Copy the address under Your BCC Logging Address.
- BCC it on shepherding emails you send.
Three things have to line up for a log to be written. Send from the email address on your Tracker account. Address the message to an email that matches a household or a member. Make sure that household is not archived. If any of the three fails, nothing is logged and no error comes back to you.
The logged contact records the date, names the household, and keeps the body of your email as a private note visible to pastors and elders.
The BCC address is a key. Anyone who sends from your email address can write to your contact history with it. If yours has been shared or exposed, Regenerate address in My Settings issues a new one and stops the old one working.
Only a contact that connected changes the status colour. Scheduling a future visit, adding a to-do, or ticking Tried, didn’t connect will not move a household to green. Log the contact after it happens.
4. Household Profiles
Click any household row to open its profile. The top of the page holds the household name, its members, its district and district officers, and the contact details. Below that, five tabs hold everything on record.
The tabs
History
Every contact ever logged for this household, newest first, with dates, types, who logged them, who joined, and whichever notes your role permits.
Prayer
Prayer requests on record for this household. Add, edit, archive or delete them here. If your church uses Shepherding Prayer, these are the same requests.
Notes/Dates
Pastoral notes attached to the household rather than to a single contact, and beneath them the dates it keeps: birthdays, anniversaries, deaths, and anything you choose to call your own.
Todos/Reminders
Scheduled visits at the top, then the to-dos and reminders linked to this household that you created, own, or are assigned to.
Lists
Every list this household belongs to. Add or remove membership here.
A tab carries a count when it holds anything. The profile opens on History.

Editing a household or a member’s details
You need the Edit Household Info permission, which administrators have already.
- Open the household profile.
- Click Edit beside the household name.
- Change the shared last name, phone, email or address, or edit an individual member’s fields (first/last name, role, phone, email, birthday, notes).
- Click Save Changes.
The profile header and member row update immediately.

The contact history
History shows every contact in order, whoever logged it, so you always have the full picture rather than only your own part in it. Each entry carries the date, the type, the leader who logged it, anyone who joined, and the notes your role permits. An attempt that did not connect appears greyed out and marked didn’t connect. Where a contact was logged for particular people rather than the whole household, their names ride on the entry.
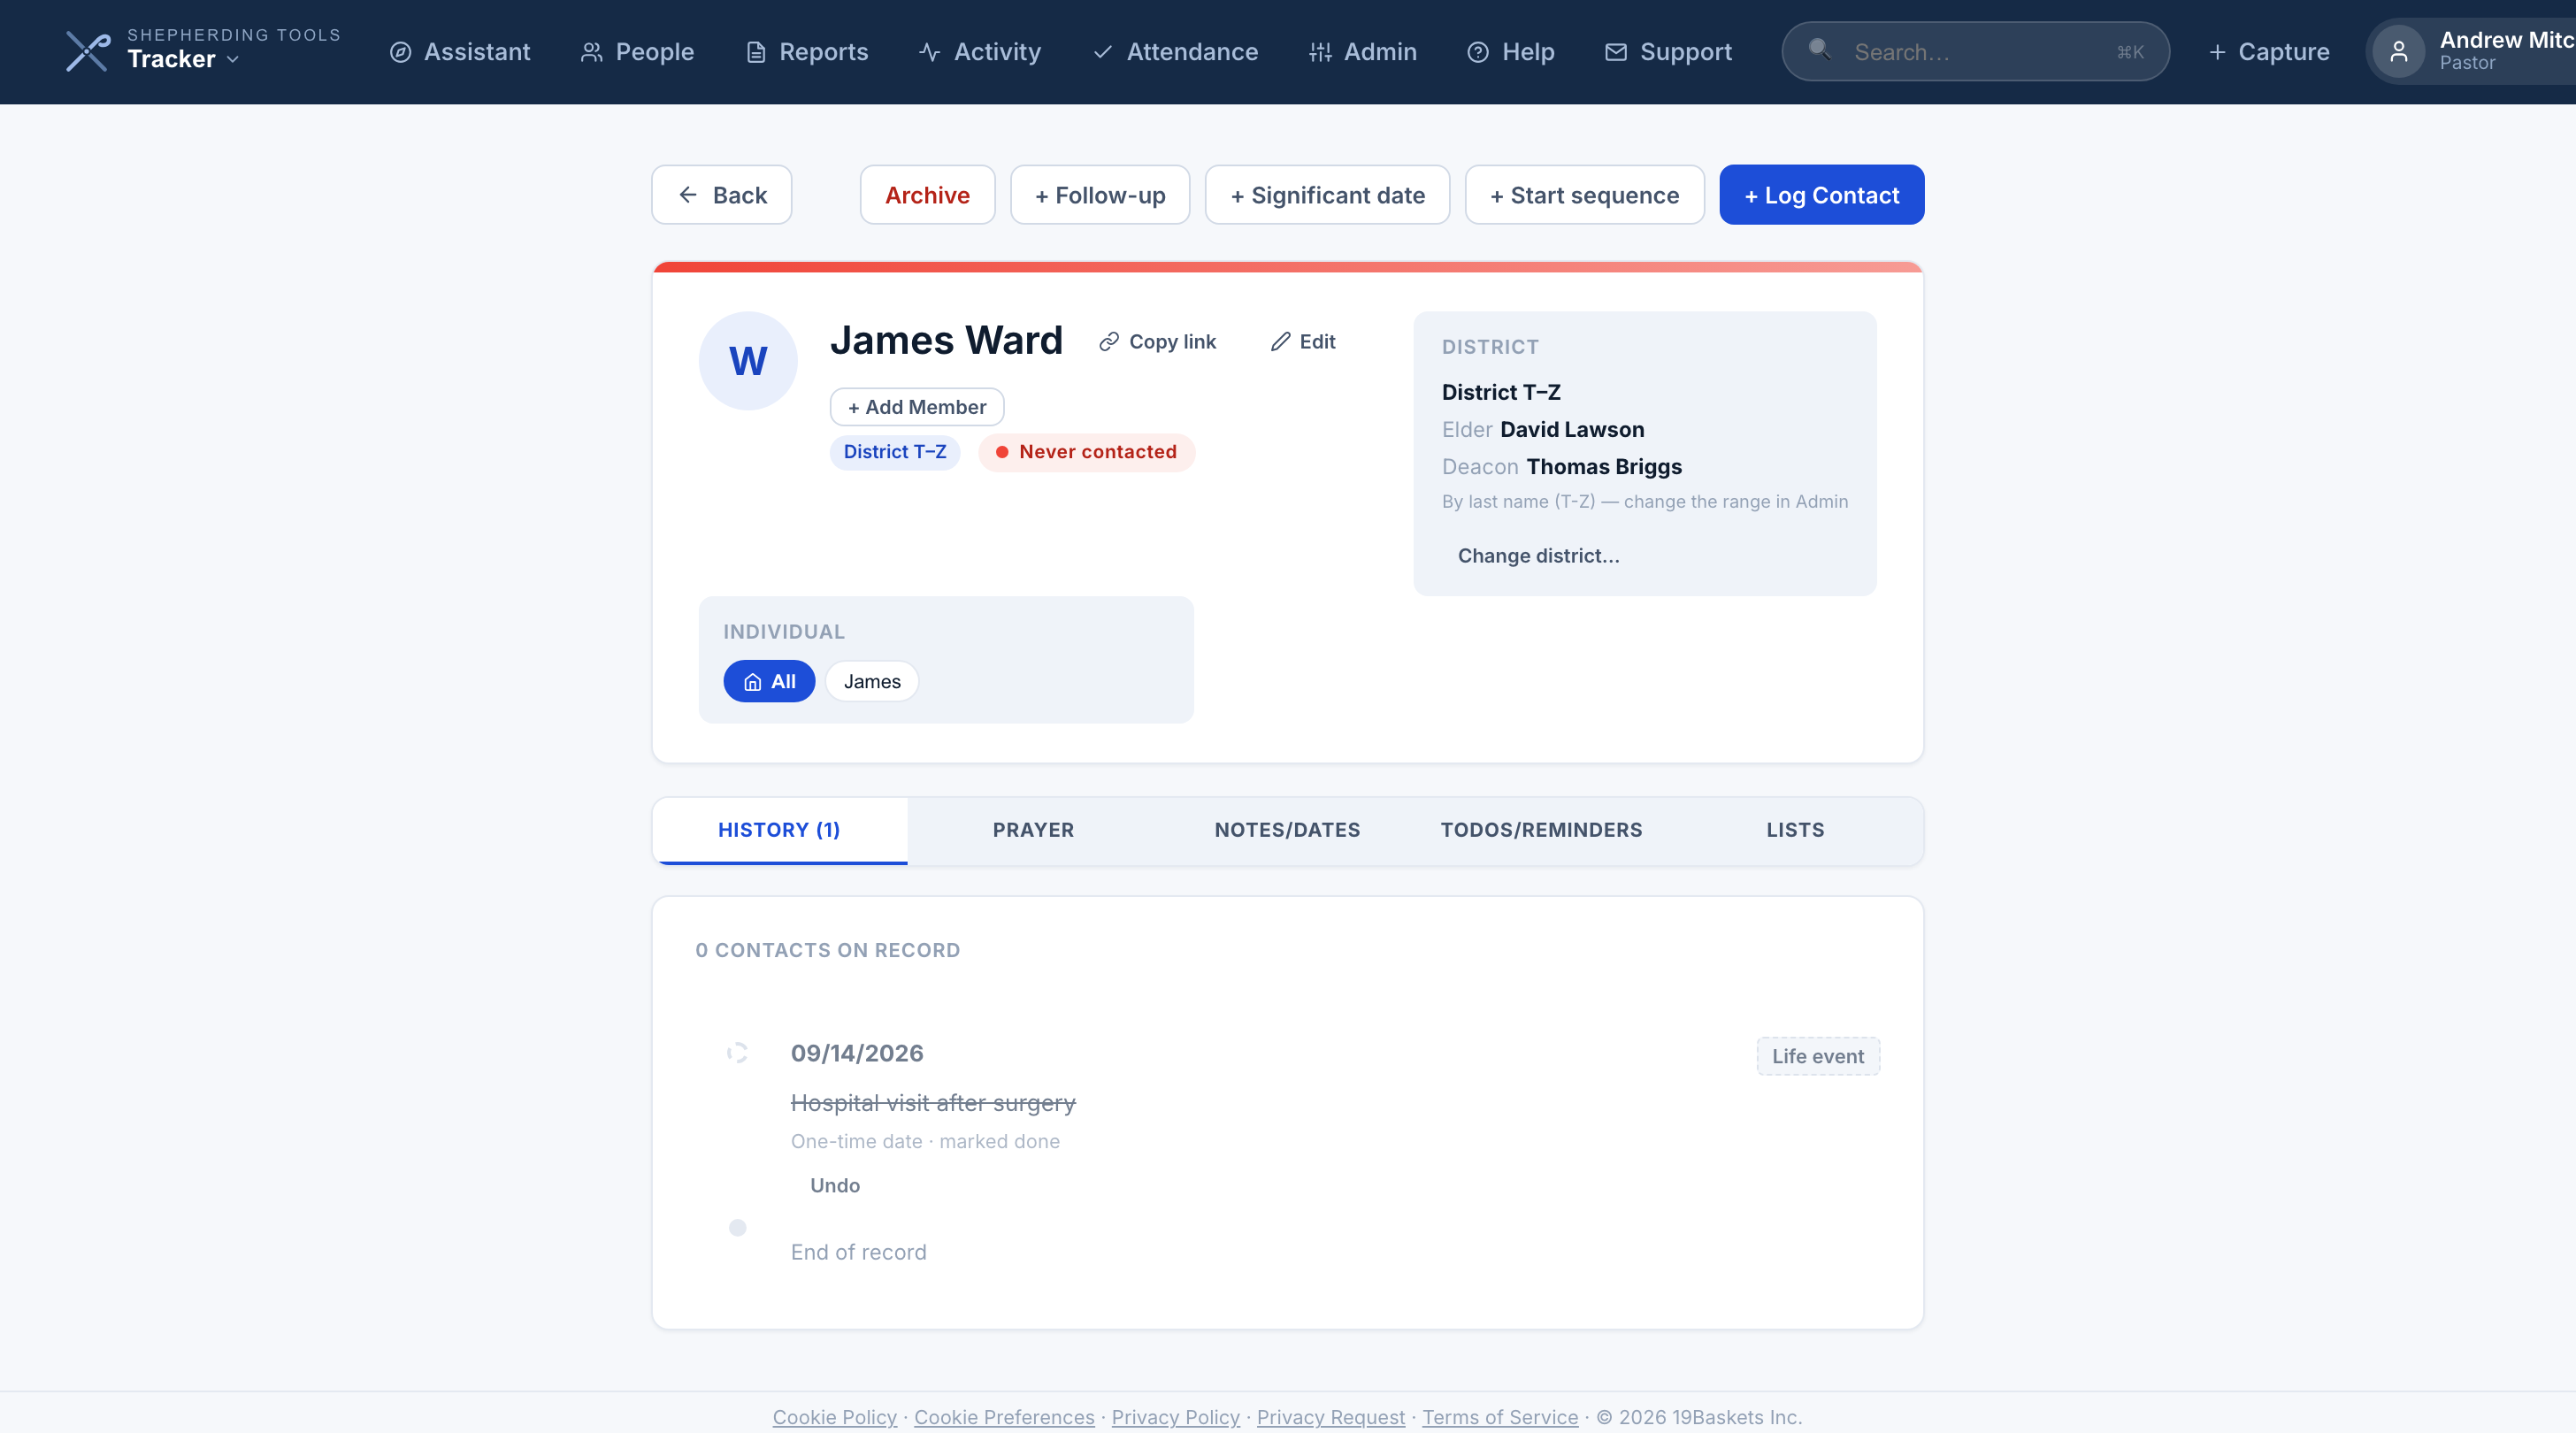
A one-time date whose day has gone by appears here too, marked as a one-time date rather than as a contact. Nobody from the church visited anyone. It is part of what has happened to this household, which is where you would look for it once it stops being something coming up.
A pastor, an administrator, or the officer who owns it can mark that kind of entry Done right from History, whether or not its date has passed. It stays on the timeline afterward, struck through and greyed, so the record of what happened is never lost — click Undo to put it back if it was marked done by mistake.
Editing or deleting a logged contact entry
A fix for the most common “I logged that wrong” moment.
- Open the household profile, History tab.
- On any entry you logged yourself — or any entry at all, if you are a pastor — click the pencil icon in the entry’s header to edit its date, type, notes and Contact For, or the × icon beside it to delete it.
- Editing: change the fields, then click the checkmark to save.
- Deleting: click ×; the entry disappears immediately with an undo toast.

Only the leader who logged a contact, or a pastor, can edit or delete it — administrators without a pastor role do not automatically get this. Deleting is not a soft-archive: once the undo toast is gone, so is the entry.
Notes and significant dates
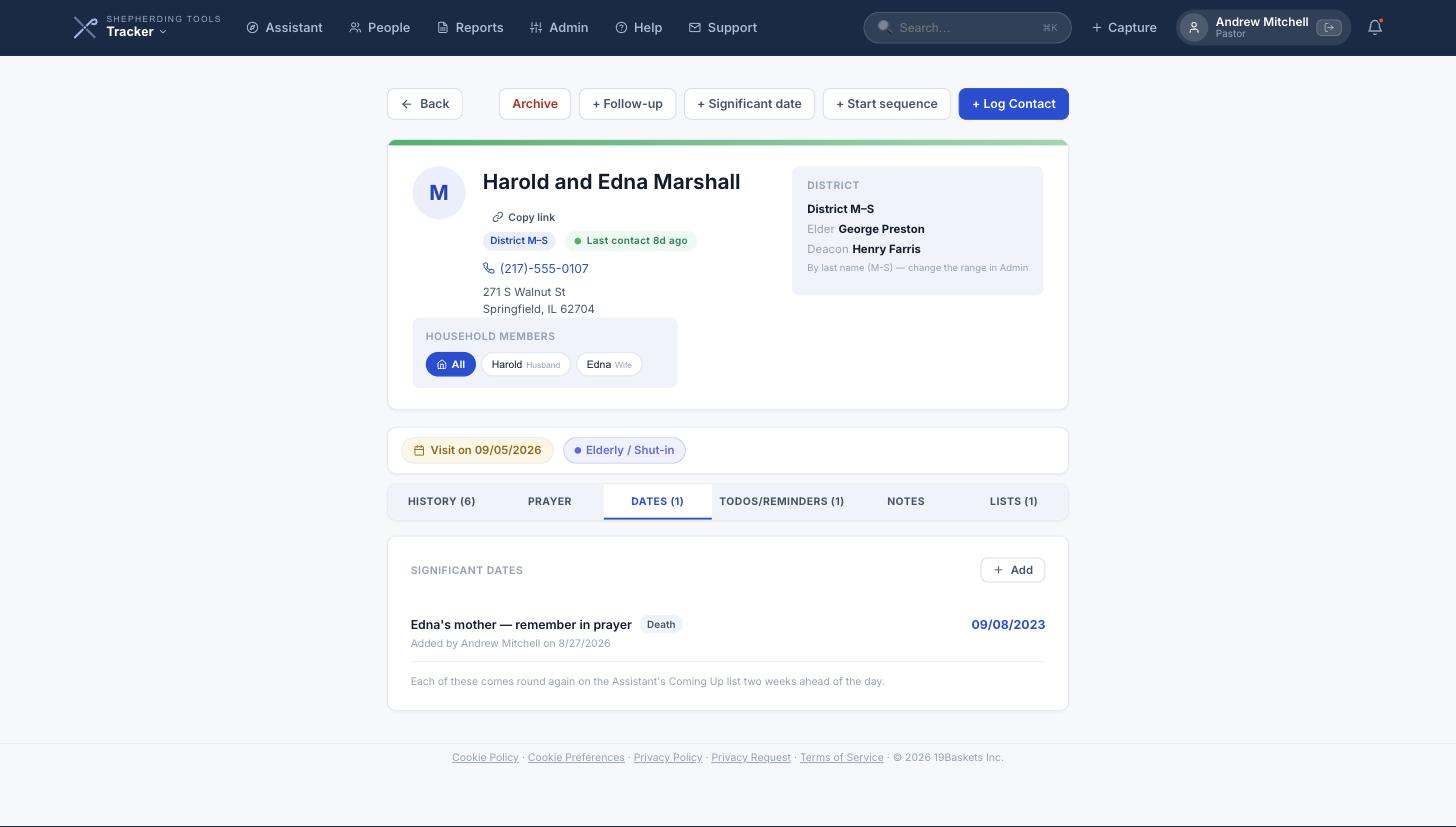
The Notes/Dates tab holds the household’s pastoral notes, and beneath them the dates it keeps: everyone’s birthday, along with anniversaries, deaths, and anything you choose to call your own. The count beside the tab name covers the notes plus the dates still ahead.
Dates are listed by when they next come round rather than by calendar month, so what is nearest sits at the top. In December, a January birthday comes above a November anniversary. That is the order you will actually meet them in.
A one-time date is on the list too: a surgery, or a follow-up you set for a particular day. It is marked One-time and sits in date order among the rest. Once its day has gone by it leaves this tab for History, where it reads as something that happened to the household rather than as a visit anyone made. A date that has passed stops counting toward the number on the tab, because it is no longer in the tab.
An entry someone typed says who added it and when; one that came in from your church management system has no person to name, so it gives the day it landed and says there is no record of who entered it. Birthdays are shown here but edited on the member himself, not on this tab. + Add opens Quick Capture with the date type already chosen.
Dates come round on the Assistant’s Coming Up list two weeks ahead of the day. Membership dates are the exception. They record the day someone joined the church rather than an occasion to mark, so they are kept off Coming Up. They stay on this tab, because it is the record of what has been written down.
Adding a note to a household
Pastoral notes are a different thing from contact logs and from dates.
- Open the household profile and click the Notes/Dates tab.
- Type in the Add a Note box.
- Tick Private (only visible to me) if it should stay yours.
- Click Save Note.
The note appears above the box, tagged Private (lock icon) or Note, with your name and the date.
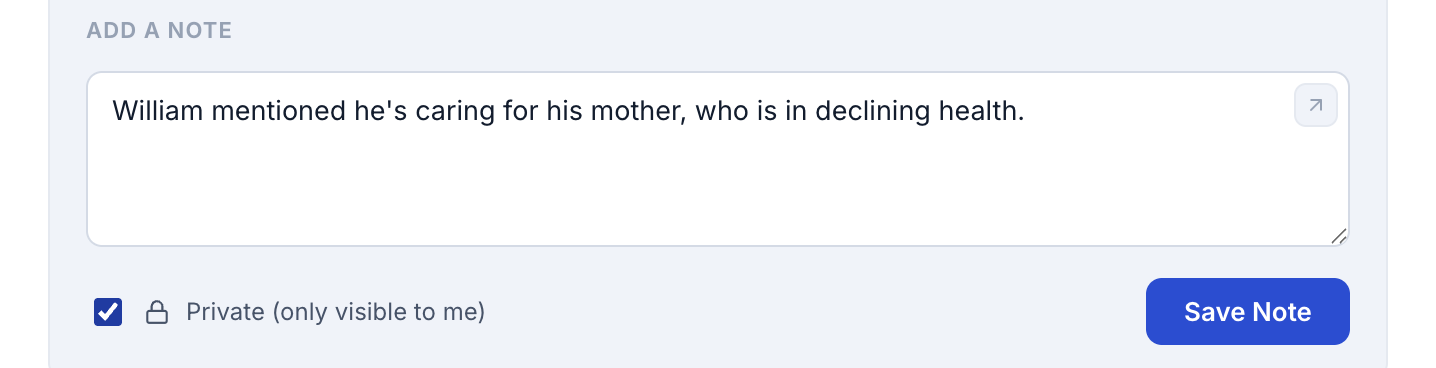
Only the note’s own author sees a delete (×) button on it — nobody else, not even an administrator, can remove another leader’s note. A private note is visible to its author only, not to “Only me / Pastors & Elders / All Officers” like a contact’s private note — a different privacy model from the one under Privacy Levels below.
Adding, editing and archiving a prayer request from a household
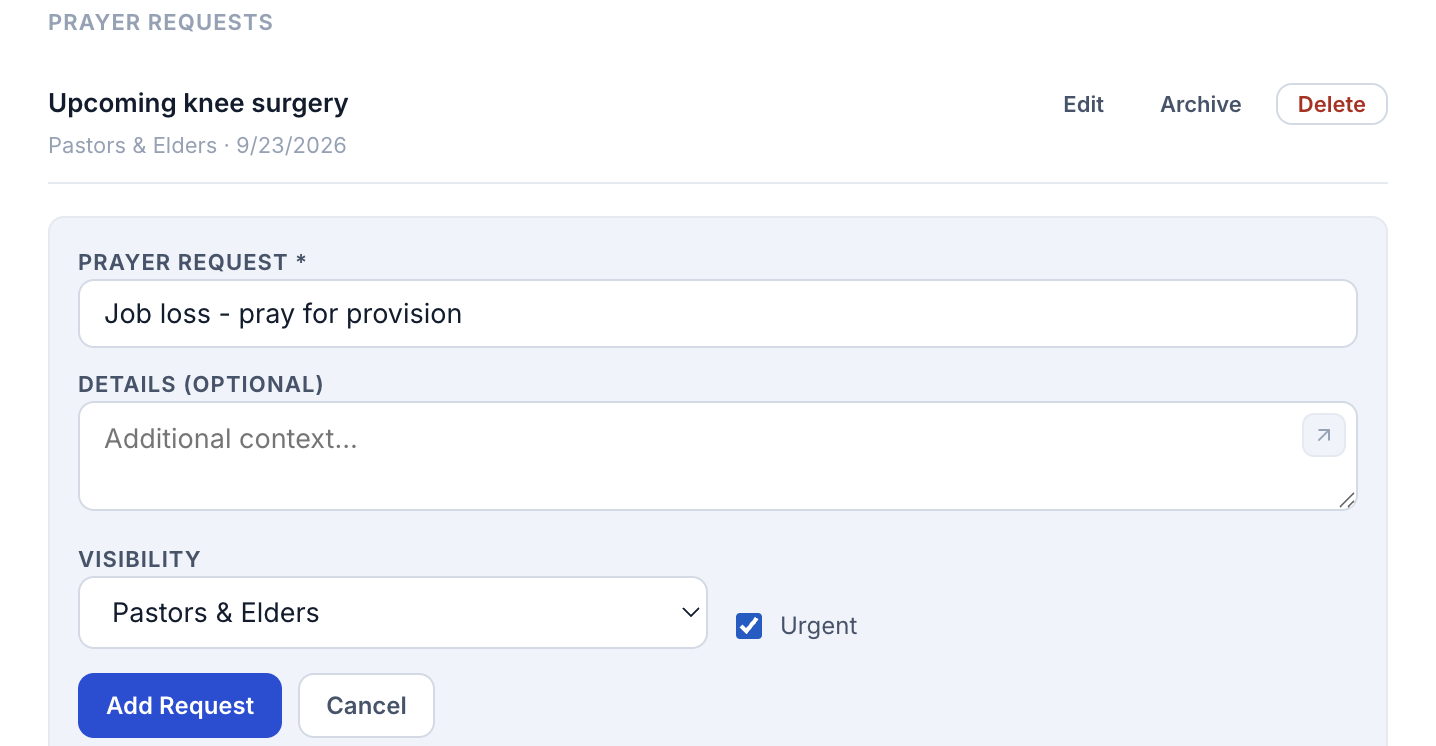
- Open the household profile, click the Prayer tab, then click + Add Prayer Request.
- Fill Prayer Request* (title) and, optionally, Details.
- Choose Visibility from the dropdown (labels come from your church’s own configuration) and tick Urgent if it should be flagged.
- Click Add Request.
To edit or retire a request later, only its own author, an administrator, or a pastor, elder or deacon sees Edit, Archive and Delete on it. Archive keeps it on the record and findable; Delete removes it permanently and takes any sub-requests with it.
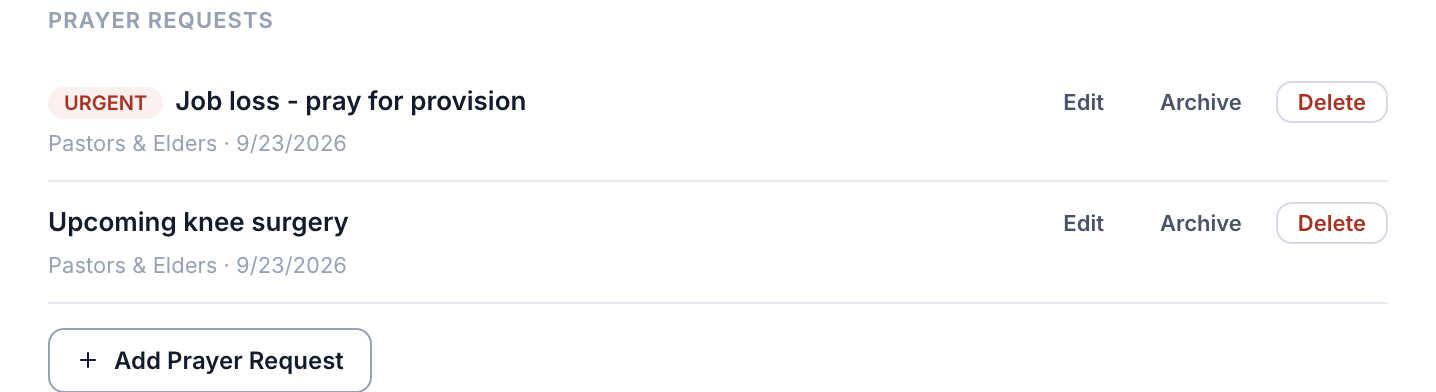
Delete is permanent and takes sub-requests with it — the app’s own confirm dialog says so. Archive is the safe default for “this is answered, or no longer needed.”
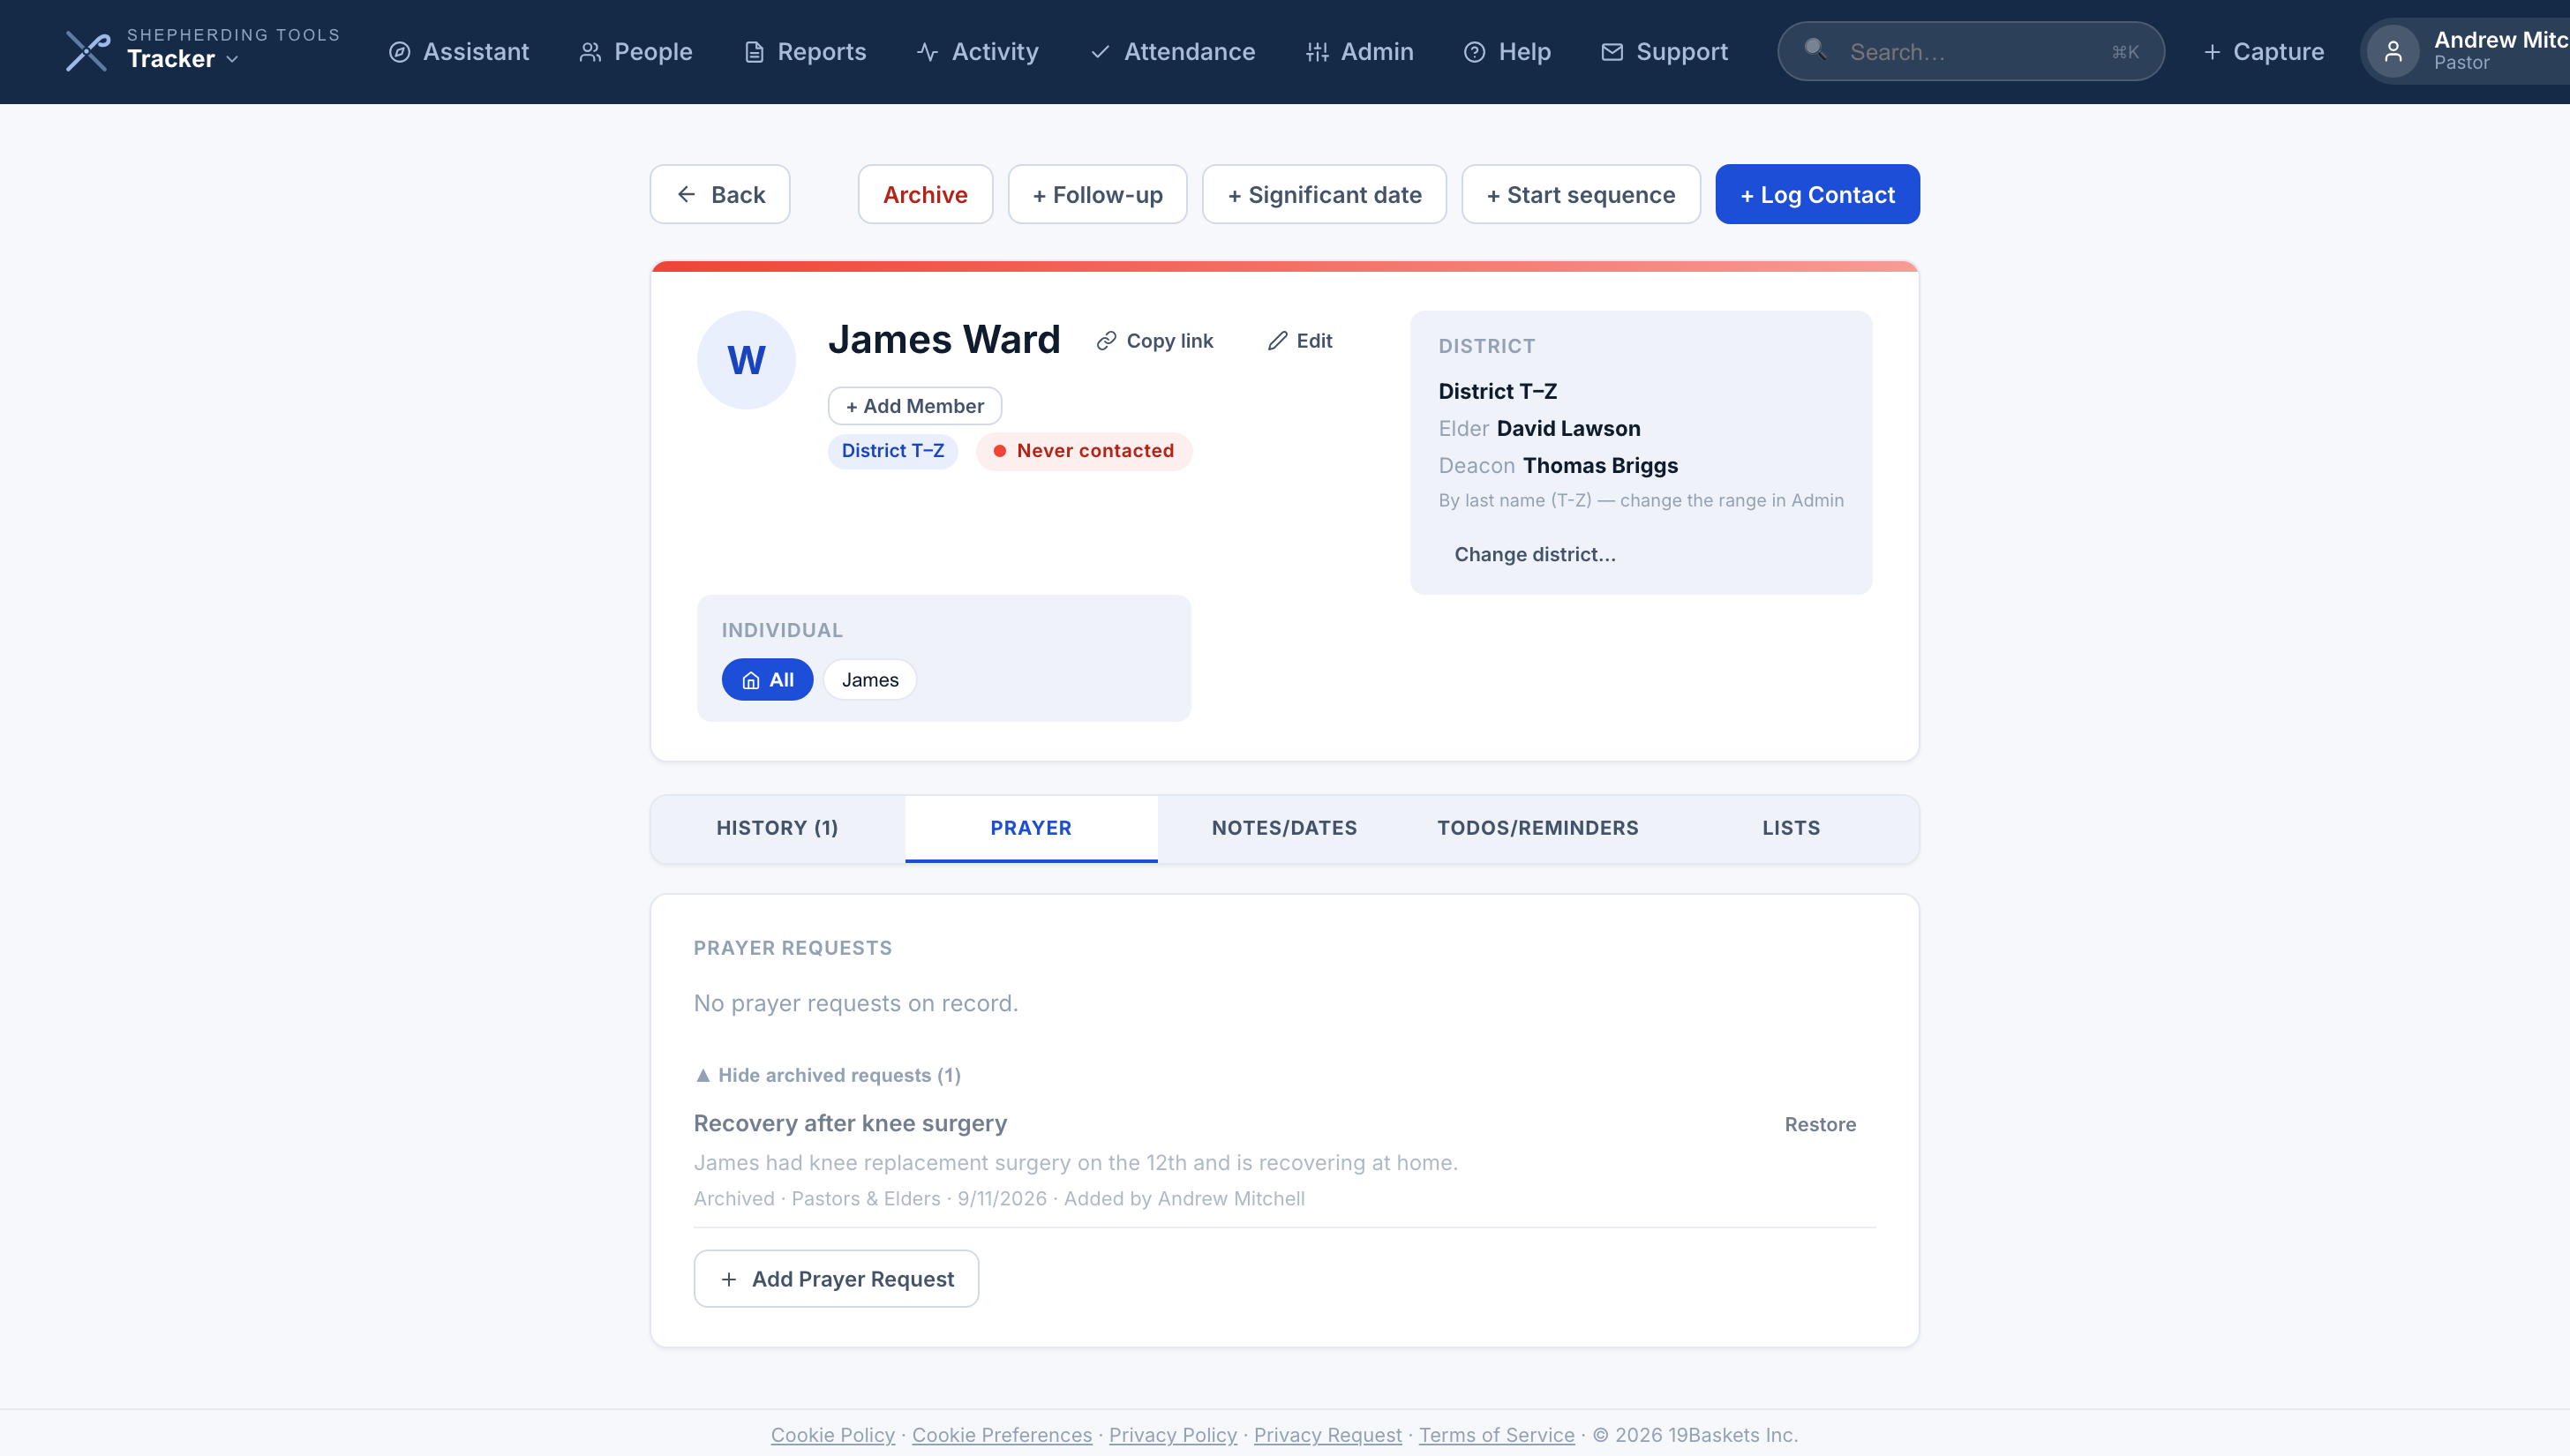
An archived request is not gone. Click Show archived requests below the list to see everything archived from this household, and click Restore on any of them to bring it back to the active list.
Sharing a link to a profile
Every household has a short address built from your church’s handle and the household’s number, in the form /tracker/p/your-church/214. Click Copy link beside the household name to put it on your clipboard.
Individual contacts have their own links too. The small link button on a history entry copies an address that opens the profile scrolled to that entry, which is the quickest way to point a colleague at one visit rather than a whole family. The link opens Tracker and still asks for a login, so it is a shortcut for your team, not a public page. If your church handle ever changes, old links keep working.
5. Scheduling & To-Dos
Three kinds of item keep you ahead of your shepherding: scheduled visits, to-dos, and reminders. All of them land in your My Todos & Reminders panel on the People page.
Scheduling a future visit
The most common route — from a household:
- Open the contact window for the household and click the Schedule tab.
- Set the planned Date.
- Add an optional note.
- Click Schedule Visit.
Two other ways in, same result: the household profile’s Todos/Reminders tab, where scheduled visits sit at the top, or + Reminder/Todo in the My Todos & Reminders panel, choosing Visit along the top.
A scheduled-visit badge appears on the household row and in your My Todos & Reminders panel. It clears itself once you log a contact that connected on or after the planned date. An attempt that did not connect leaves it standing.

To-dos
A to-do appears in your panel immediately and stays until you check it off. It can carry:
- A task description
- An optional due date
- An optional related household
- One or more ministry leaders it is assigned to
Once the due date passes, the to-do is highlighted as overdue and counted in the badge on the panel header. Edit it and set a later due date to clear the highlight.
Reminders
A reminder is a personal note that is invisible until the date you set. Before that day it appears nowhere in the app, which is the point: set one for “follow up with the Smiths in three weeks” and forget it until the day arrives. From then it stays in your panel until you dismiss it. To push it further out, edit it and set a new date, which hides it again. You can also ask to be notified at a particular hour on the day.
Reminders never go overdue. They simply become visible on their date. Only to-dos and scheduled visits carry an overdue highlight.
Creating one
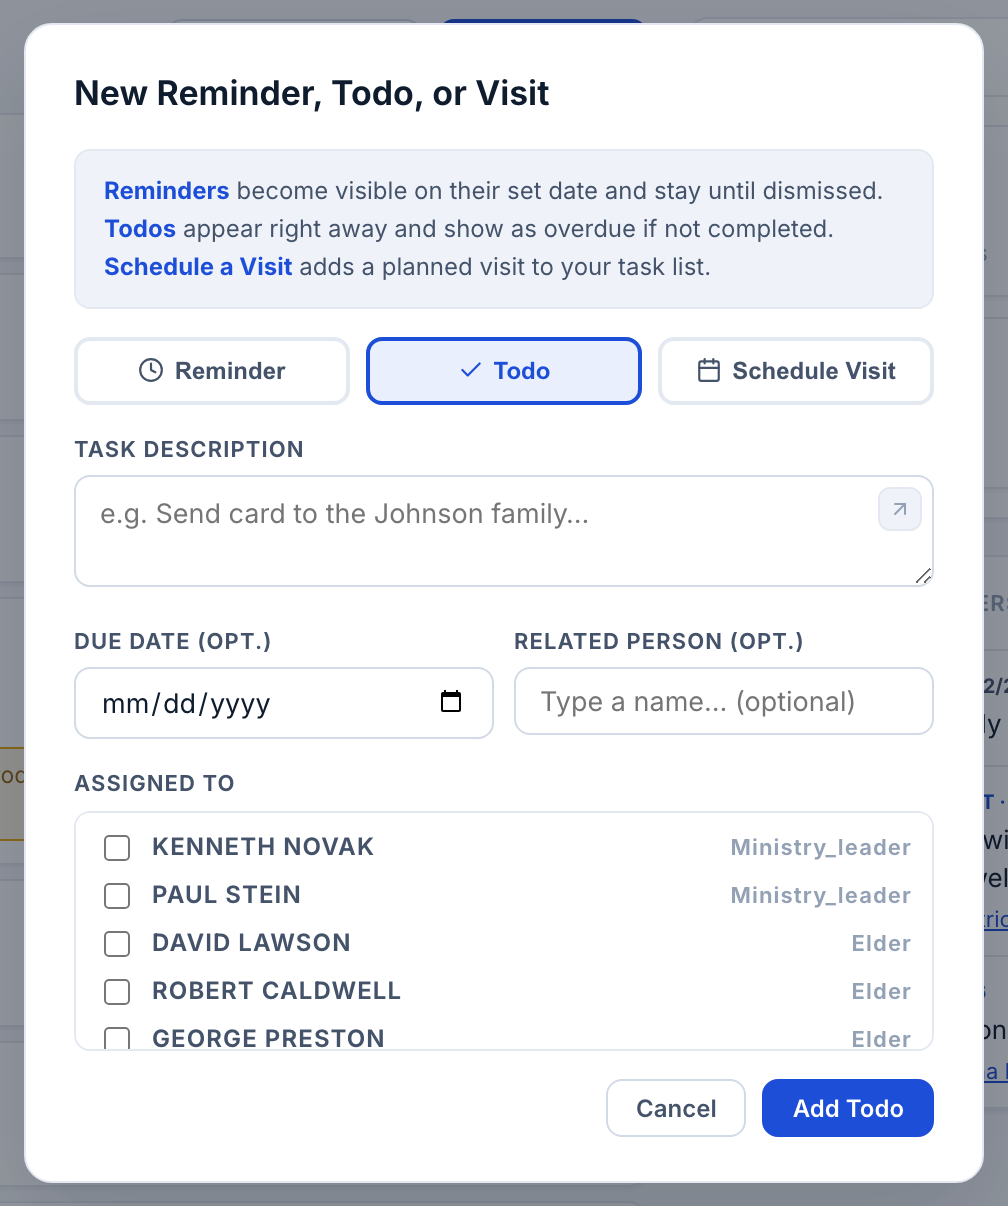
- On the People page, click + Reminder/Todo at the top of My Todos & Reminders.
- Choose Reminder, Todo, or Schedule Visit along the top of the window.
- Fill in the fields (task text, optional due date, optional household, optional assignee(s)).
- Click Set Reminder, Add Todo, or Schedule Visit to save.
The new item appears in the panel immediately (a reminder stays hidden until its date instead — see the note below). You can also create a to-do or reminder from any household, using the Todo / Remind tab in the contact window or the Todos/Reminders tab on the profile.
Completing a scheduled visit, and checking off a to-do or reminder
- To complete a scheduled visit: log a contact for that household that connects on or after the planned date. It clears on its own — nothing to click in the panel itself.
- To check off a to-do or dismiss a due reminder: open My Todos & Reminders on the People page and click the item’s own checkbox or done control.
The item disappears from the panel, and the header count drops by one.
6. Lists
Lists group households for any purpose: a follow-up list, a small group, a shut-in list, a particular ministry. Once a list exists you can filter the People page down to it.
Creating a list
The Manage Lists window has two places to create one, and which box you type in decides who can see it.
- Public Lists:Visible to every ministry leader. Only administrators can create these.
- My Private Lists:Yours alone until you share it. Anyone can create these.
- Above the household rows on the People page, click Manage Lists.
- Type a name in either the Public Lists box (administrators only) or the My Private Lists box.
- Click Add (public) or Add Private (private).
The new list appears in its section immediately, with a colour assigned automatically; click the pencil icon on its row later to rename or recolour it.

Sharing a private list
Each leader you share with gets a level:
- Can view:Sees the list and who is on it.
- Can edit:Can add and remove households, rename it, recolour it, and share it further.
- Open Manage Lists and find your private list.
- Click the people icon on its row (title: “Share with others”).
- Tick the leaders you want to share it with.
- For each one ticked, click Can view or Can edit.
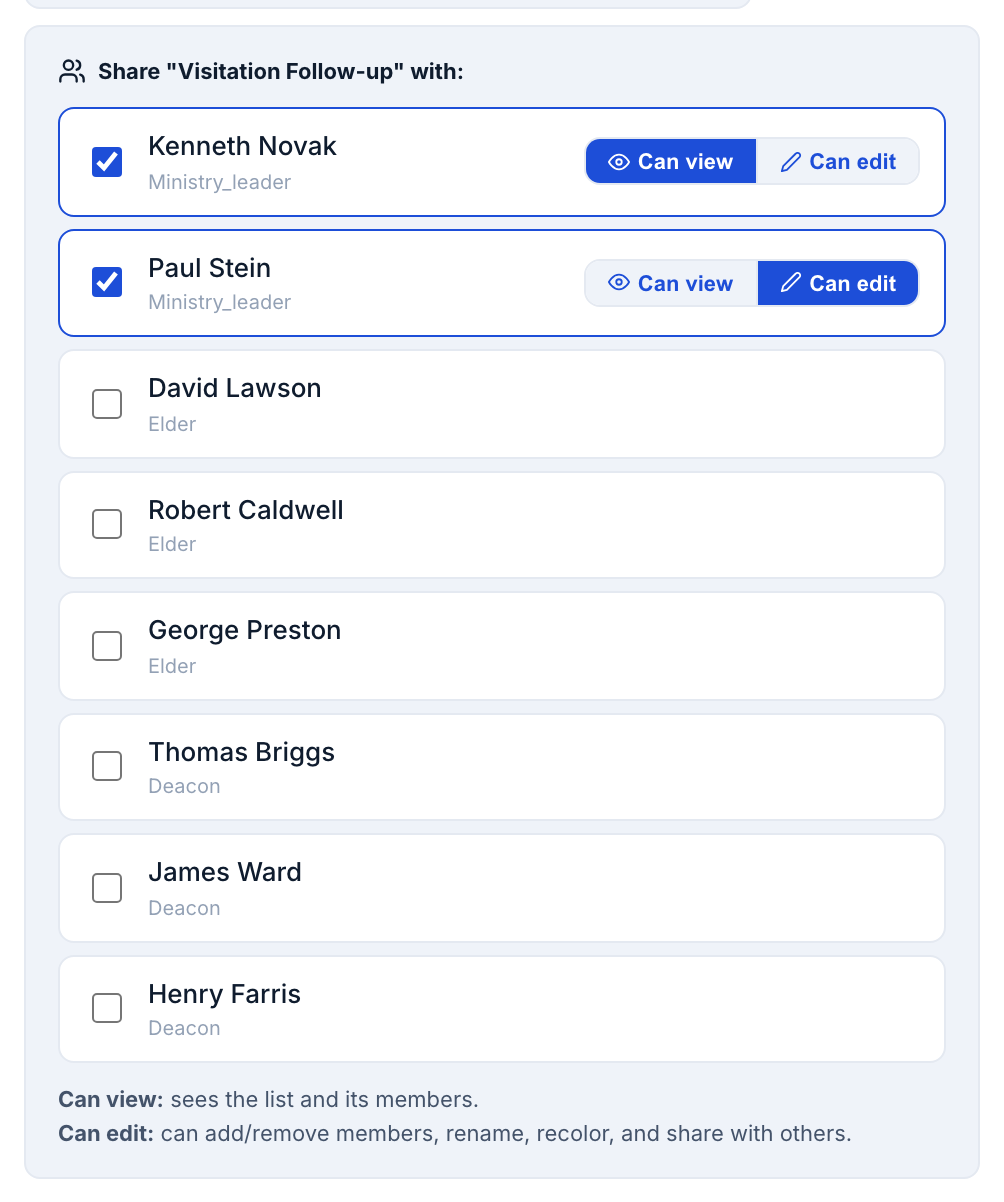
The list gains a small “shared” tag for the people you picked, and it now appears under Shared With Me on their own People page.
Adding households to a list
The fastest route — from Manage Lists:
- Open Manage Lists, click a list’s row to expand its members panel.
- Type a name in Type a name to add… and pick from the suggestions.
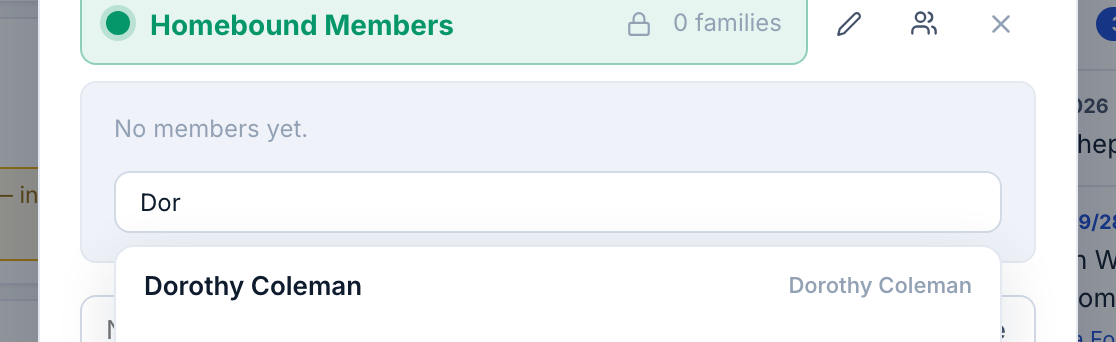
Two other routes, same result: open a household’s contact window and click Lists in the header, ticking a list to add or unticking to remove; or open the household profile’s Lists tab.
A chip with the person’s name (and household, for disambiguation) appears in the expanded list; the list’s household count updates.
Filtering the People page by a list
- On the People page, open the All Lists dropdown above the rows.
- Pick a list or a district. Private lists are marked [Private].
The household rows narrow immediately; combine with the sort control or status tiles as needed.
A Tracker list can drive a prayer plan in Shepherding Prayer, so the families you group here are the families your church prays for, without a second list to maintain.
7. Worship Attendance
Attendance lets your officers check off who was at worship each Sunday, and tells you who has stopped coming. It is switched off until a church asks for it.
Turning it on
- Open Admin > Church Info.
- Under Worship Attendance, tick Take attendance for Sunday worship.
- Set Flag after this many missed Sundays. Three is the default.
- Click Save Settings.
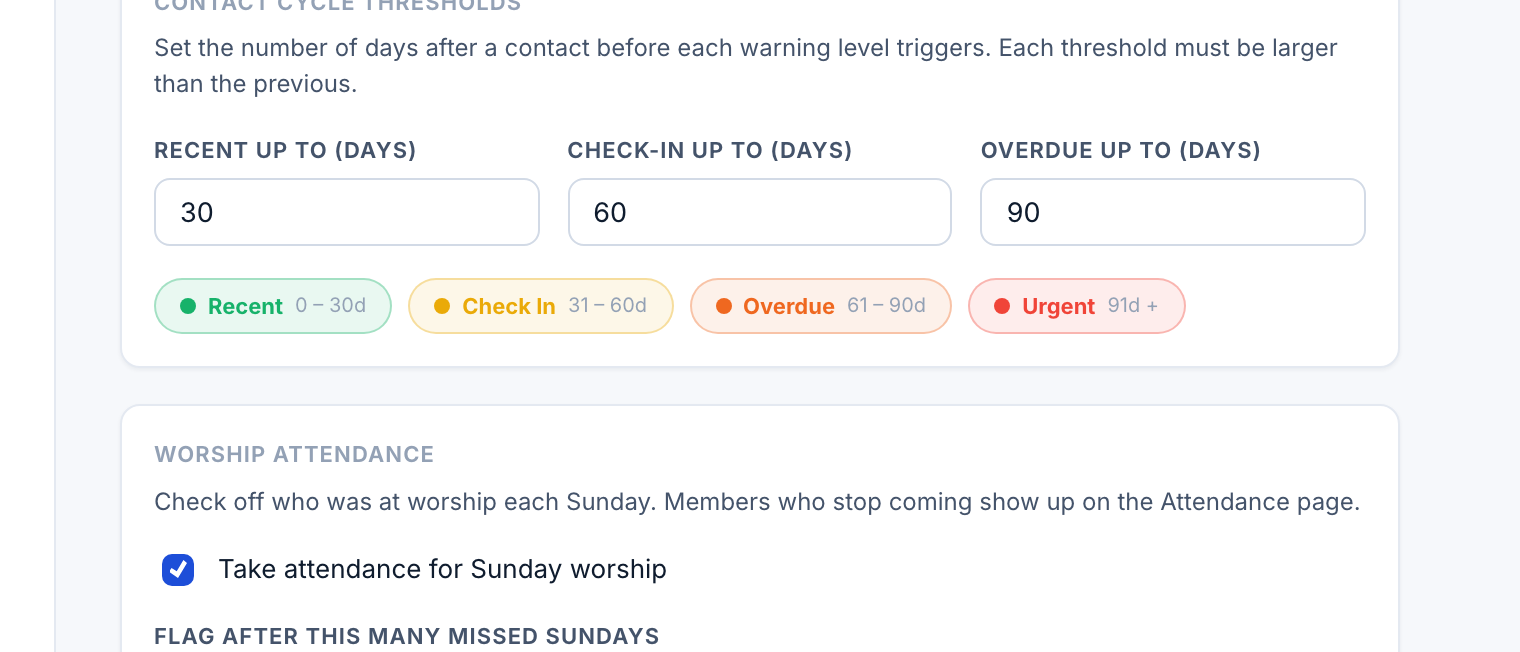
An Attendance button then appears in the top bar for pastors, elders, deacons and administrators. Other ministry leaders do not see it.
Taking attendance
- Click Attendance in the top bar (visible to pastors, elders, deacons and administrators once the church has it on).
- Confirm or change the service date — it starts on the most recent Sunday.
- Tick each person who came; the roster is grouped by household. Search by name first if the roster is long.
Each tick saves immediately (no separate Save button), and a running count updates above the roster.
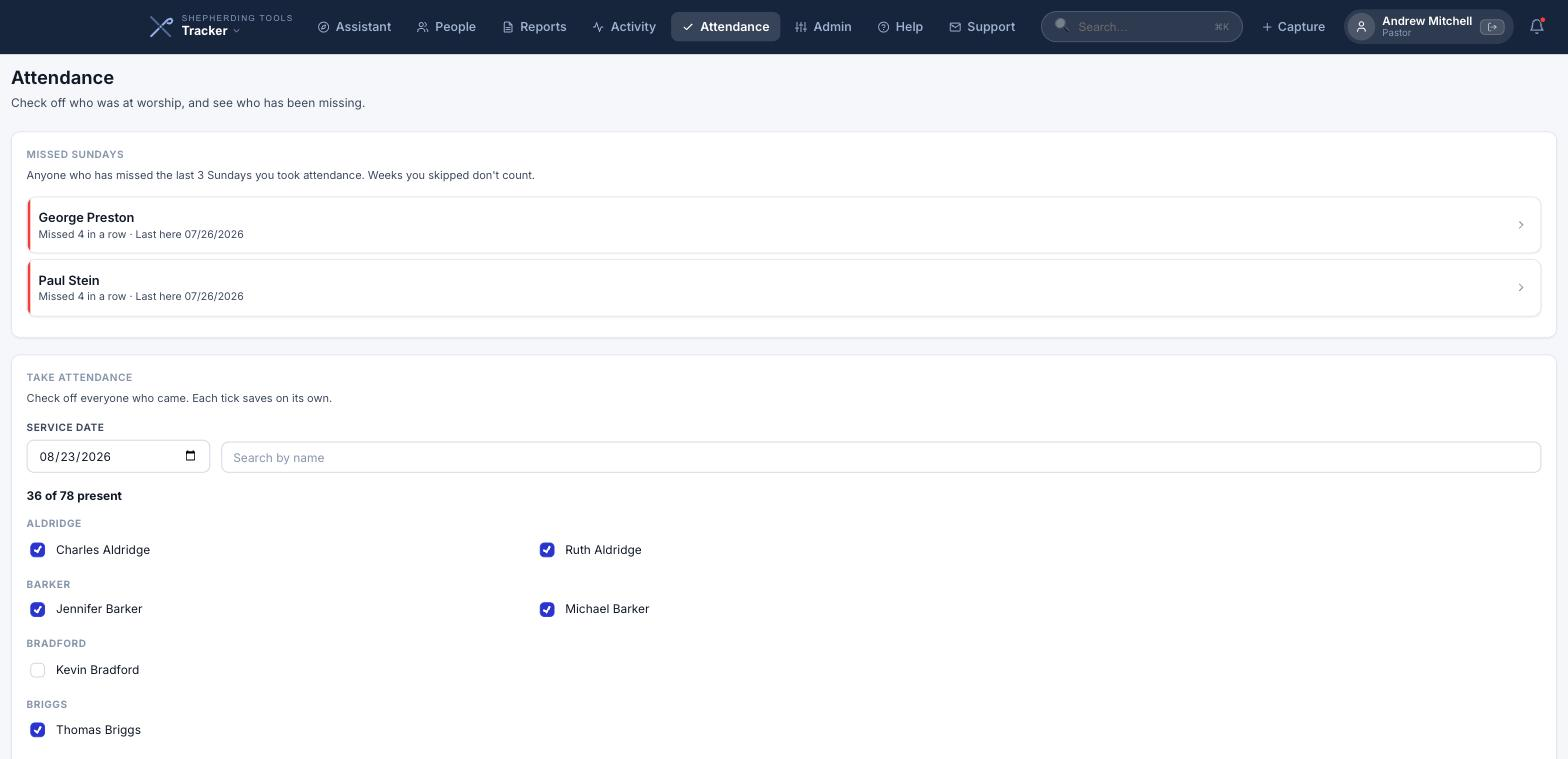
Reading Missed Sundays
- On the Attendance page, look at the Missed Sundays panel above the roster.
- Click any row to open that person’s household.
Each row states how many Sundays in a row and when he was last present; a Sunday nobody recorded breaks no streak.
Attendance is a shepherding signal, not a scoreboard. It never affects a household’s contact status, and it does not appear in the printed report.
8. Reports & Statistics
Statistics and reports live on one screen. Click Reports in the top bar.
Pastors, elders, deacons and administrators have access already. Any other ministry leader can be granted it by ticking View Reports on his account under Admin > Users.
Reading Ministry Leader Activity
- Click Reports in the top bar; the Ministry Leader Activity table is the first block on the page.
Every leader with contacts logged this quarter and this month appears, and — for a leader with a district — the share of that district reached. It always covers the current quarter and month regardless of the date range set below it, and it never appears on the printed report.

Congregational Health Snapshot
The report opens with a snapshot of the whole church: a bar showing the proportions, one tile per status with a count and a percentage, the total number of households, and a district-by-district table with the same four columns. It is dated as of the day you generate it, and it can be left out with the Include church-wide health section switch.
Building and printing a report
- Pick a Report Period. Quarter to Date, Last Quarter, Month to Date, Last Month and Year to Date are one click; or set From and To yourself.
- Choose the Leaders to Include. Tick them individually, or use the role buttons, All, or None.
- Decide whether to include the health snapshot, and whether to use Export in concise format for a tighter printout.
- Click Print / Save as PDF and choose Save as PDF in your browser.

For a quarterly session meeting, set the period to the last quarter and print one report per leader. The controls disappear from the printout, so what comes out of the printer is the report alone.
9. Activity Feed
Activity is a church-wide, day-by-day feed of what the team has been doing, newest first. Each entry names the household, the type of contact, the leader who logged it and anyone who joined him. Prayer requests and changes to the roll appear here too, so a household archived last Tuesday is on the record with the rest.
Access to the Activity feed is not automatic, and administrators are no exception. A pastor must tick View Activity Feed on the person’s account under Admin > Users.
Narrowing the Activity Feed
A worked example — every visit logged in March:
- Click Activity in the top bar (requires View Activity Feed, granted per-person).
- Set From to March 1 and To to March 31.
- Open Activity Type and pick Visit.
- Click Clear Filters to reset when done.
The feed narrows to matching entries as each filter is set; there is no separate “apply” step. Four controls sit above the feed:
- Search by Name:Matches a household, the leader who logged the entry, or anyone who joined him. It filters as you type.
- From / To:Limits the feed to a stretch of dates.
- Activity Type:One dropdown grouped in three: contact types, prayer requests, and changes to the roll such as Household Added or Member Archived.
- Clear Filters:Resets all of them.

10. Admin & Settings
The last button on the top bar reads Admin if you are an administrator and Settings if you are not. Administrators get the full panel. Anyone who can edit households and members — an administrator, or a user granted the Edit Household Info permission — also sees Merge Duplicates, Households and Import there.
Connecting or disconnecting your church management system, and entering its API keys, stays with administrators and pastors. Without that access, the ChMS Integration tab still shows, minus the connect, key and disconnect controls — just a line saying an administrator or pastor connects it.
The administrator’s panel holds ten sections down the left: Users, Districts, Role Labels, Church Info, Billing, Households, Import, Lists, Danger Zone, and My Settings.
Users
Headed Ministry Leaders by default, or your church’s own label if you’ve set one under Role Labels below. See Adding People to Your Account for the click-by-click steps to add someone — a new account starts from a congregation member you search for by name, so a leader and his household record stay one person.
For each leader you set:
- Role. Pastor, Elder, Deacon, Ministry Leader or Secretary, plus any custom role your church has named.
- District, for elders and deacons.
- Individual permissions, App Access, and alert preferences, described below.

Permissions
Seven permissions can be granted to any account, on top of what his role already gives him:
Add / Remove Users
Create accounts, edit them, deactivate and reactivate them, and remove somebody’s login. It cannot set a role, tick these permissions, or make anybody a full administrator. On somebody who already has admin access, or who is a pastor, elder or deacon, it cannot change the login email or set a new password.
Edit Household Info
Add, edit and permanently delete households and members.
Manage Admin Settings
Edit church info, districts, role labels and public lists.
View Reports
Open Reports and print them. Elders and deacons have this already.
View Activity Feed
See the church-wide activity feed.
Log Contacts for Others
Record a contact on another leader’s behalf.
Approve Prayer Requests
Review and release requests submitted by members and through the church’s public prayer form. It grants no extra sight of anything, which is what makes it safe to give a secretary who runs the prayer chain.
If you untick Approve Prayer Requests on the last person who holds it while requests are waiting, Tracker says so before you save. Nobody can release those requests until someone is granted the permission again.
App Access
Below the permissions, App Access decides which Shepherding Tools products this person can open: Tracker, Connections, Prayer and Discipleship. Tick a product to give him access, untick to take it away. The list appears once the account exists, so create the person first and set his access on a second pass. You cannot remove your own Tracker access.
Districts
Districts group households and give each group its officers.
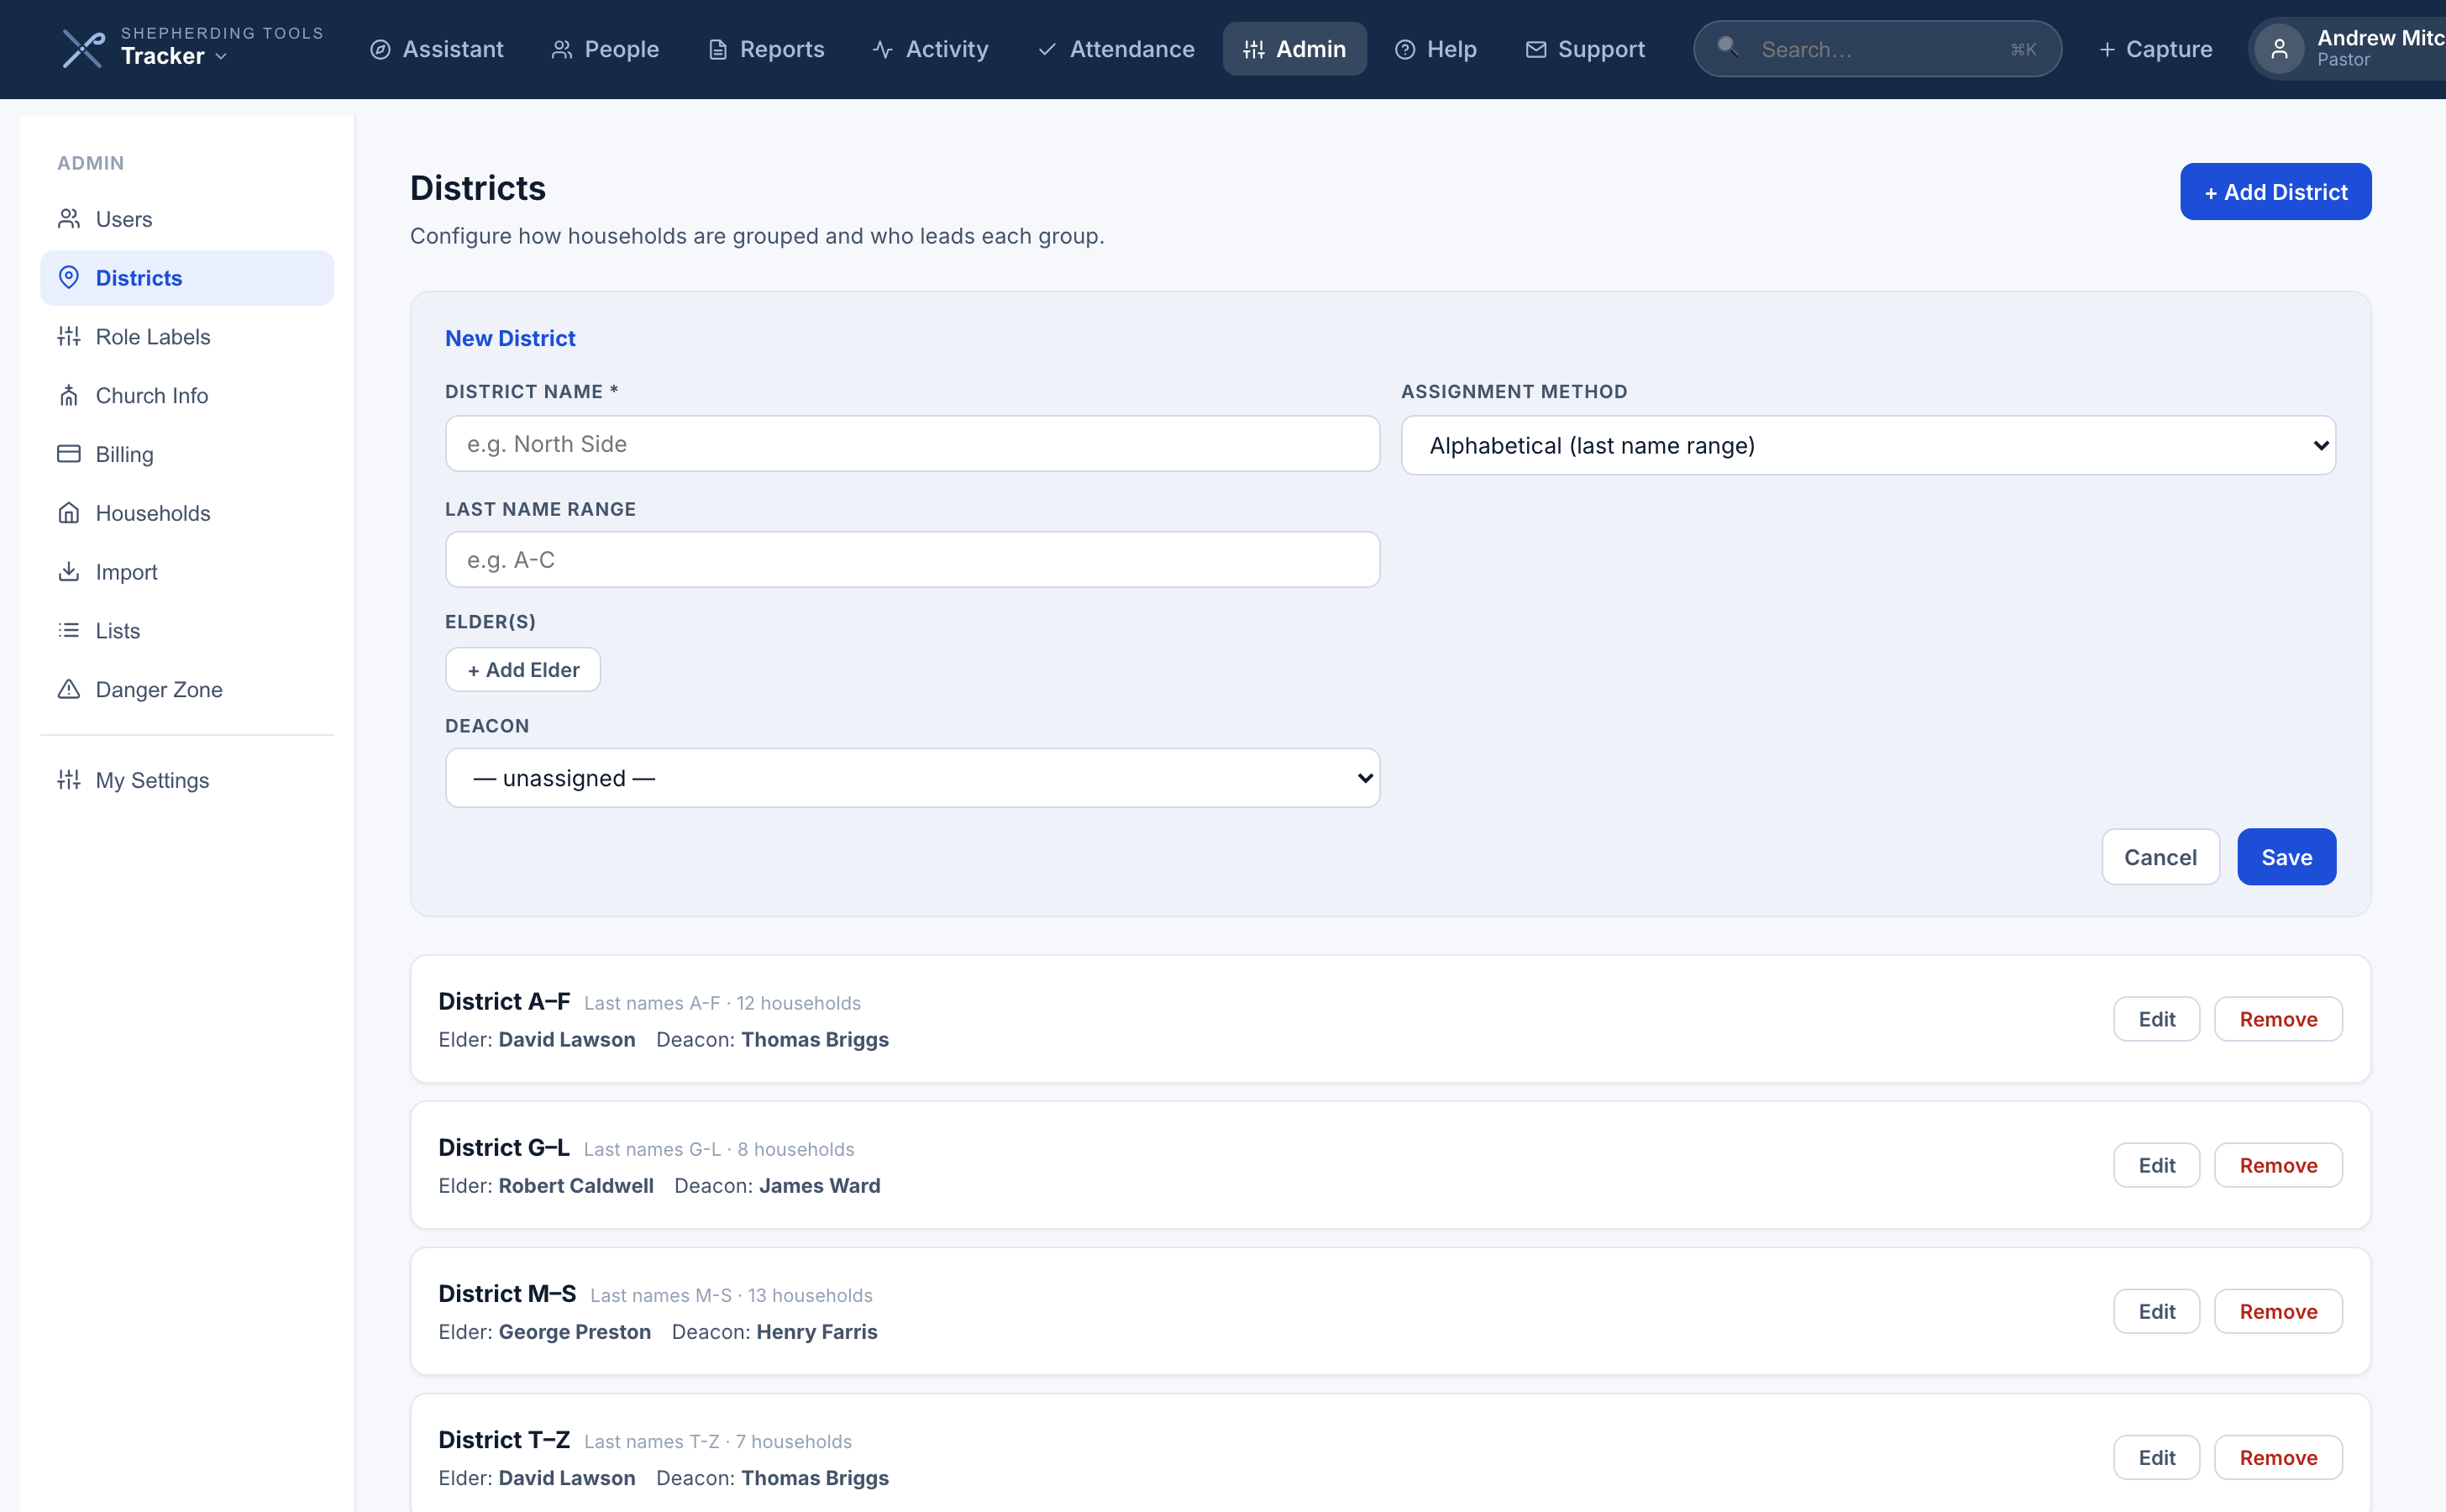
- Open Admin > Districts.
- Click + Add {District} — the button uses your church’s own word for a district if you’ve set one under Role Labels below.
- Enter the district’s name.
- Choose an Assignment Method. There are two:
- Alphabetical (last name range). Enter a range such as A-C and every household whose last name starts inside it belongs to the district. New households join automatically.
- Manual (assign households individually). A tick list of your households appears; tick the ones that belong. Nothing is assigned unless you assign it, which is usually what a small church wants.
- Add one or more elders and a deacon from the dropdowns.
- Click Save.
The new district appears in the list below with its assignment method, member count and named officers. A district can carry more than one elder, and a household can belong to more than one district. To move a single household later, anyone with Edit Household Info can do it from that household’s own profile.
If your church syncs with a church management system, districts can be filled from a tag or a profile field there instead. That is set up in the ChMS card, not here. See Import below.
Households
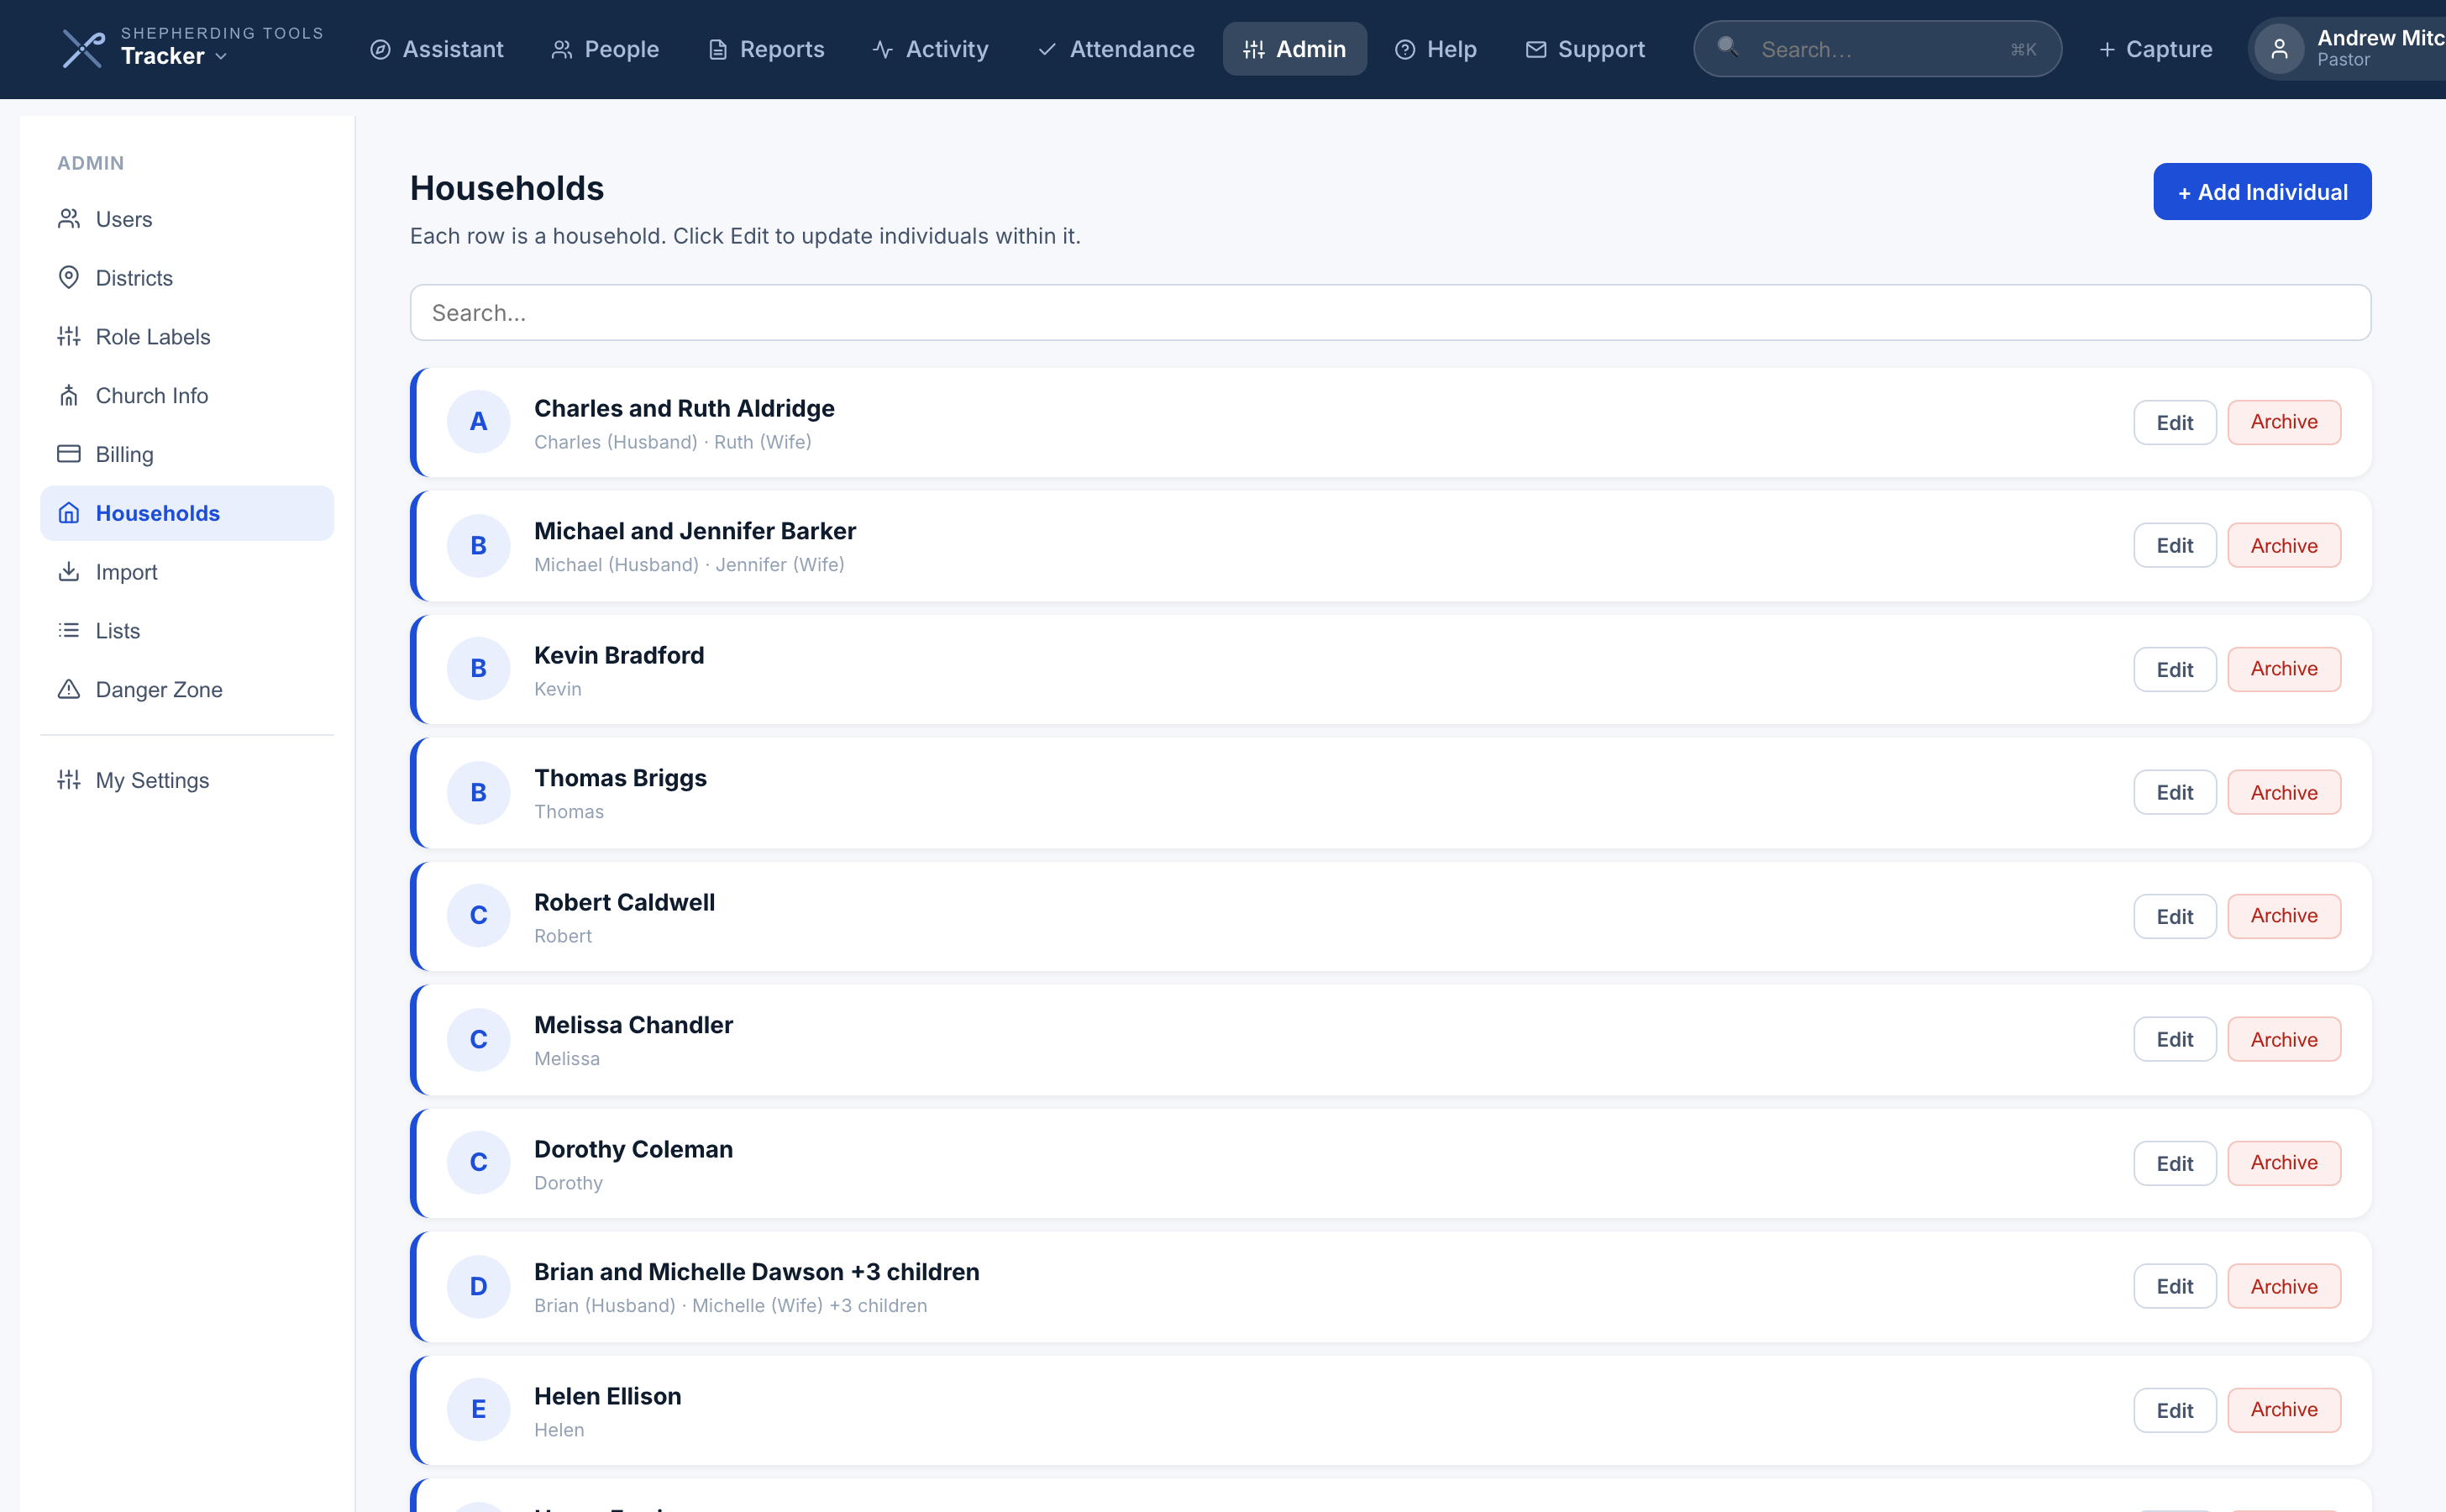
Add, edit, and archive households from here. Each household has a shared last name, phone, email and address, plus its member records.
- Open Admin > Households.
- To add a household, see Adding a Household above — the same form opens from here.
- To take a household out of your active numbers without deleting it, edit the household and tick Mark household as inactive.
The inactive checkbox says it itself: “(leaves your coverage numbers; the Assistant still suggests contact)”. Marking a household inactive hides it from your dashboard numbers — it does not hide it from the Assistant’s queue. If an inactive household still shows up as a suggested contact, that is by design.
Moving a person between households, splitting a household in two, and deleting a member entirely are covered next.
Moving a person to a different household, or splitting a household in two
To move a person:
- Admin > Households, click Edit on the household the person is currently in.
- Beside that person’s name, click Move ↗.
- In the panel that opens, search for and pick the destination household, then confirm.
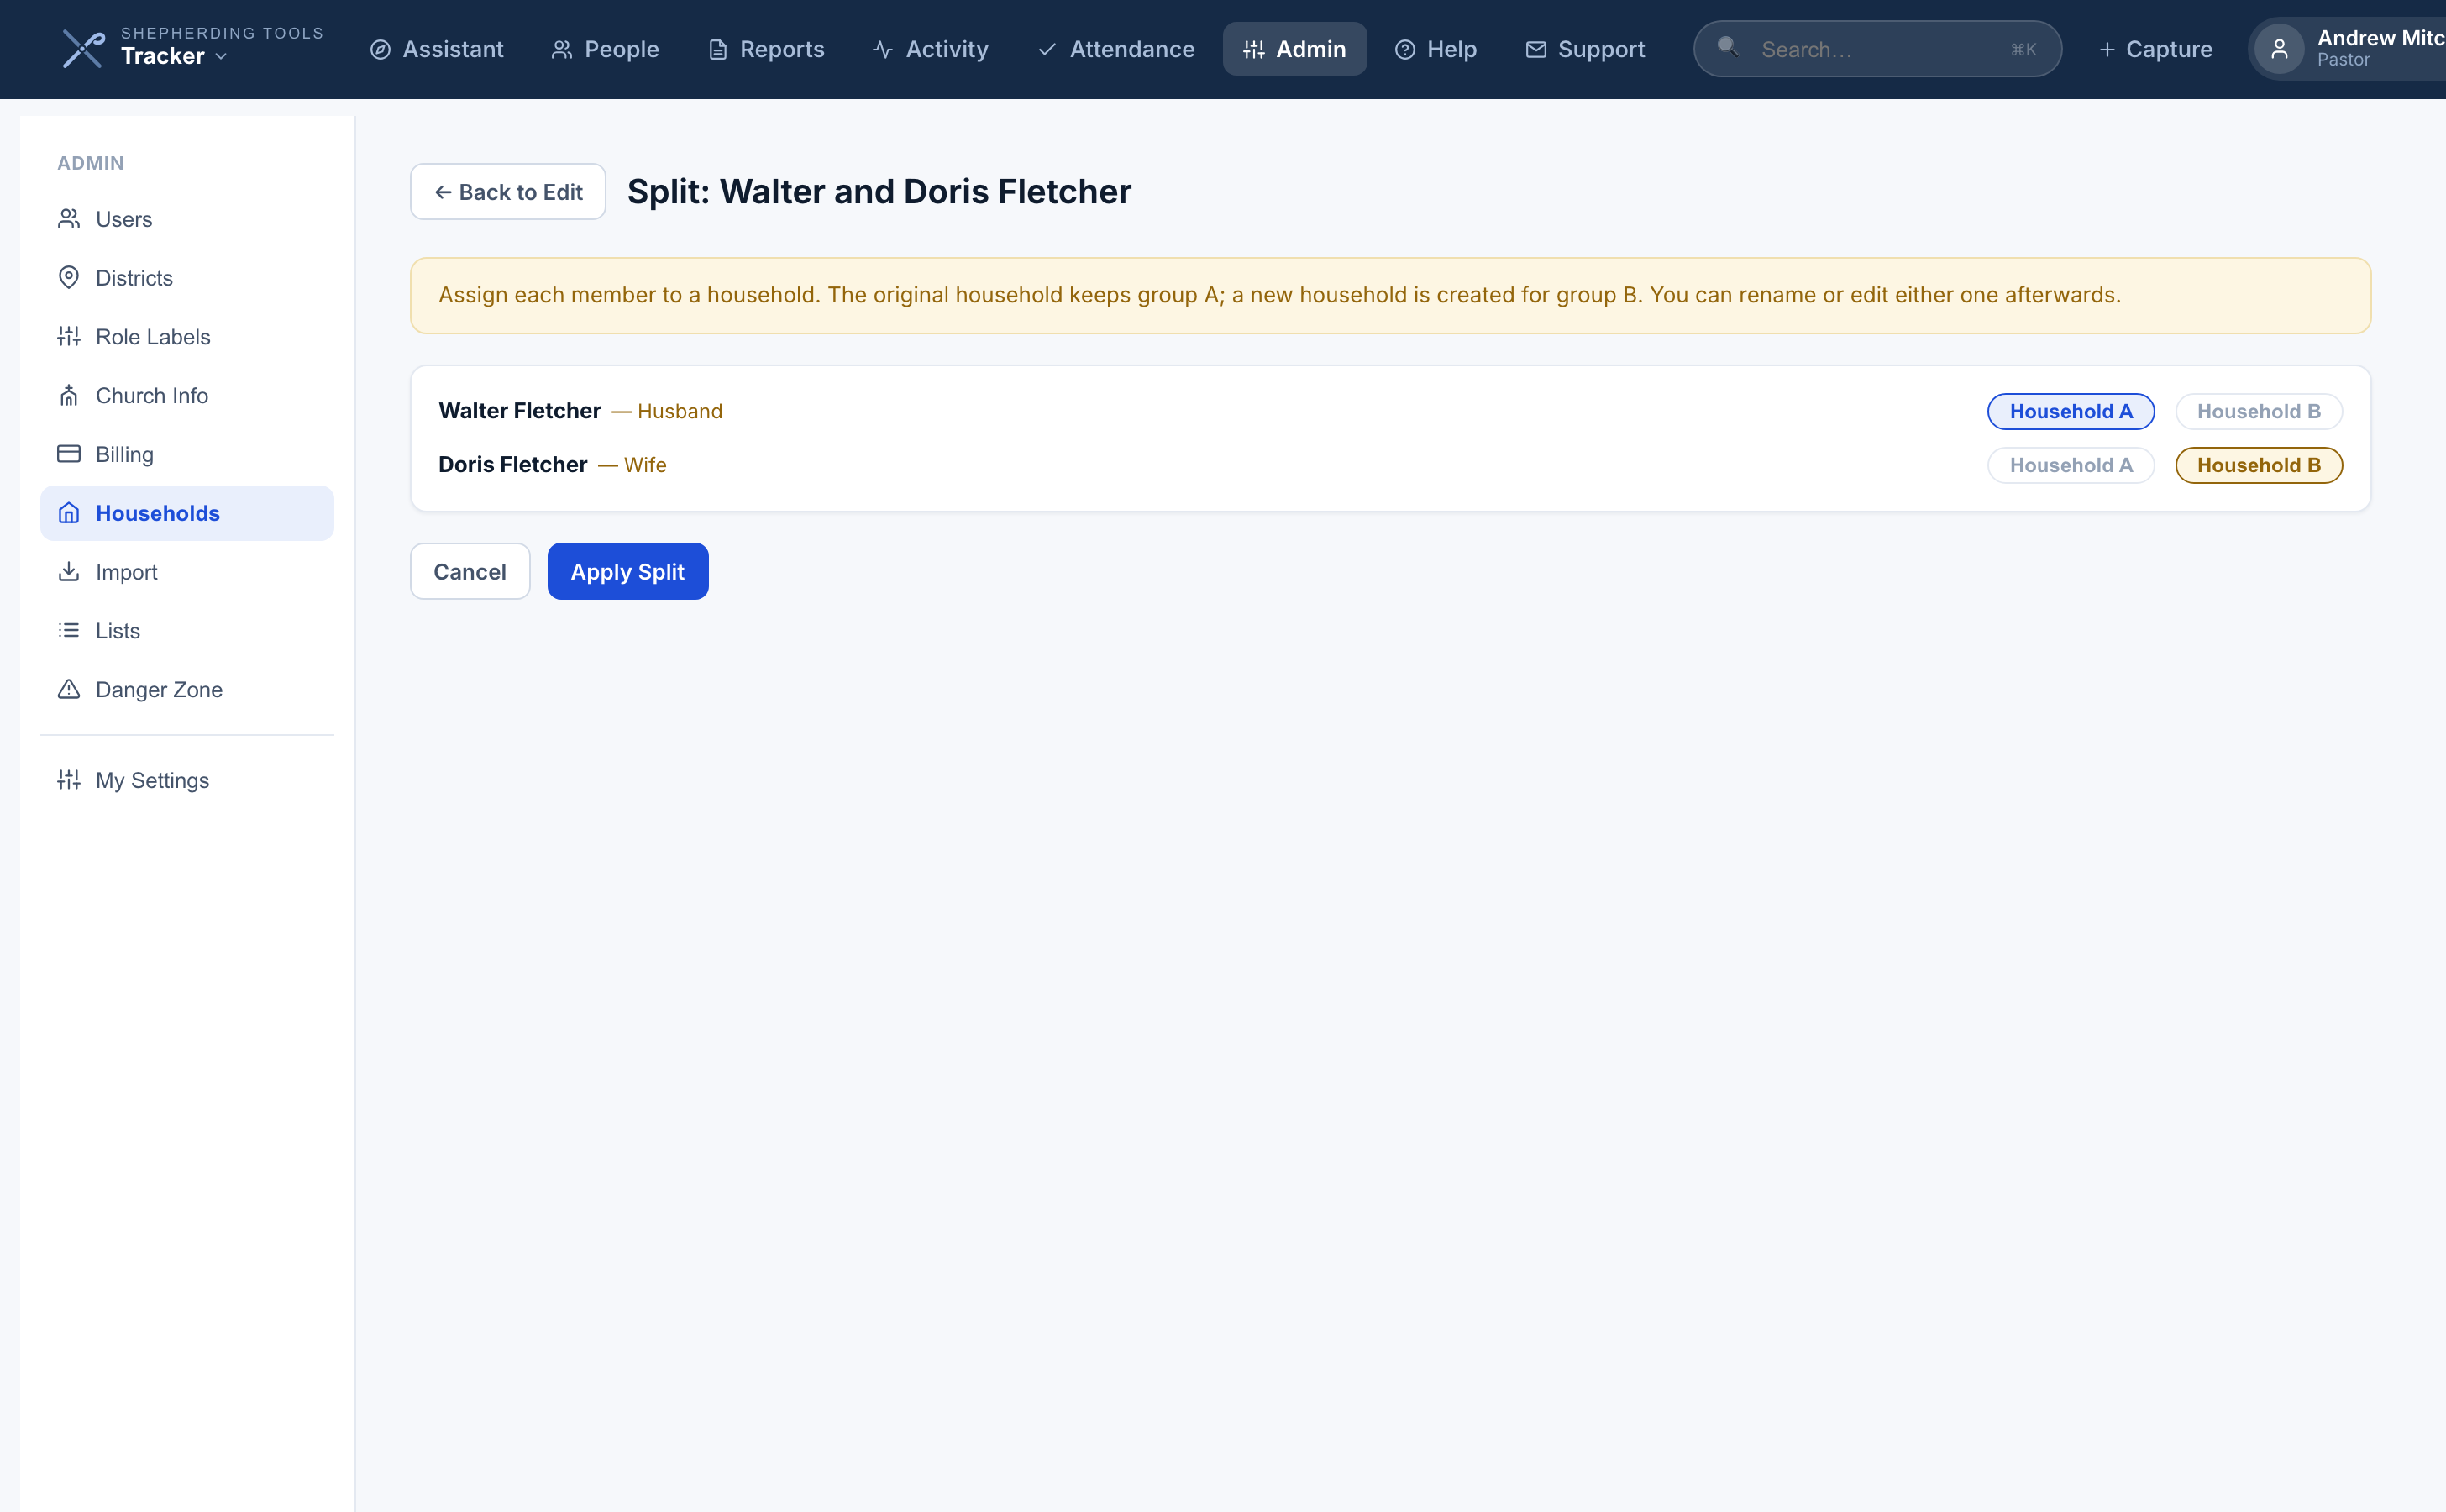
To split a household:
- Admin > Households, click Edit on the household.
- Click ✂ Split Household — only shown once the household has more than one member.
- For each member, choose Household A or Household B.
- Click Apply Split.
After a move, the person disappears from the old household’s edit form and appears in the destination household. After a split, two households exist where one did.
There is no “merge two households” feature — Split is the only structural operation besides Move, and it only divides, never combines. If two households need to become one, move every member of the smaller one into the larger one, one at a time.

Deleting a member entirely
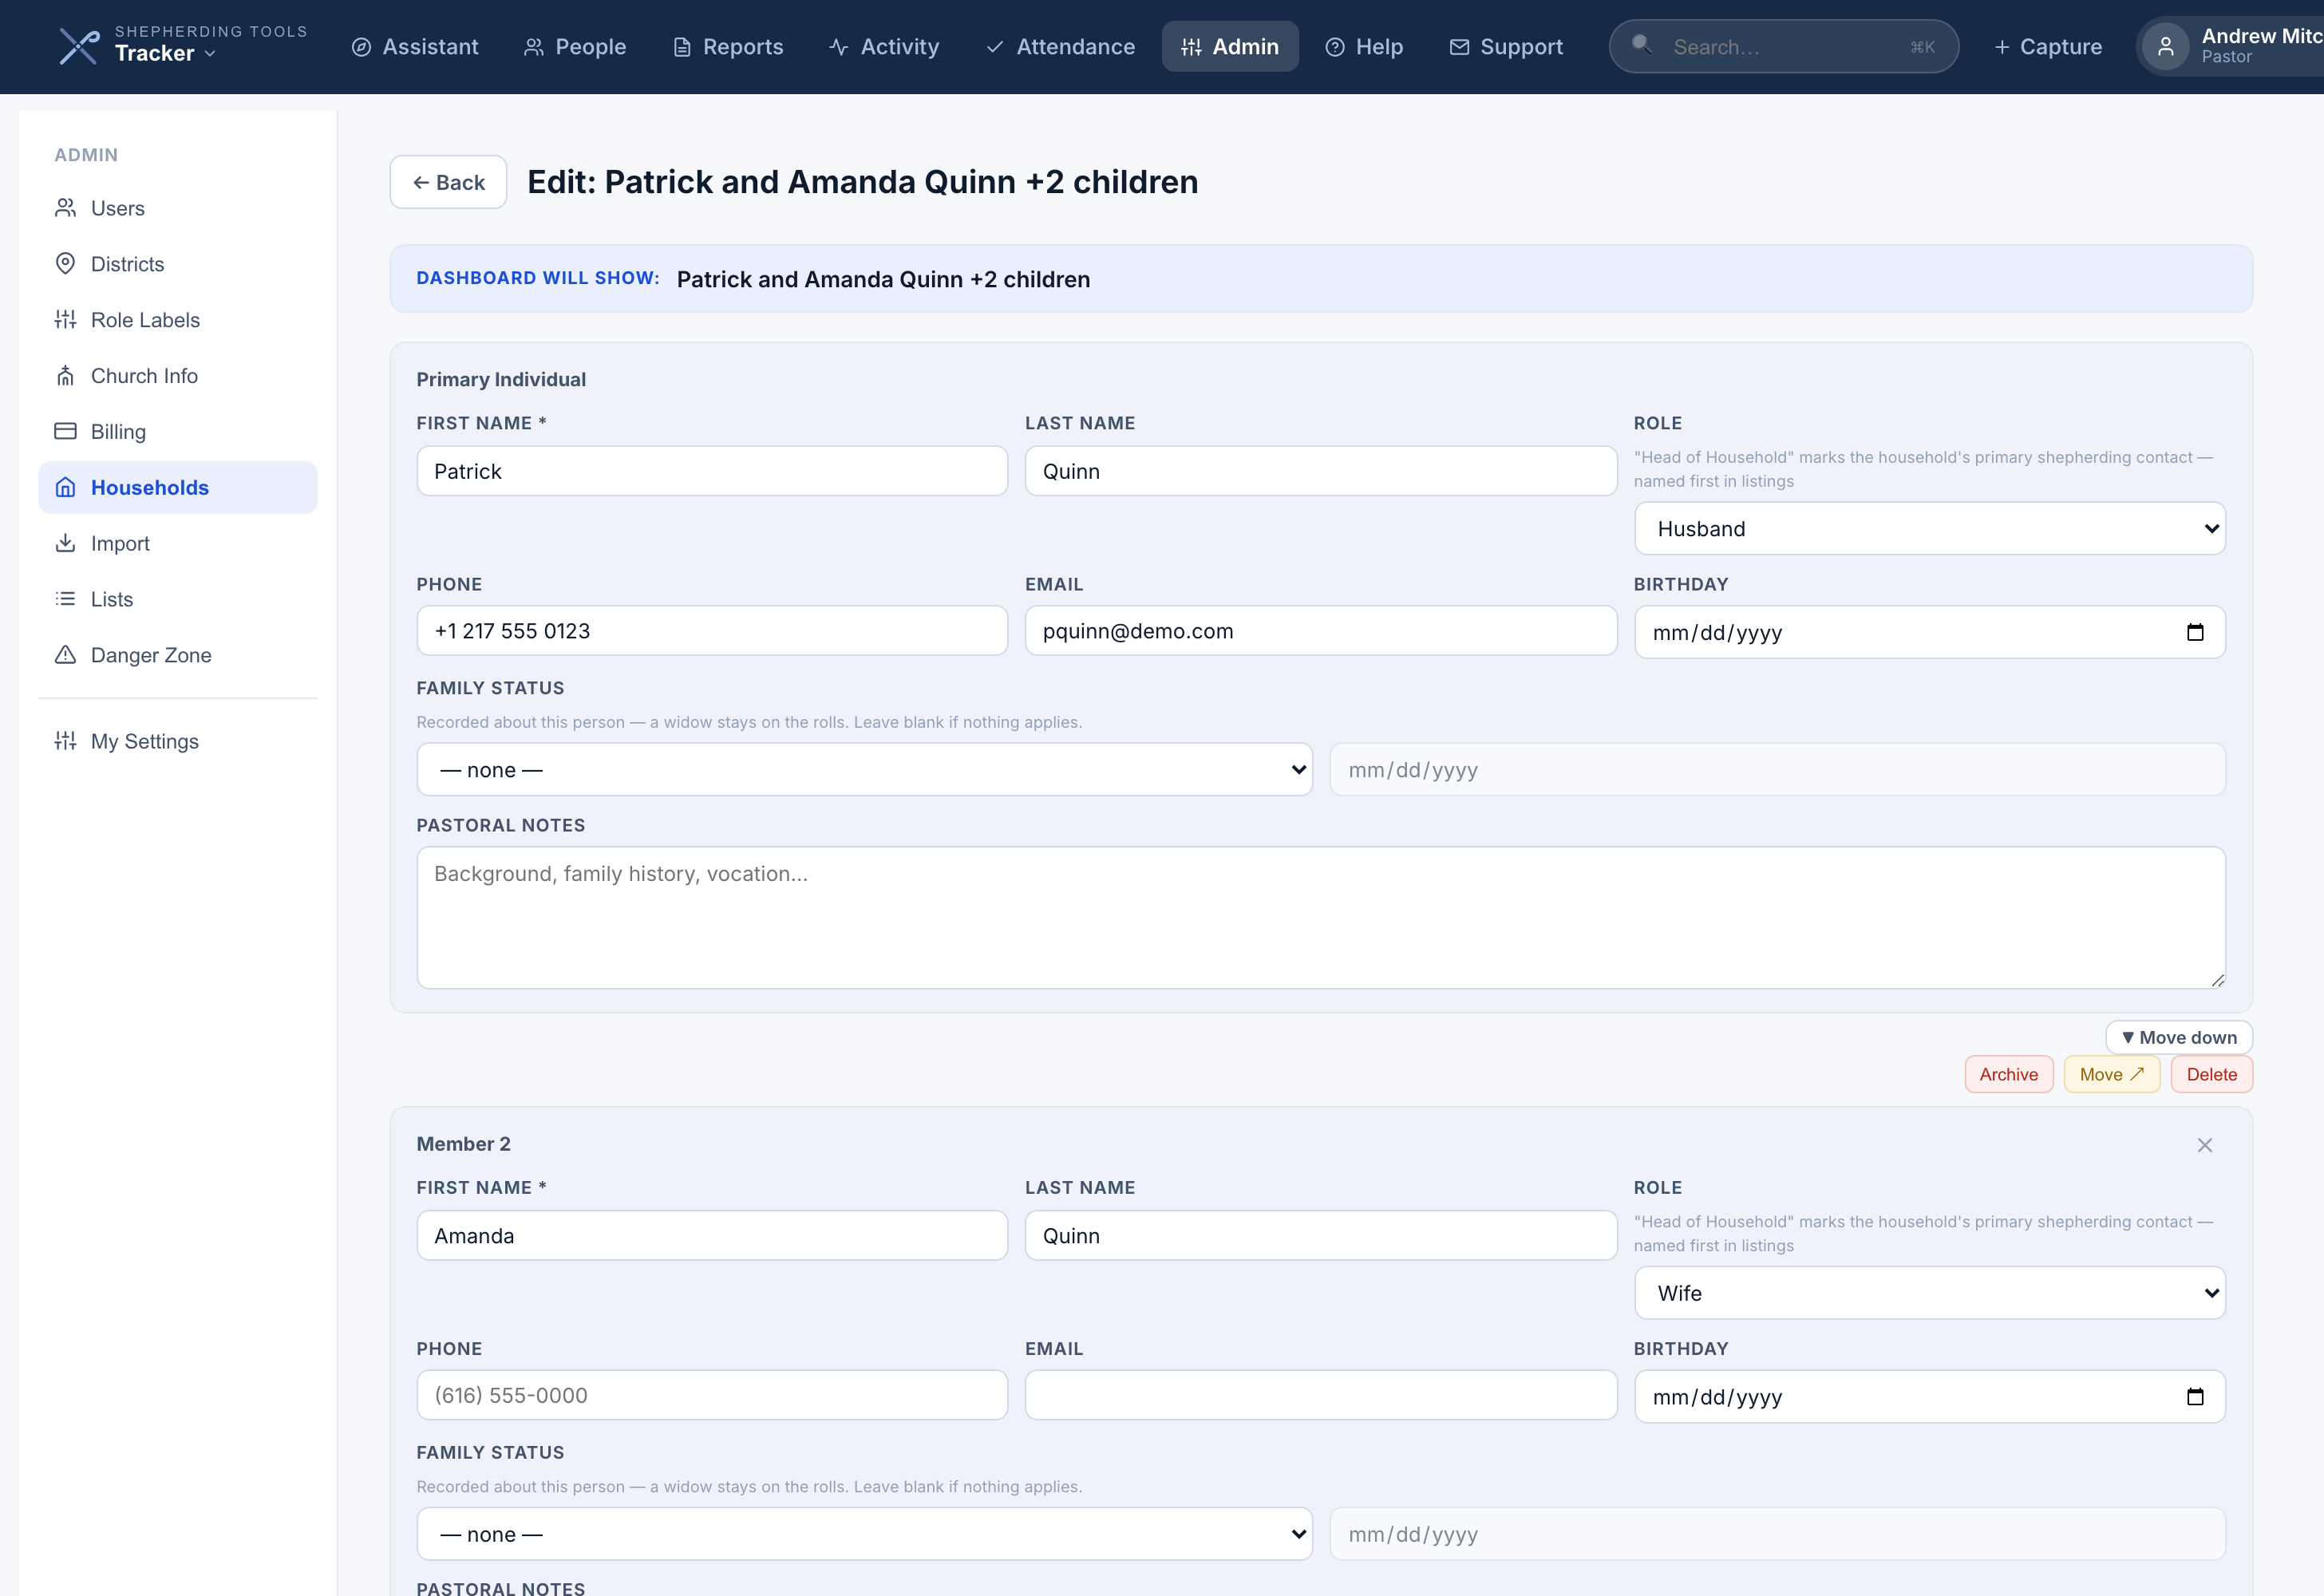
This is different from archiving, which is reversible and keeps a person’s pastoral history. Deleting a member removes the person record itself.
- Admin > Households, Edit the household.
- Beside the member, click Delete.
- Confirm in the panel that appears.
The member is gone from the household immediately. This is separate from Archive. If the member can sign in to Tracker, the panel says so, because deleting the record removes that sign-in too. You can’t delete your own record.
Use this only for a record entered by mistake or an exact duplicate — never for someone who died or transferred. Archive is for that, and it keeps their pastoral history. Deleting a member is permanent and removes their contact history along with them.
Role Labels
Two editors share this section.
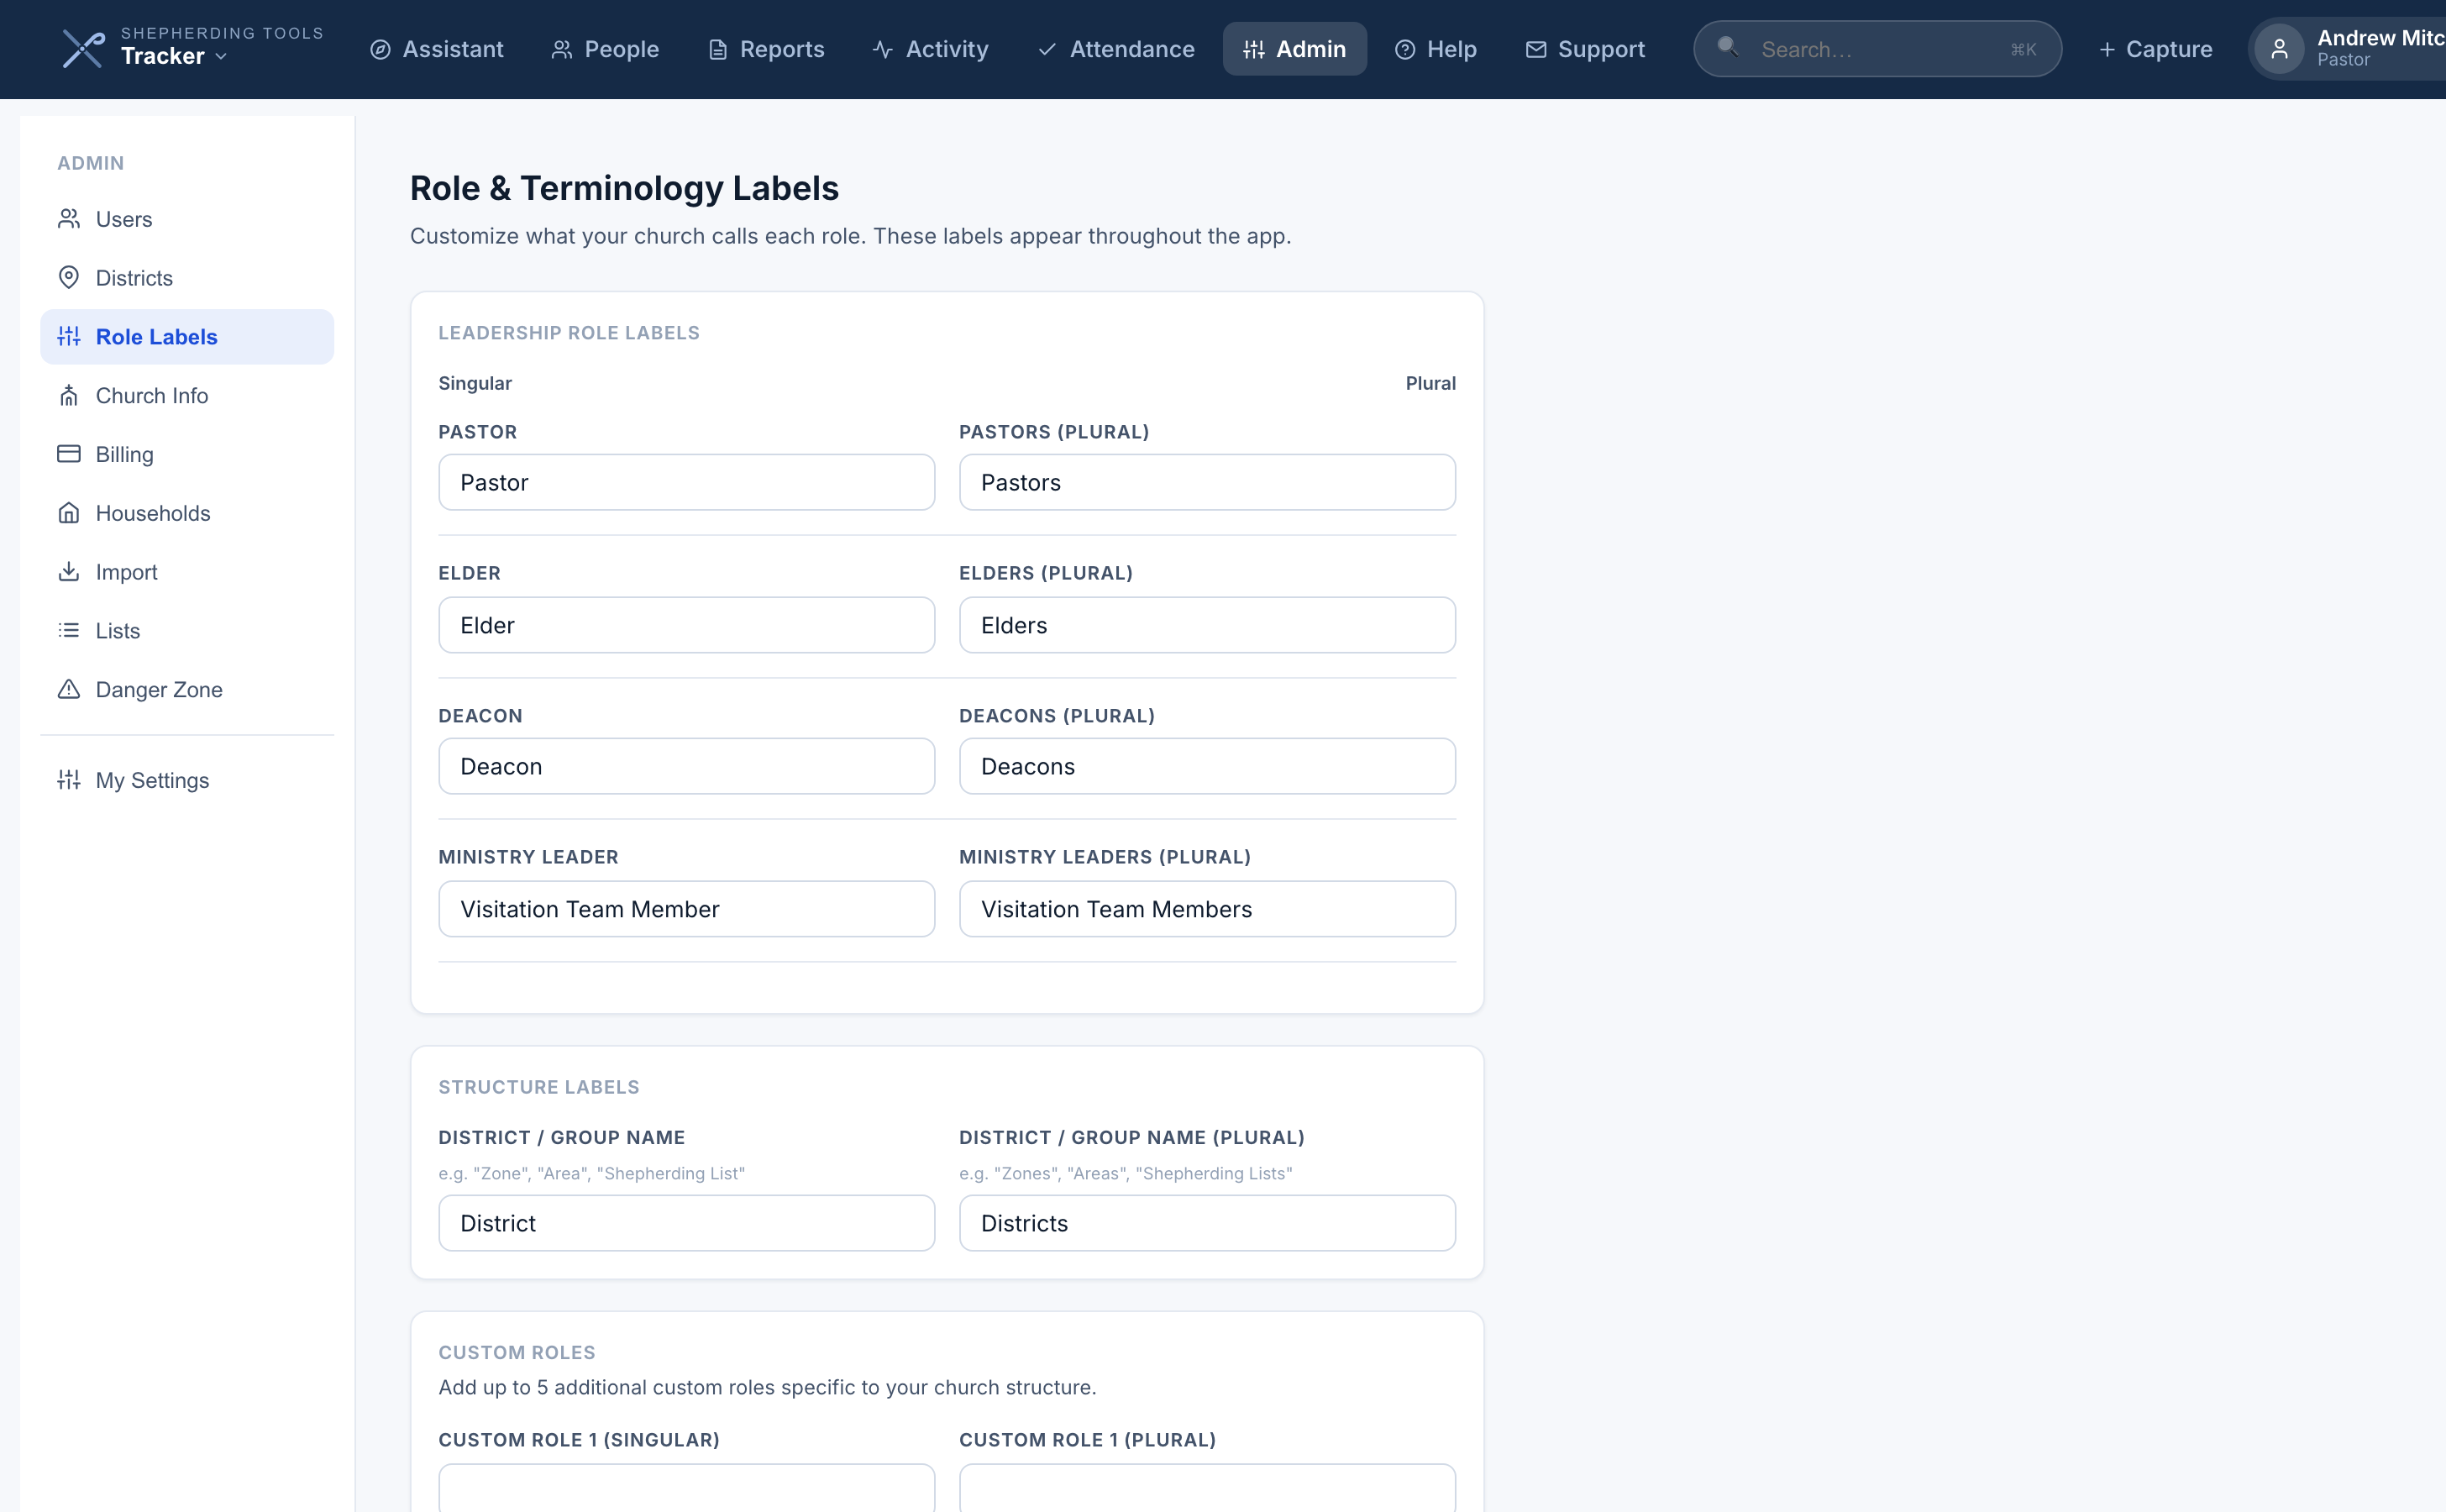
Role & Terminology Labels renames the offices to match your church’s language.
- Open Admin > Role Labels.
- Under Leadership Role Labels, set the singular and plural for Pastor, Elder, Deacon and Ministry Leader.
- Under Structure Labels, set your District / Group Name and its plural — each field carries an example hint (“Zone”, “Area”, “Shepherding List”). Set both boxes: a church that calls them Shepherding Groups wants the singular on a household page and the plural on a heading.
- Under Custom Roles, up to five are available if your church has offices ours does not name — each one has its own singular and plural field.
- Click Save Labels.
These labels appear throughout the app.
The screen itself warns: “Changes here affect display labels only — they don’t change how permissions work.” Renaming Elder to something else does not change who has elder-level access.
Member Roles edits the dropdown you see when adding someone to a household. It starts from our defaults, and you can rename, remove or add entries.
Church Info
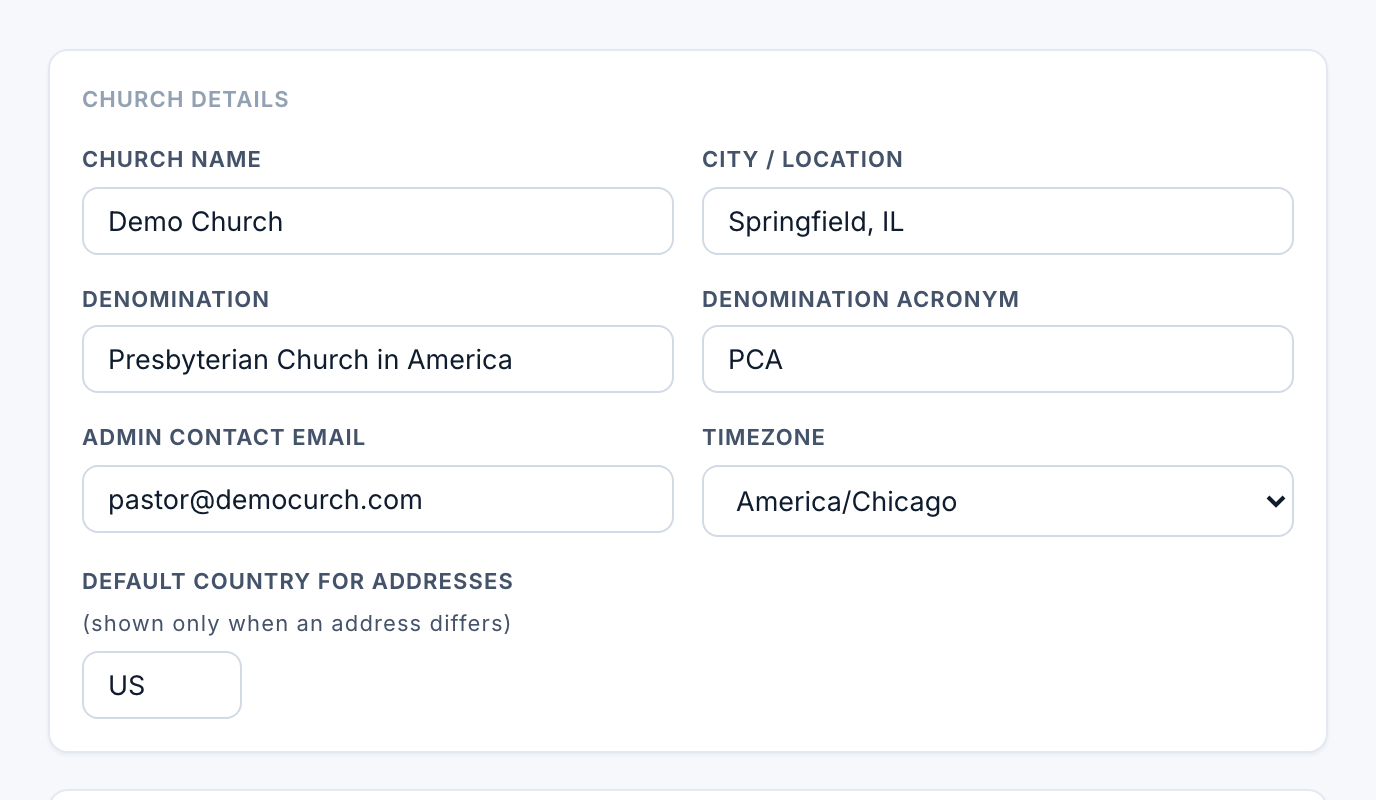
Your church’s basic info, and the numbers that decide when a household turns yellow, orange or red.
- Open Admin > Church Info.
- Under Church Details, set your Church Name, City / Location, Denomination, Denomination Acronym (e.g. “PCA” — a separate field from Denomination), Admin Contact Email, Timezone, and Default Country for Addresses.
- Under Contact Cycle Thresholds, set Recent up to (days), Check-In up to (days), and Overdue up to (days) — each must be larger than the one before it. These three numbers are what colors a household green, yellow, orange or red everywhere in the app, and a live color preview updates as you type.
- The Worship Attendance card is on this page too. See Worship Attendance above.
- Click Save Settings.
The church name appears in the app header, in email notifications, and at the top of printed reports. The timezone decides when your Assistant emails go out.
Billing
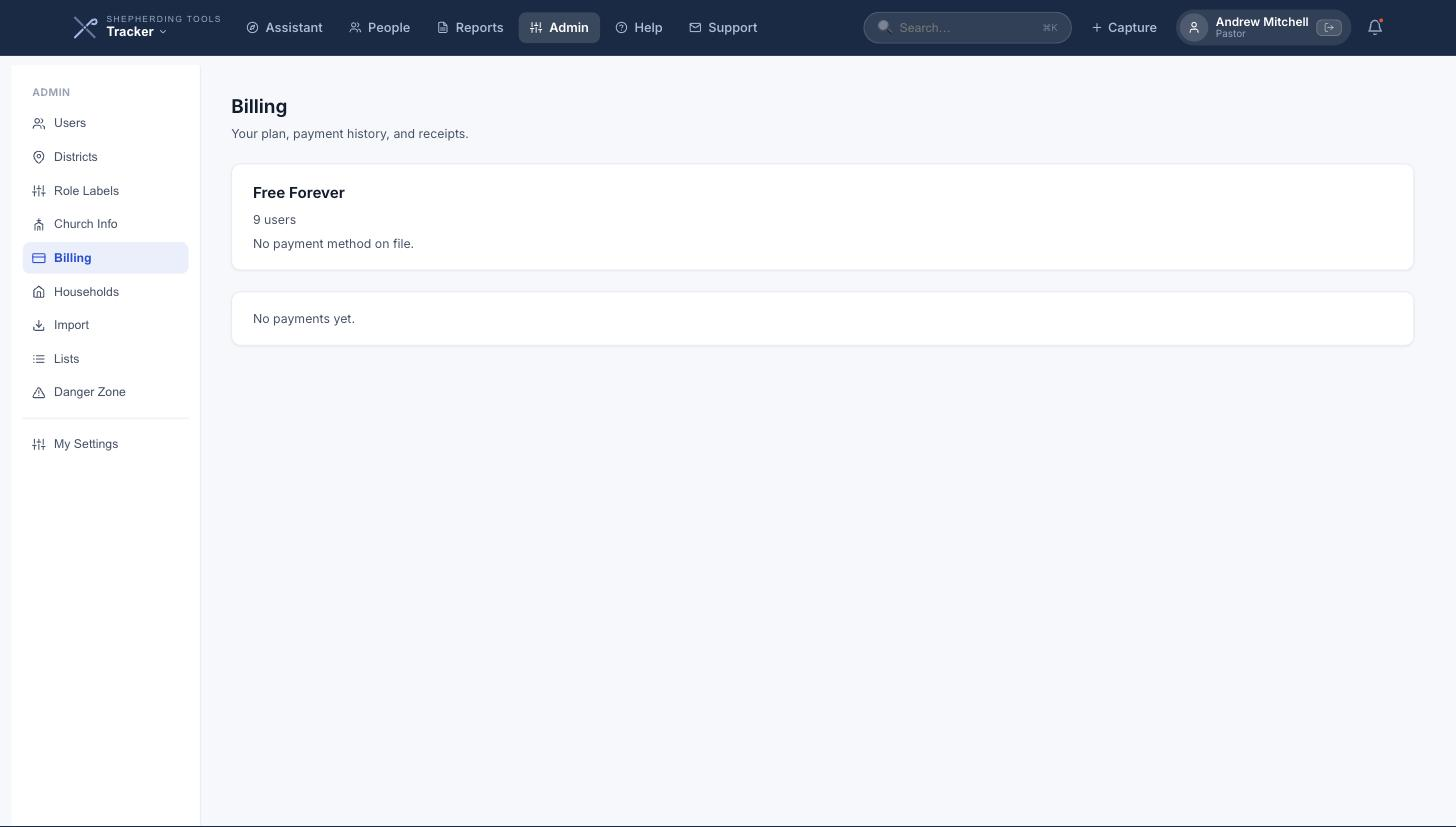
Your plan, how many of its seats are in use, your renewal or expiry date, and the card on file. Below that is every payment, each with a Receipt (PDF) link. Manage Subscription is where you change plan, update your card, or cancel.
Import
Admin > Import has two tabs: Spreadsheet and ChMS Integration.
The spreadsheet import takes Excel, CSV or OpenDocument files in any column order.
- Drop your file on the page, or click Choose File.
- On Map Columns, tell Tracker what each column is. It shows sample values from your own file so you can see what you are matching. Map at least Household Last Name and First Name.
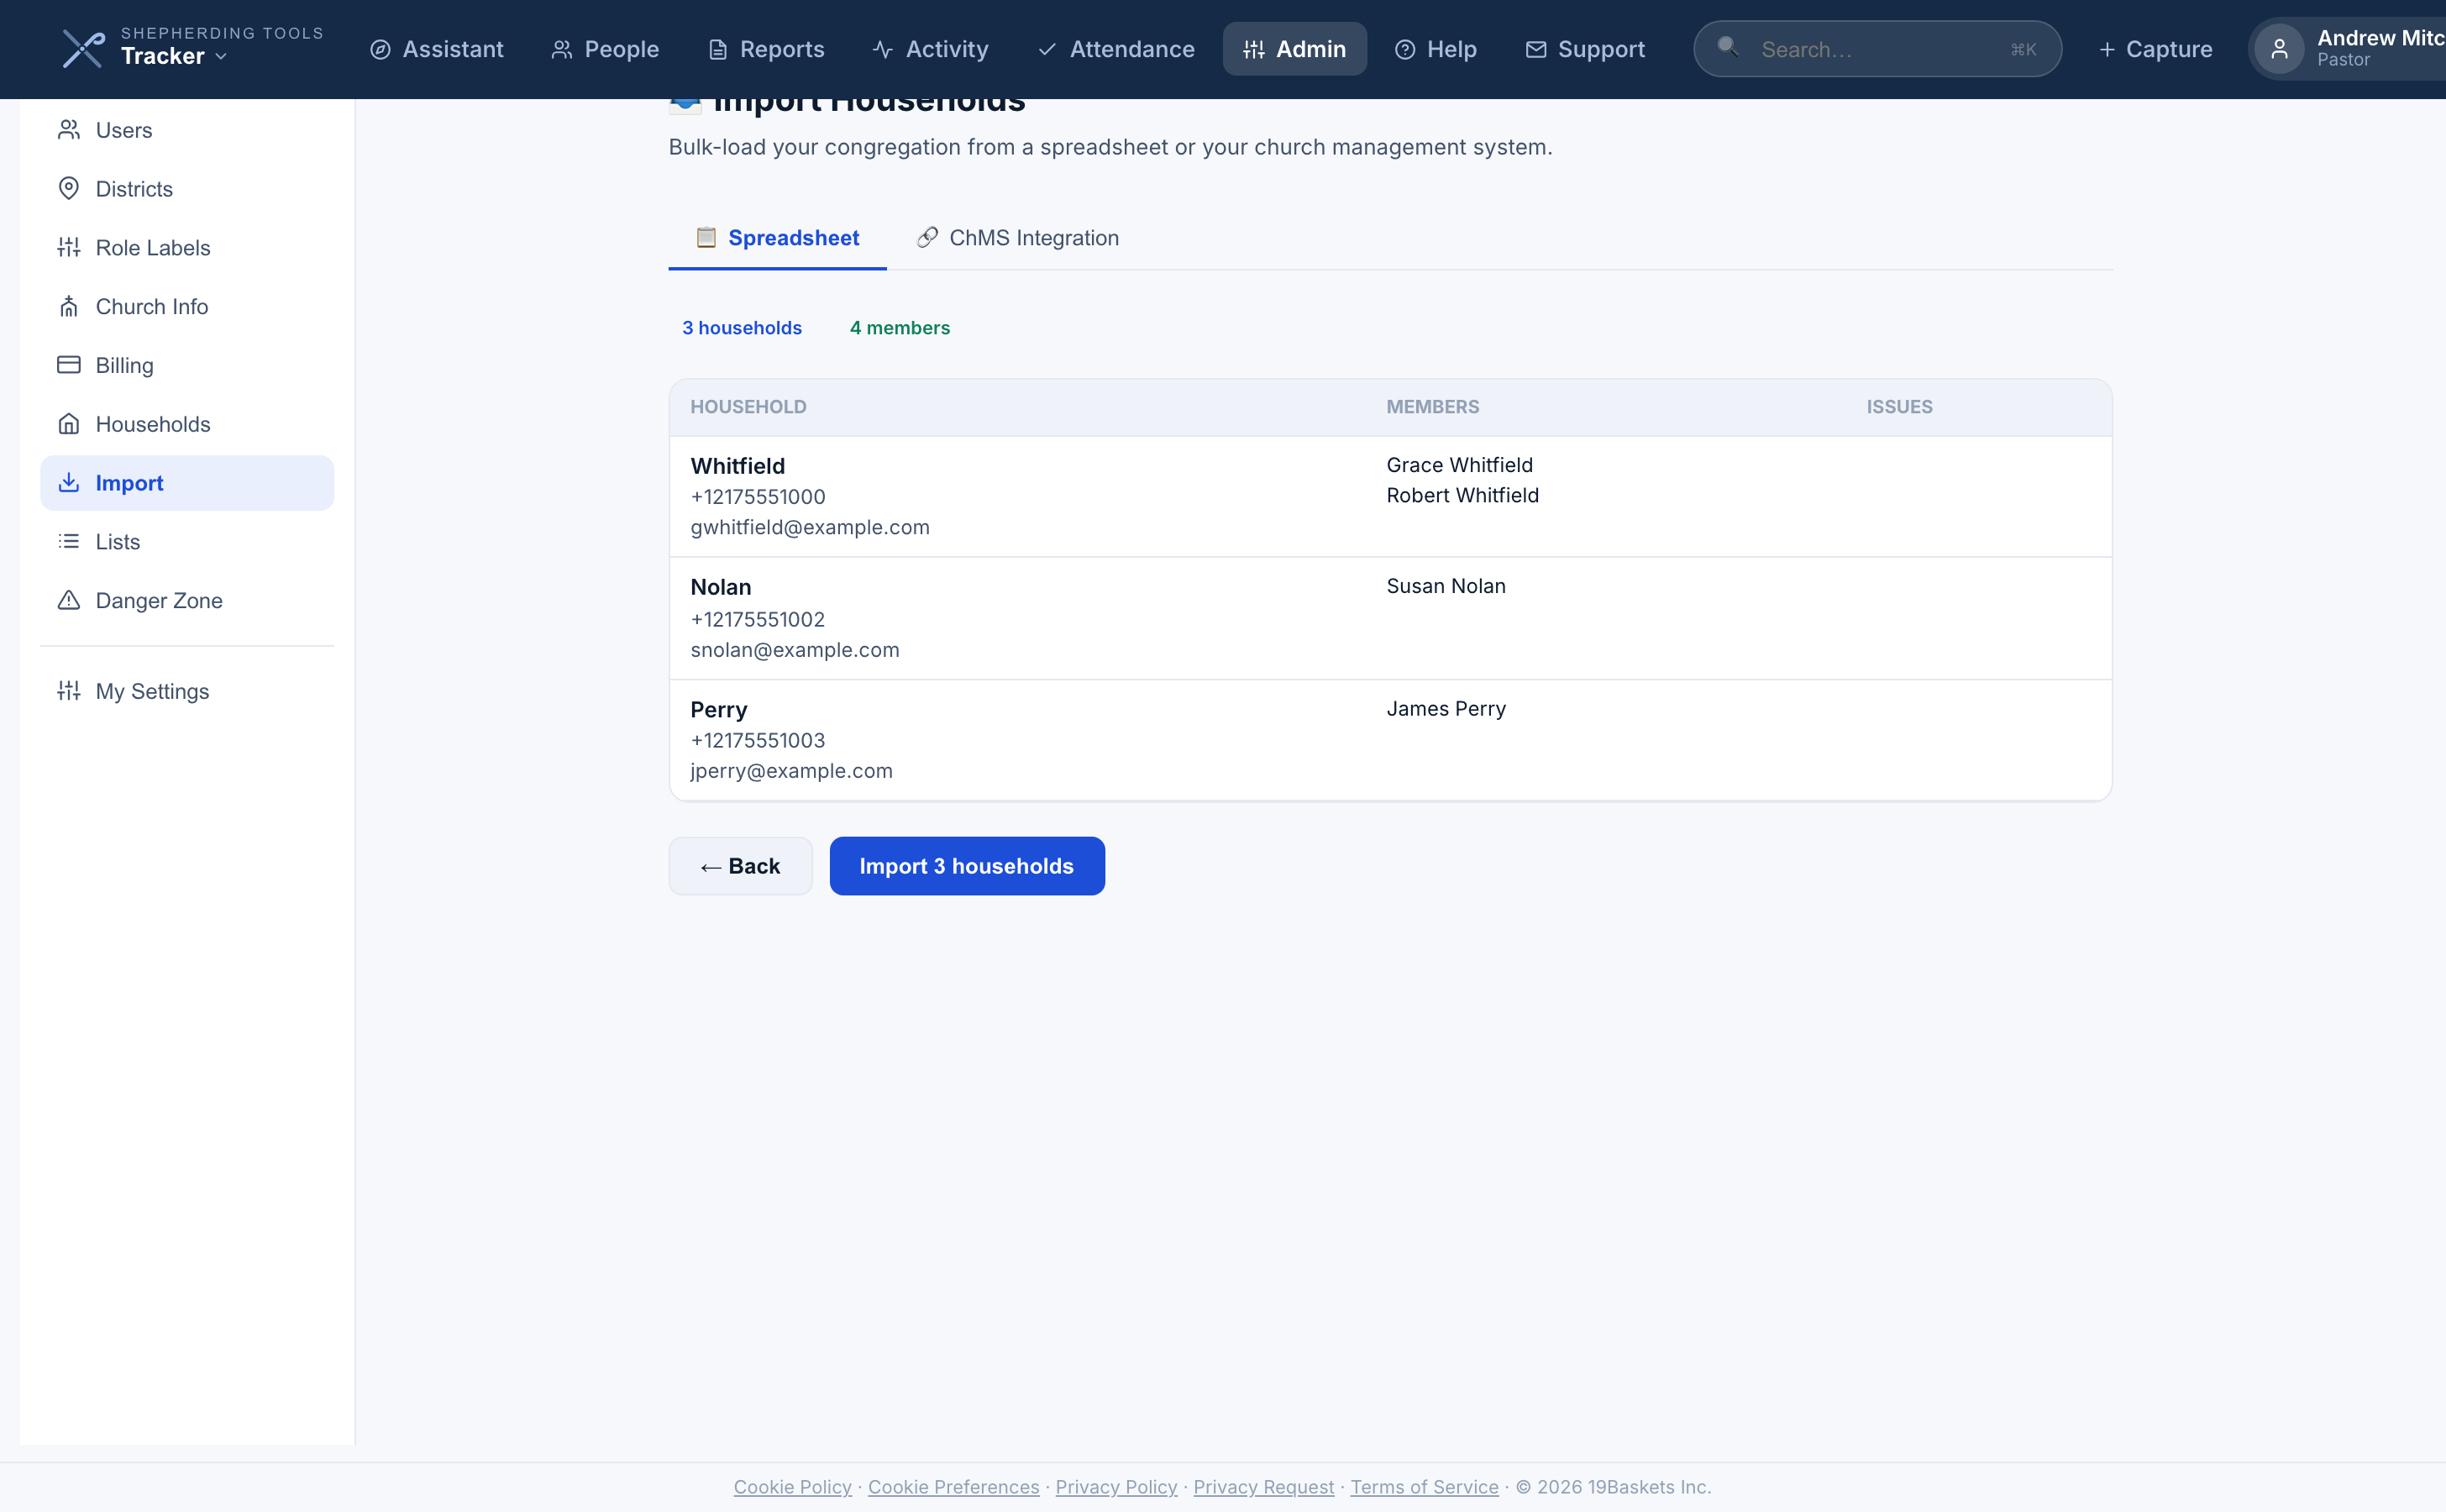
- Click Preview Import and check how the rows have been grouped into households. Split any group that has been joined wrongly.
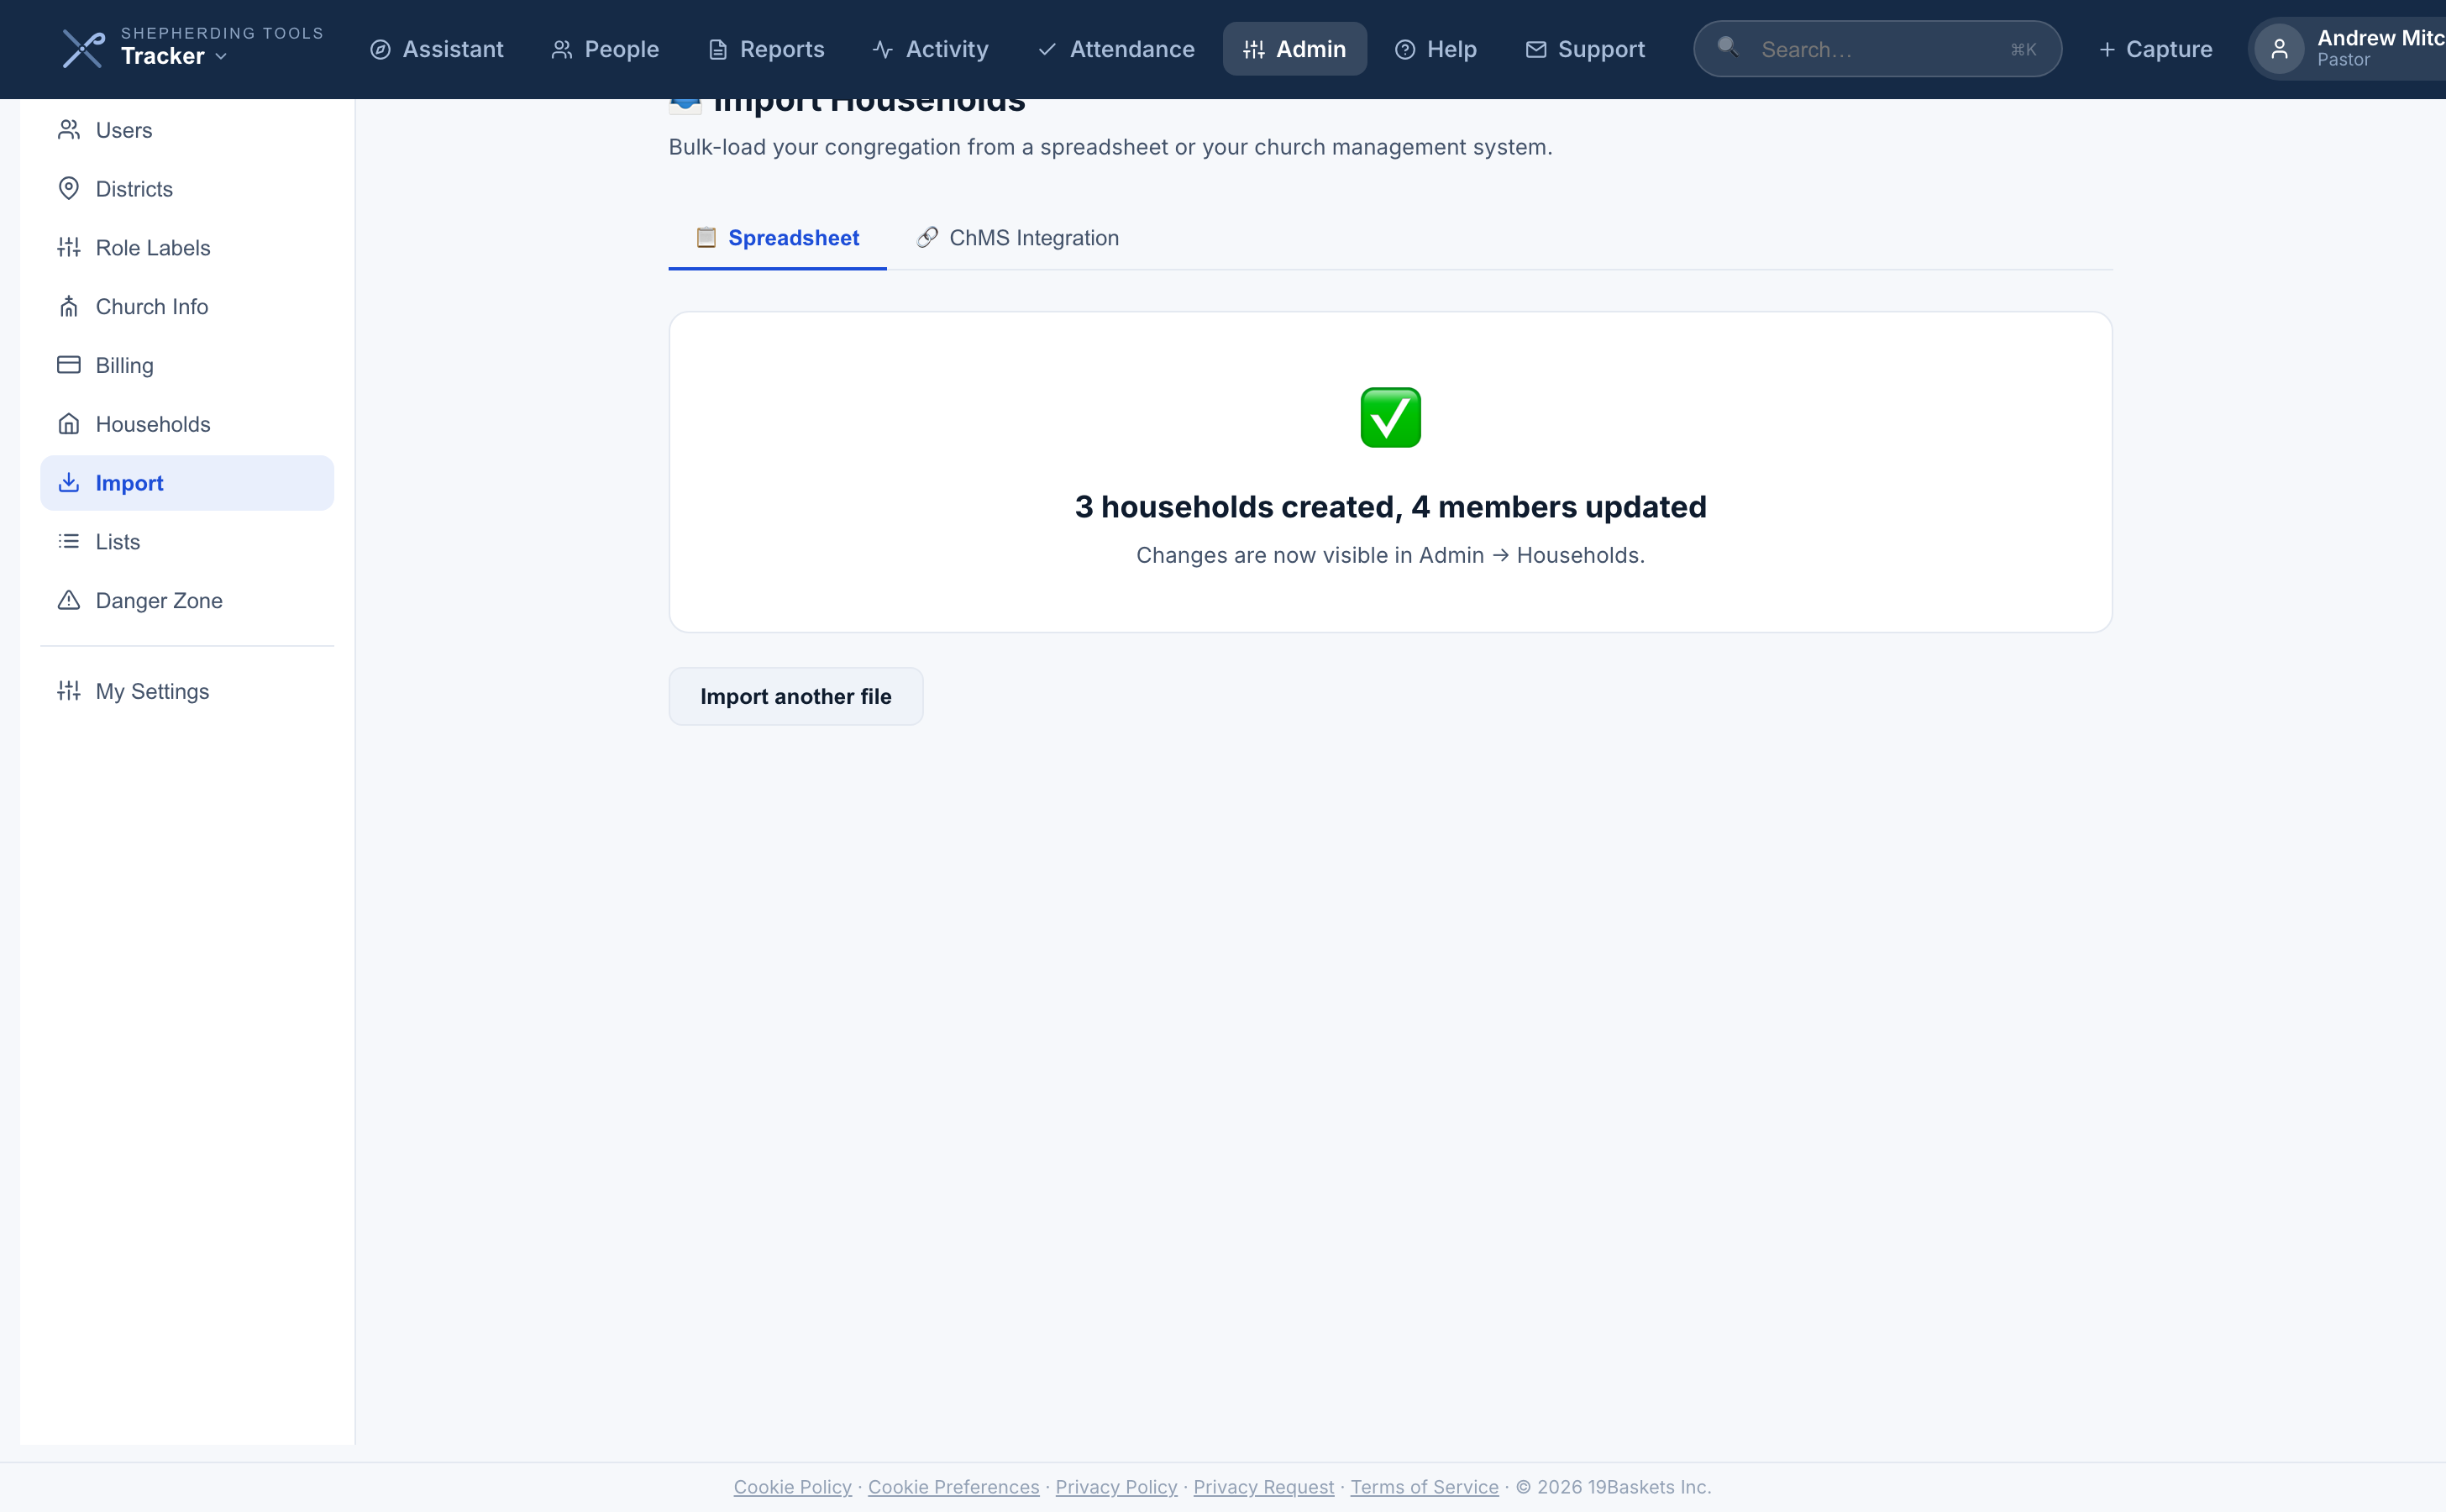
- Import, and read the results summary.
No file yet? Download a starter template gives you the right columns. If what you have is a PDF, a Word document or a photo directory, use Request staff import and we will do it for you.
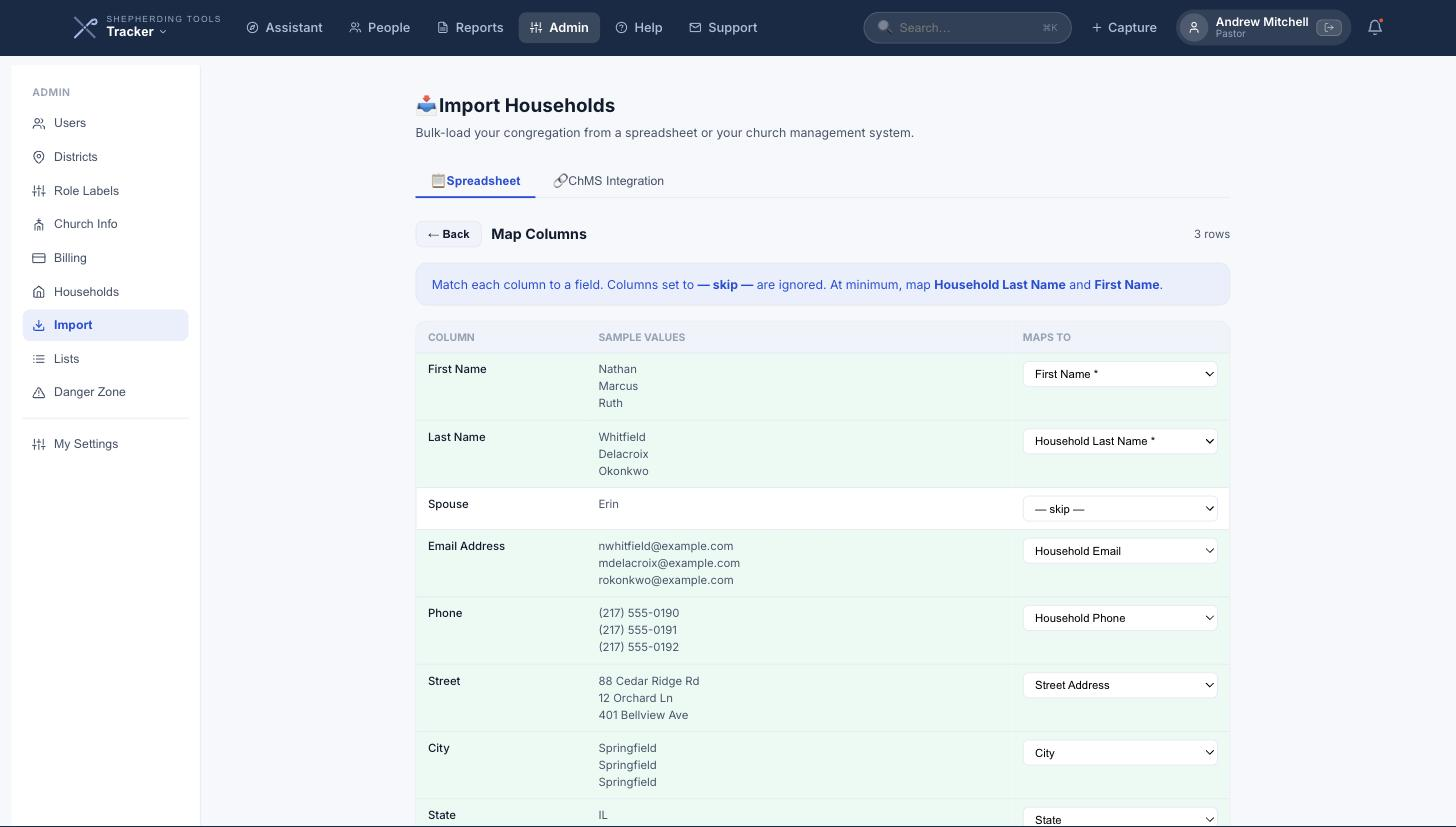
If your file has no Household ID column, people with the same last name and the same street address go into one household, so two families who share a surname but live at different addresses come in as two. Rows with no address are grouped by last name alone.
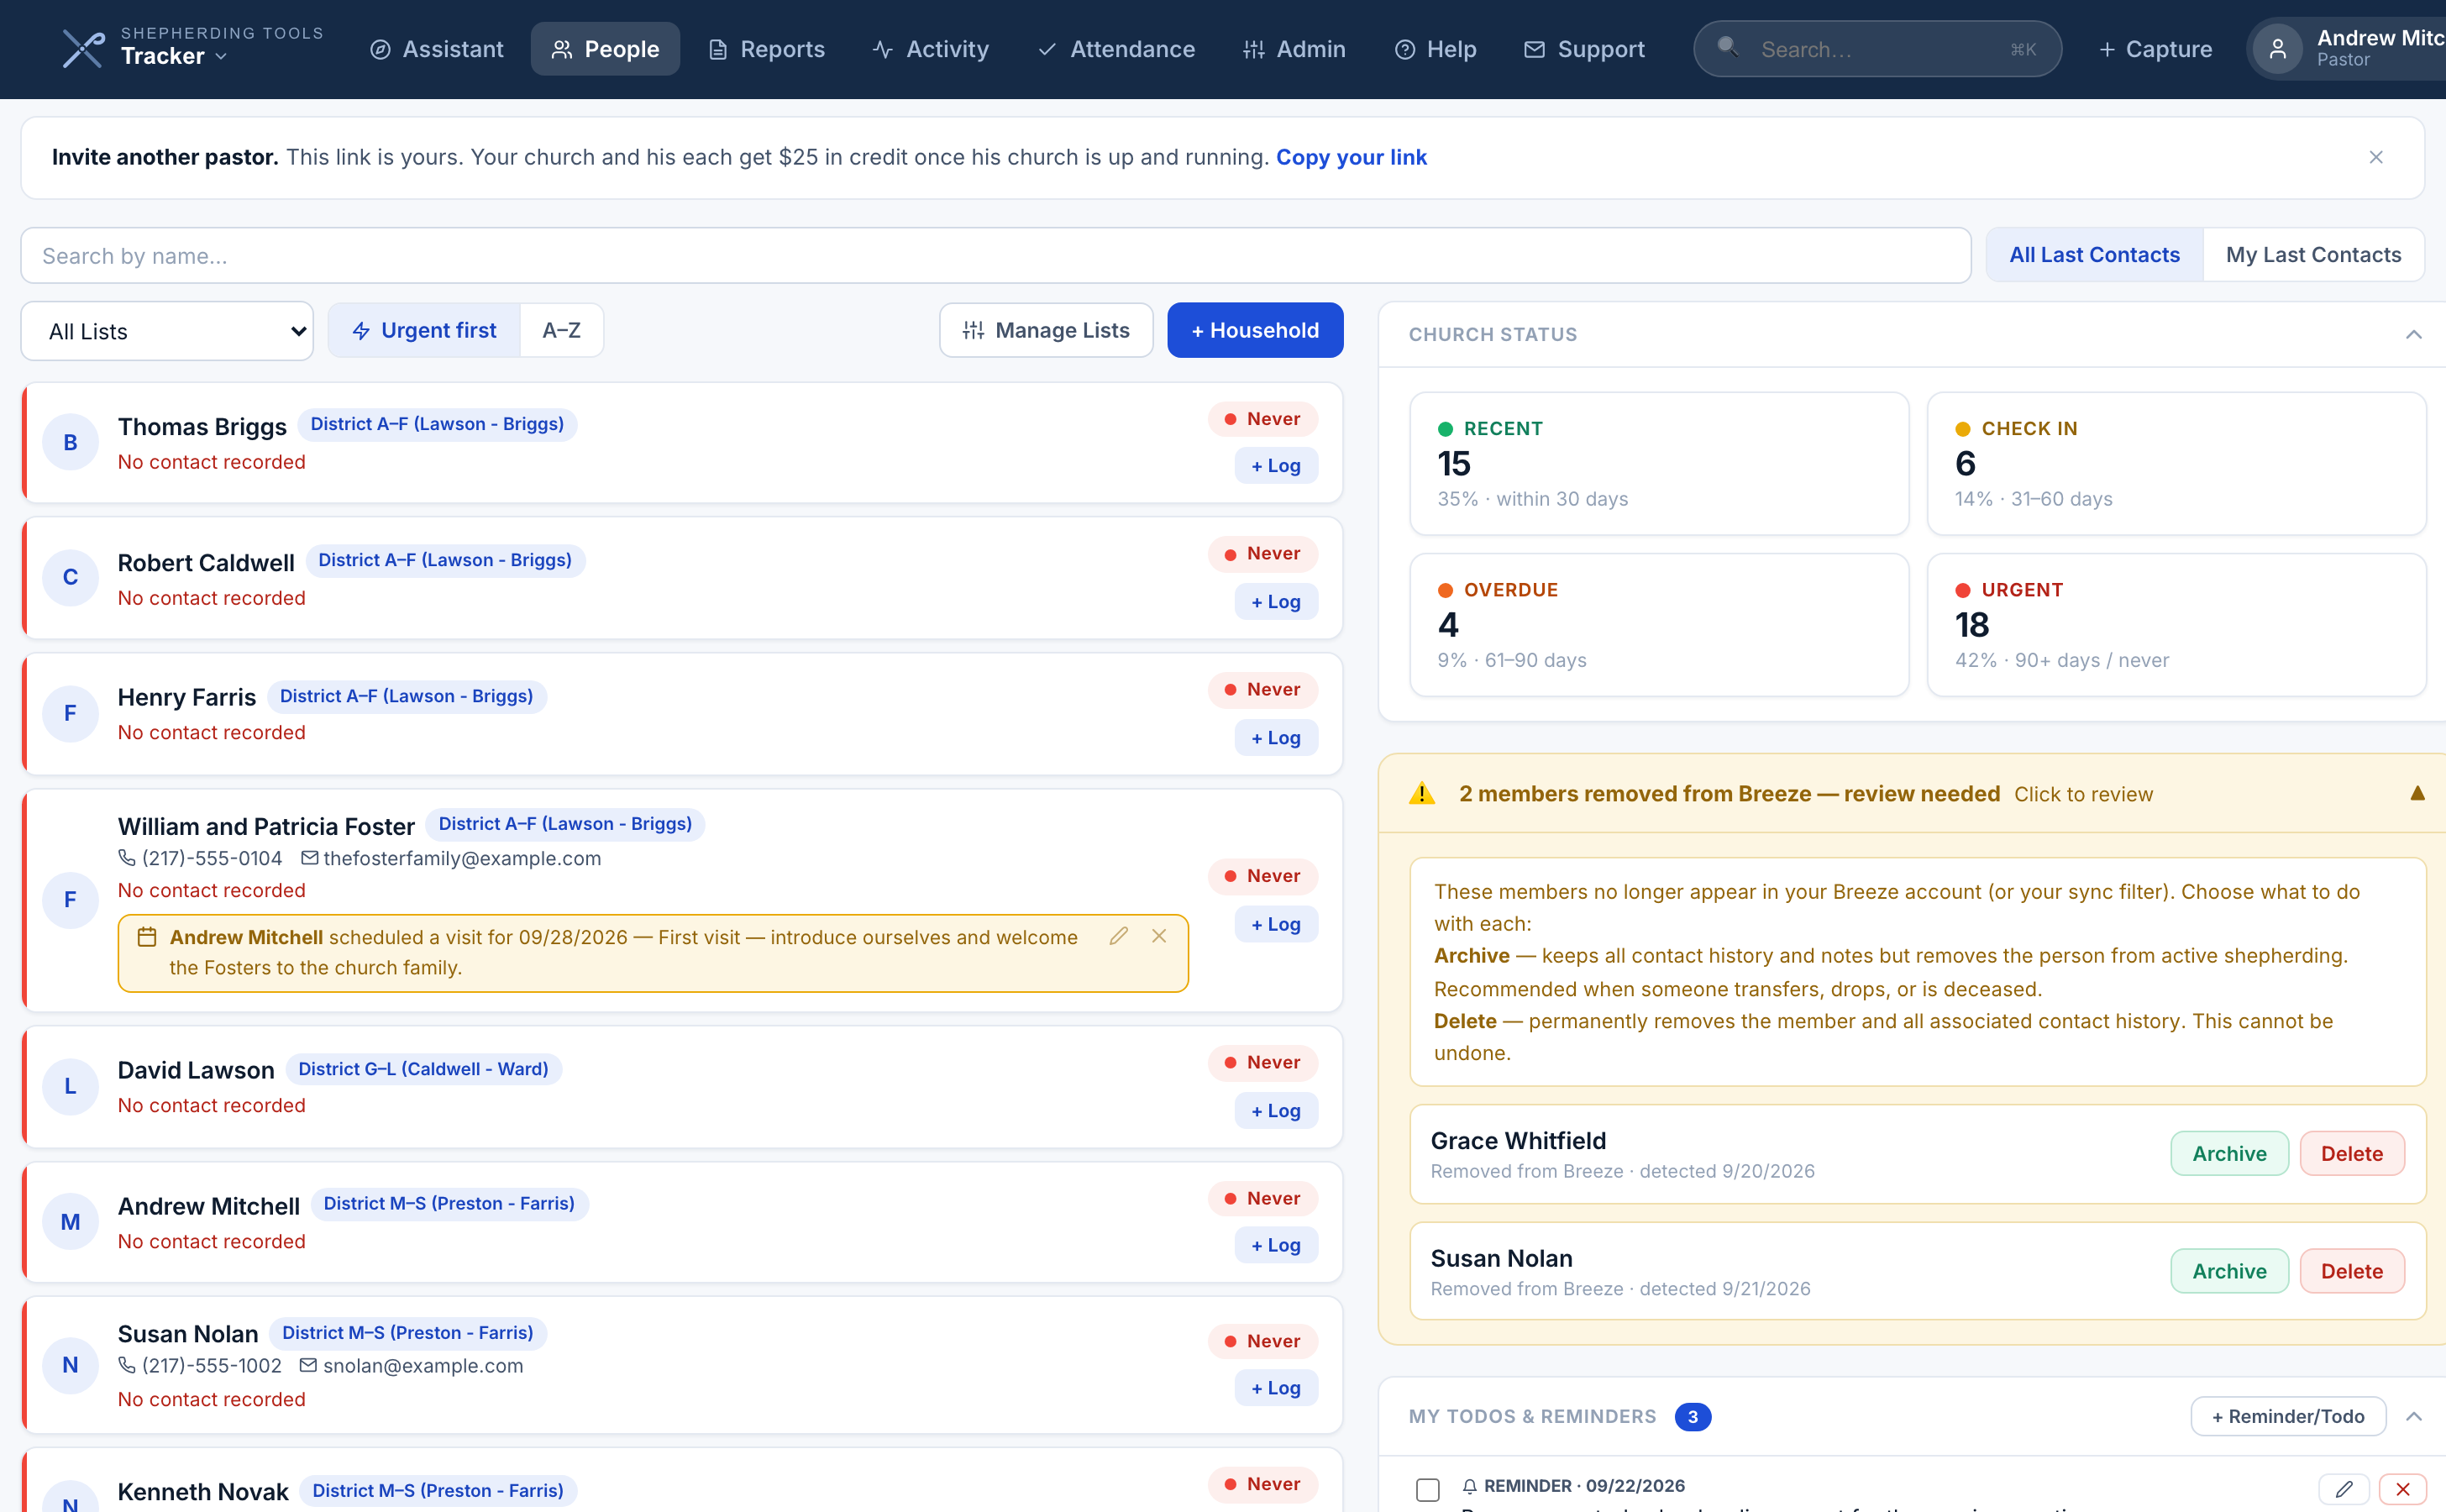
When a ChMS sync (below) no longer sees a person, Tracker does not delete him. A banner reading “N members removed from {Breeze/Planning Center/Elvanto} — review needed” appears on the People page, visible to administrators only.
Expand the banner to see each person, with two choices per row: Archive — keeps all contact history and notes but removes the person from active shepherding, recommended when someone transfers, drops, or is deceased — or Delete — permanently removes the member and all associated contact history. The row disappears from the banner once you resolve it. Delete isn’t available for anyone who can sign in to Tracker. Archive that person instead, or remove the login under Admin > Users first.
Delete here is irreversible and destroys contact history, not just the login. If you’re not sure, Archive is the safer choice — it can be undone.
Church management system sync
Tracker syncs with Breeze or Planning Center. One system connects at a time.
- Open Admin > Import, click the ChMS Integration tab.
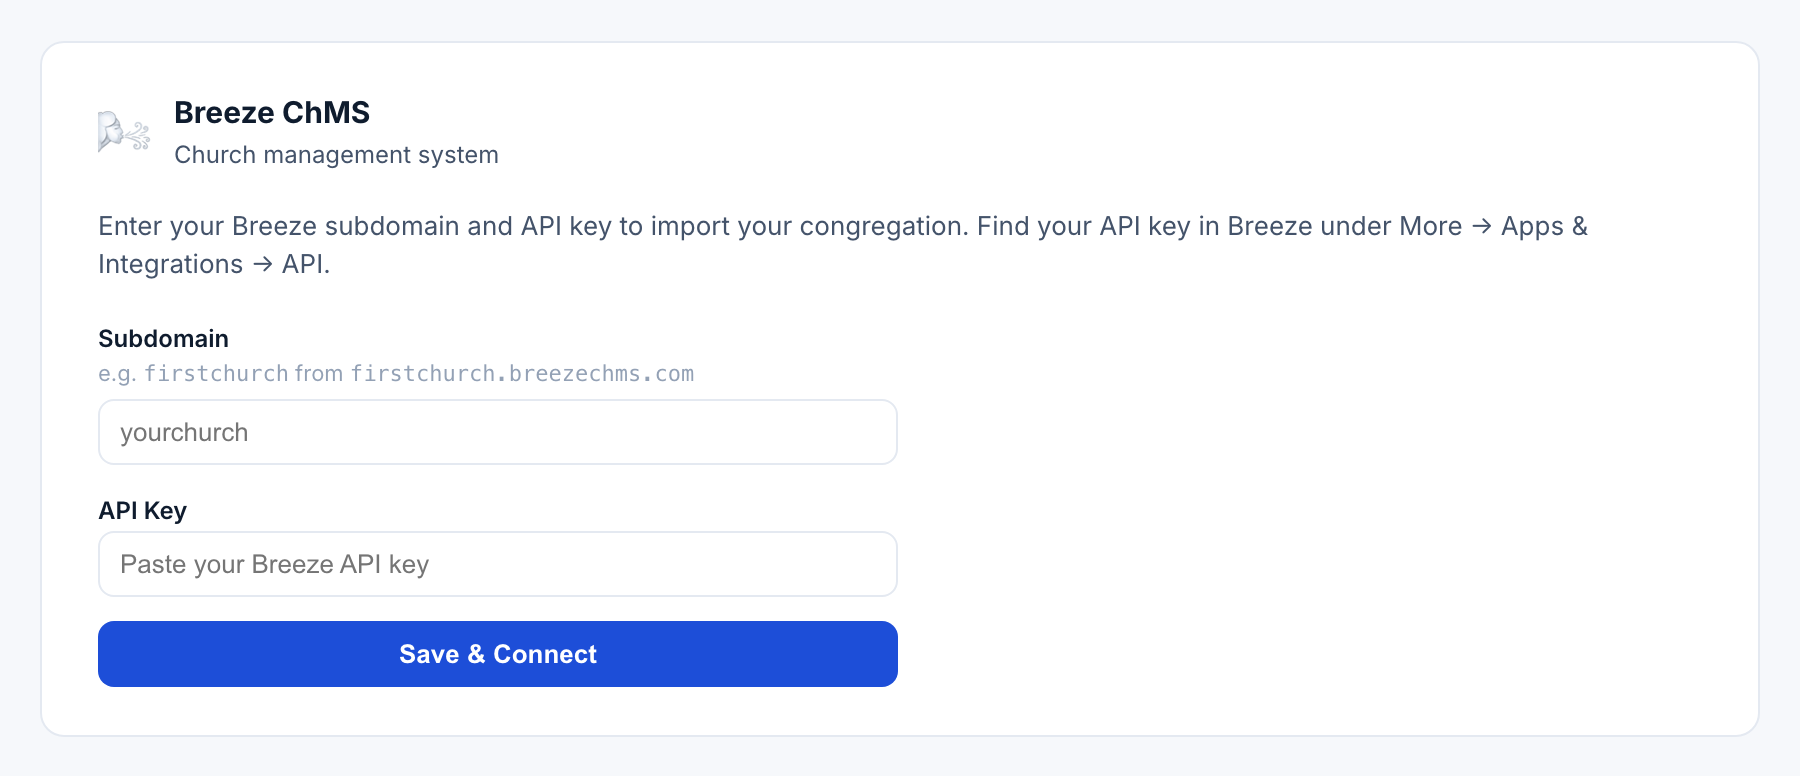
- Breeze: enter your Subdomain (e.g.
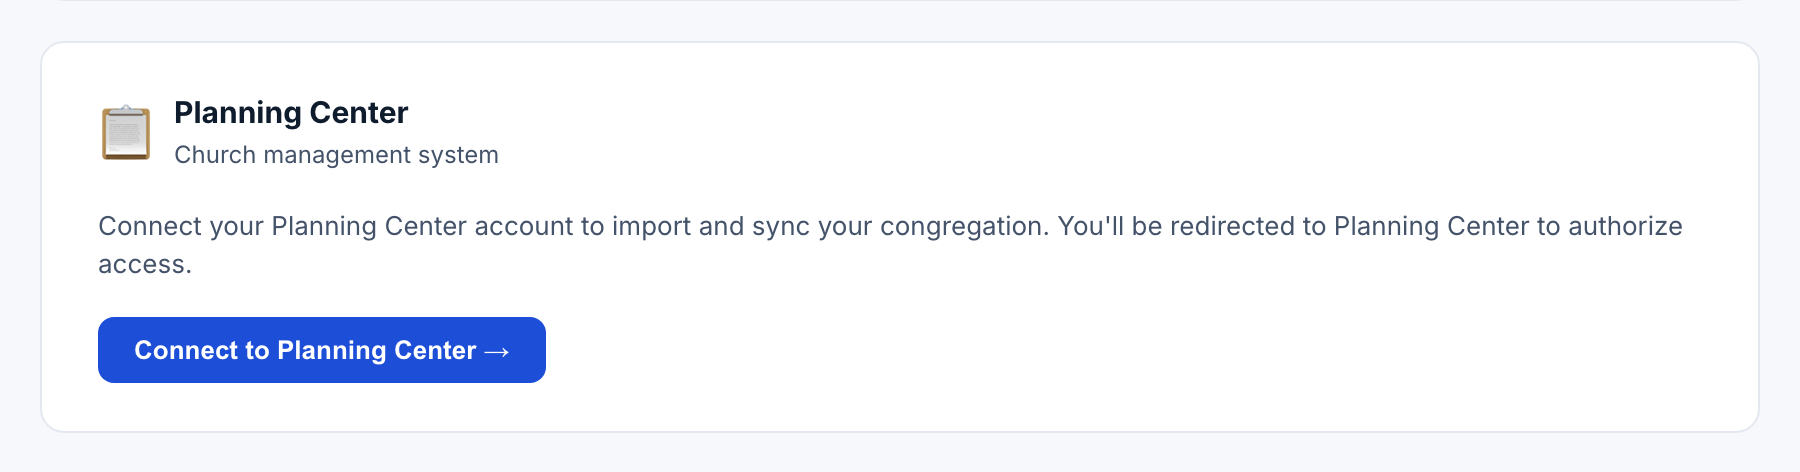
firstchurchfromfirstchurch.breezechms.com) and your API Key — the screen itself says “Find your API key in Breeze under More → Apps & Integrations → API” — then click Save & Connect. - Planning Center: click Connect to Planning Center →; you’re redirected to Planning Center to authorize access — no fields to fill in on our side.
When it worked, you’ll see a green “Connected” badge (Planning Center) or a connected-state subdomain readout (Breeze). Tracker imports your congregation, then keeps names and contact details up to date on an hourly sync you can also run by hand.
With Planning Center, households follow Planning Center: each sync places every synced person in the household Planning Center has him in, moving him if it changed, and his contacts and history move with him. The Planning Center card lists who moved in the last sync that moved anyone. Tracker never groups two families together just because they share a last name.
Disconnecting either one asks for confirmation and explicitly says imported members are not deleted — “disconnect” only stops future syncing.
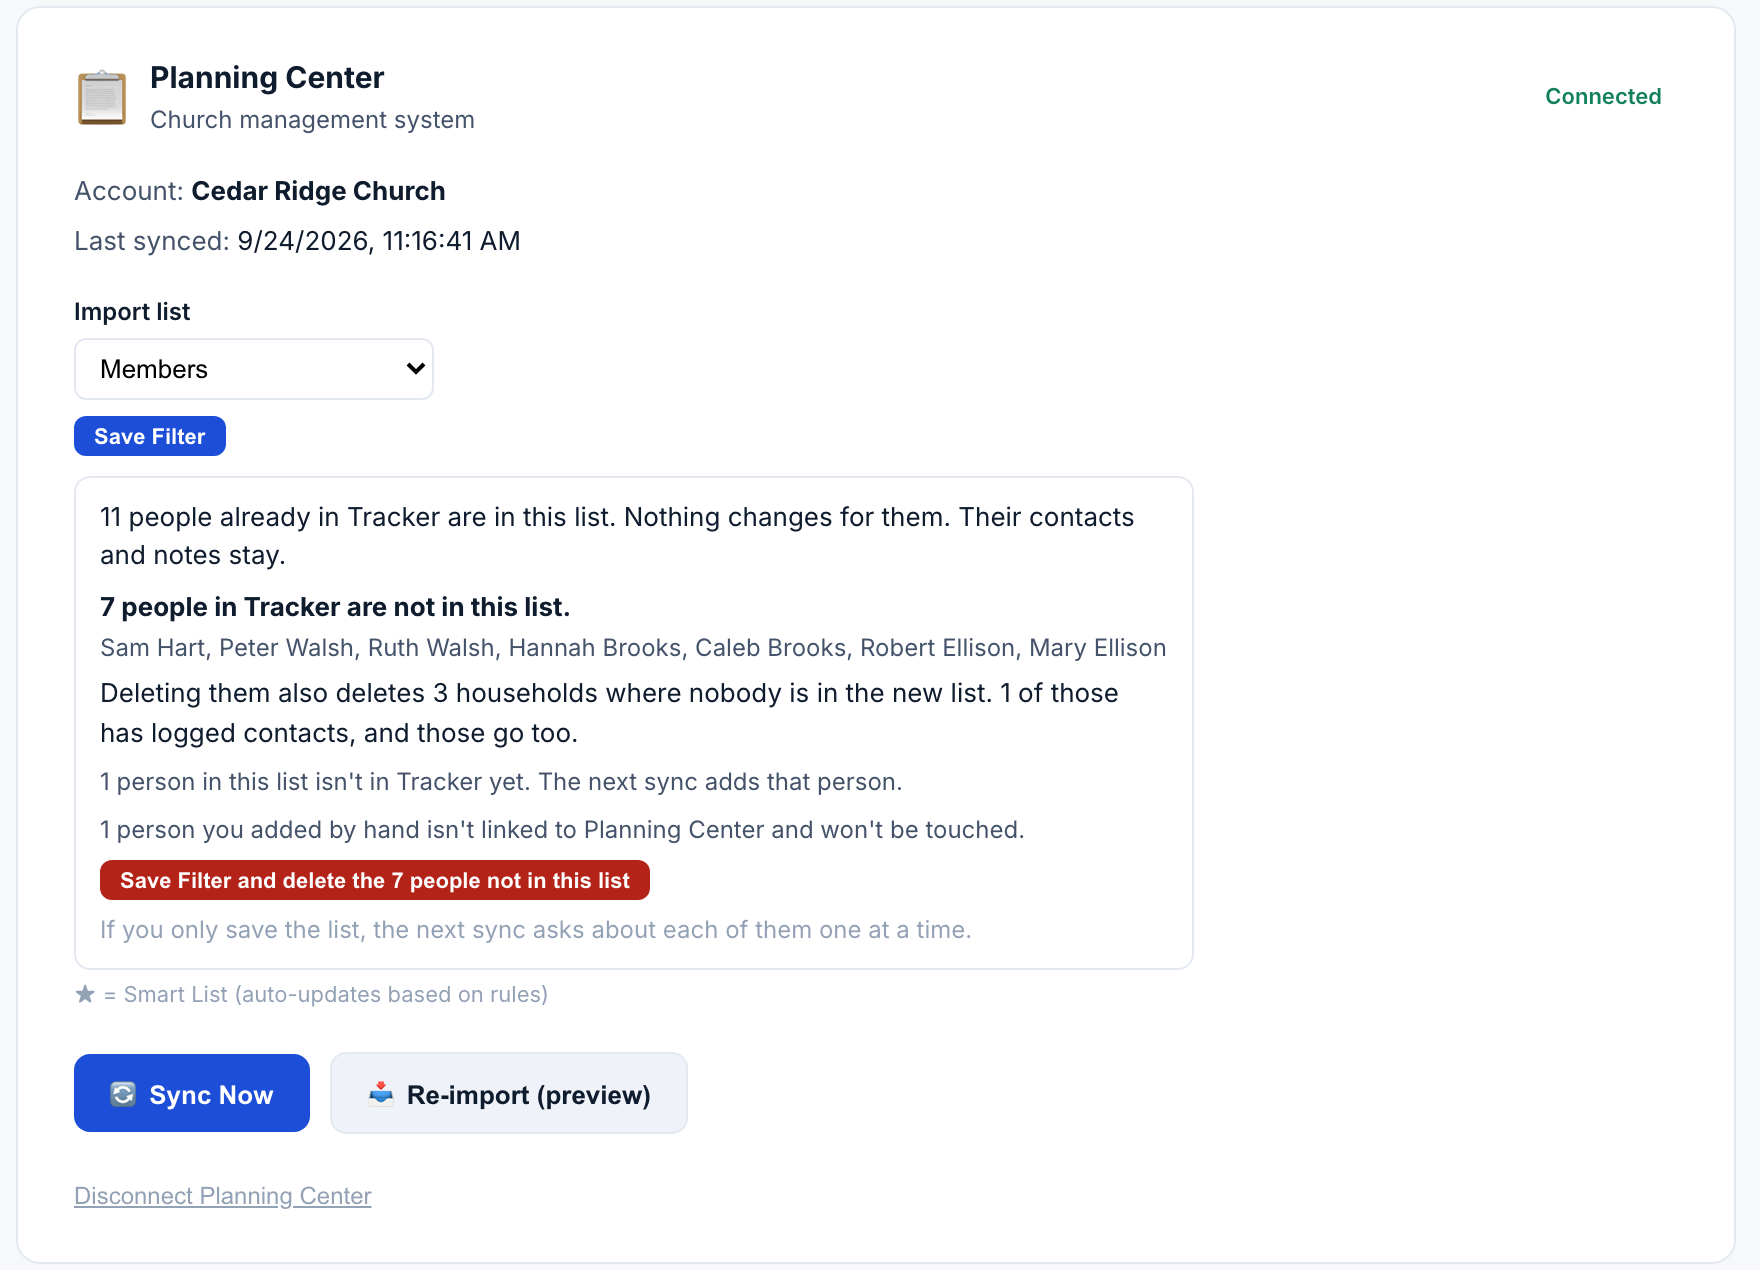
With Planning Center you choose which people come across by picking an Import list. You can change it later, for example to go from everyone in Planning Center to just your members. Tracker shows you who stays and who leaves before anything is saved.
- Open Admin > Import, then the ChMS Integration tab.
- Pick the new list under Import list.
- Read the summary that appears. People in both lists stay as they are, with their contacts and notes. The people not in the new list are named, with how many households would go with them.
- To remove them all at once, click Save Filter and delete the N people not in this list, then Yes, delete them.
- To decide one person at a time instead, click Save Filter only. The next sync lists them on the People page with an Archive and a Delete button each.
A household is deleted only when nobody in it is in the new list. If a husband is in the list and his son is not, the son is removed and the household keeps its contacts and notes. People you added by hand in Tracker are never touched, and if Planning Center returns nobody for the list, nobody is removed. Anyone who can sign in to Tracker is never removed either, and neither is that person’s household; the summary names them. Deleting can’t be undone.
With Breeze you also choose which people come across, by tag or by a profile field value, and you can map tags or profile fields onto districts so households are assigned on every sync. Each mapping row takes the elder and the deacon over that district too, and the sync attaches them along with the households.
A church already connected to Elvanto from before keeps syncing and keeps its own settings card — Elvanto just isn’t offered as a starting option to new churches any more.
Building your districts when you connect
Most churches on Breeze already keep their shepherding structure there, in a profile field or a set of tags named something like Shepherd Team, Flock, Parish or District.
- Tracker goes looking for it the moment you connect. If it finds one, a panel appears on the ChMS Integration tab asking whether those groups should be imported, each listed with the number of people in it, counted off your own roster rather than guessed at.
- Tick the groups you want.
- Beside each one, name the elder and the deacon over it.
- Click the import button underneath, which counts up what you have ticked. Tracker creates one district per group and writes the mapping. The households themselves move on the next sync, not when you click. A district you already have under that name is reused rather than duplicated, so answering twice merges instead of doubling.
Name the officer even where it feels optional. An elder who belongs to no district does not get an empty queue from the Assistant. He gets the whole church. The officer pickers appear only once your officers are in Tracker, so if you have just connected and imported nobody yet, run a sync first and set the officers on the mapping rows afterwards.
No thanks closes the question for good. You will not be asked at all if you have already mapped tags or profile fields onto districts yourself, since you have answered it. A group holding nobody is still listed, just not ticked: it is your account, and you may know something about it we cannot see.
This is the one screen in these pages we cannot show you a picture of. The panel only appears on an account with Breeze connected and no district mappings yet, so it exists for a few minutes on a church’s first connection and never again — including on the demo account, where there is no Breeze connection to photograph. The description above was written from the screen rather than from a picture of it. If what you see differs, trust your screen and tell us.
Bringing across significant dates
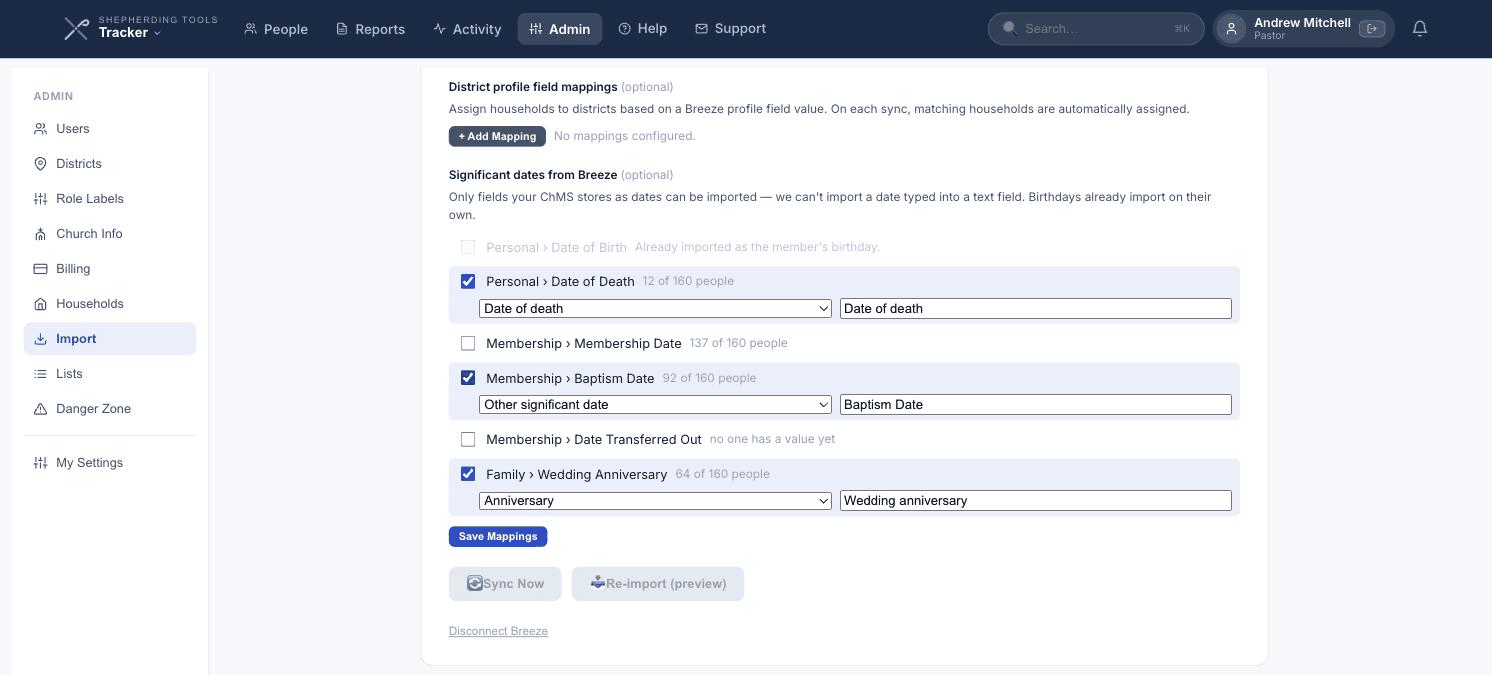
The connection settings carry a Significant dates section listing every field your church management system stores as a date.
- Read the field list. A date somebody typed into a free-text field cannot be imported, and the screen says so. Beside each field is how many people have a value in it, so you can see what you would be bringing across before you bring it — a field nobody has filled in says that too.
- Tick a field and say what it is — nothing is imported until you do. Tracker never guesses from a field’s name, which sounds like extra work until you meet the churches: one calls its membership field Date Joined, so guessing from names would import the wrong things and be confident about it.
- File each ticked field under one of three kinds: Anniversary, Date of death, or Other significant date, and give it a label — that label is what appears on the household profile. There is no membership option: a membership date records the day someone joined the church rather than an occasion to mark, so there is nowhere to file one. Birthdays are greyed out; they already import on their own.
- Click Save Mappings.
Unticking a field stops future imports. It does not remove dates already brought in — those stay on the households they were written to, and taking one off is an edit you make by hand.
One-way sync
The sync runs one direction: from Breeze, Planning Center, or Elvanto into Tracker. Nothing you enter or change in Tracker travels back to it: not a new note, not an edited phone number, not a household you add. Your church management system stays the one place that data is managed; Tracker keeps a current copy for pastoral care.
Danger Zone
Two things live here, both for administrators only.
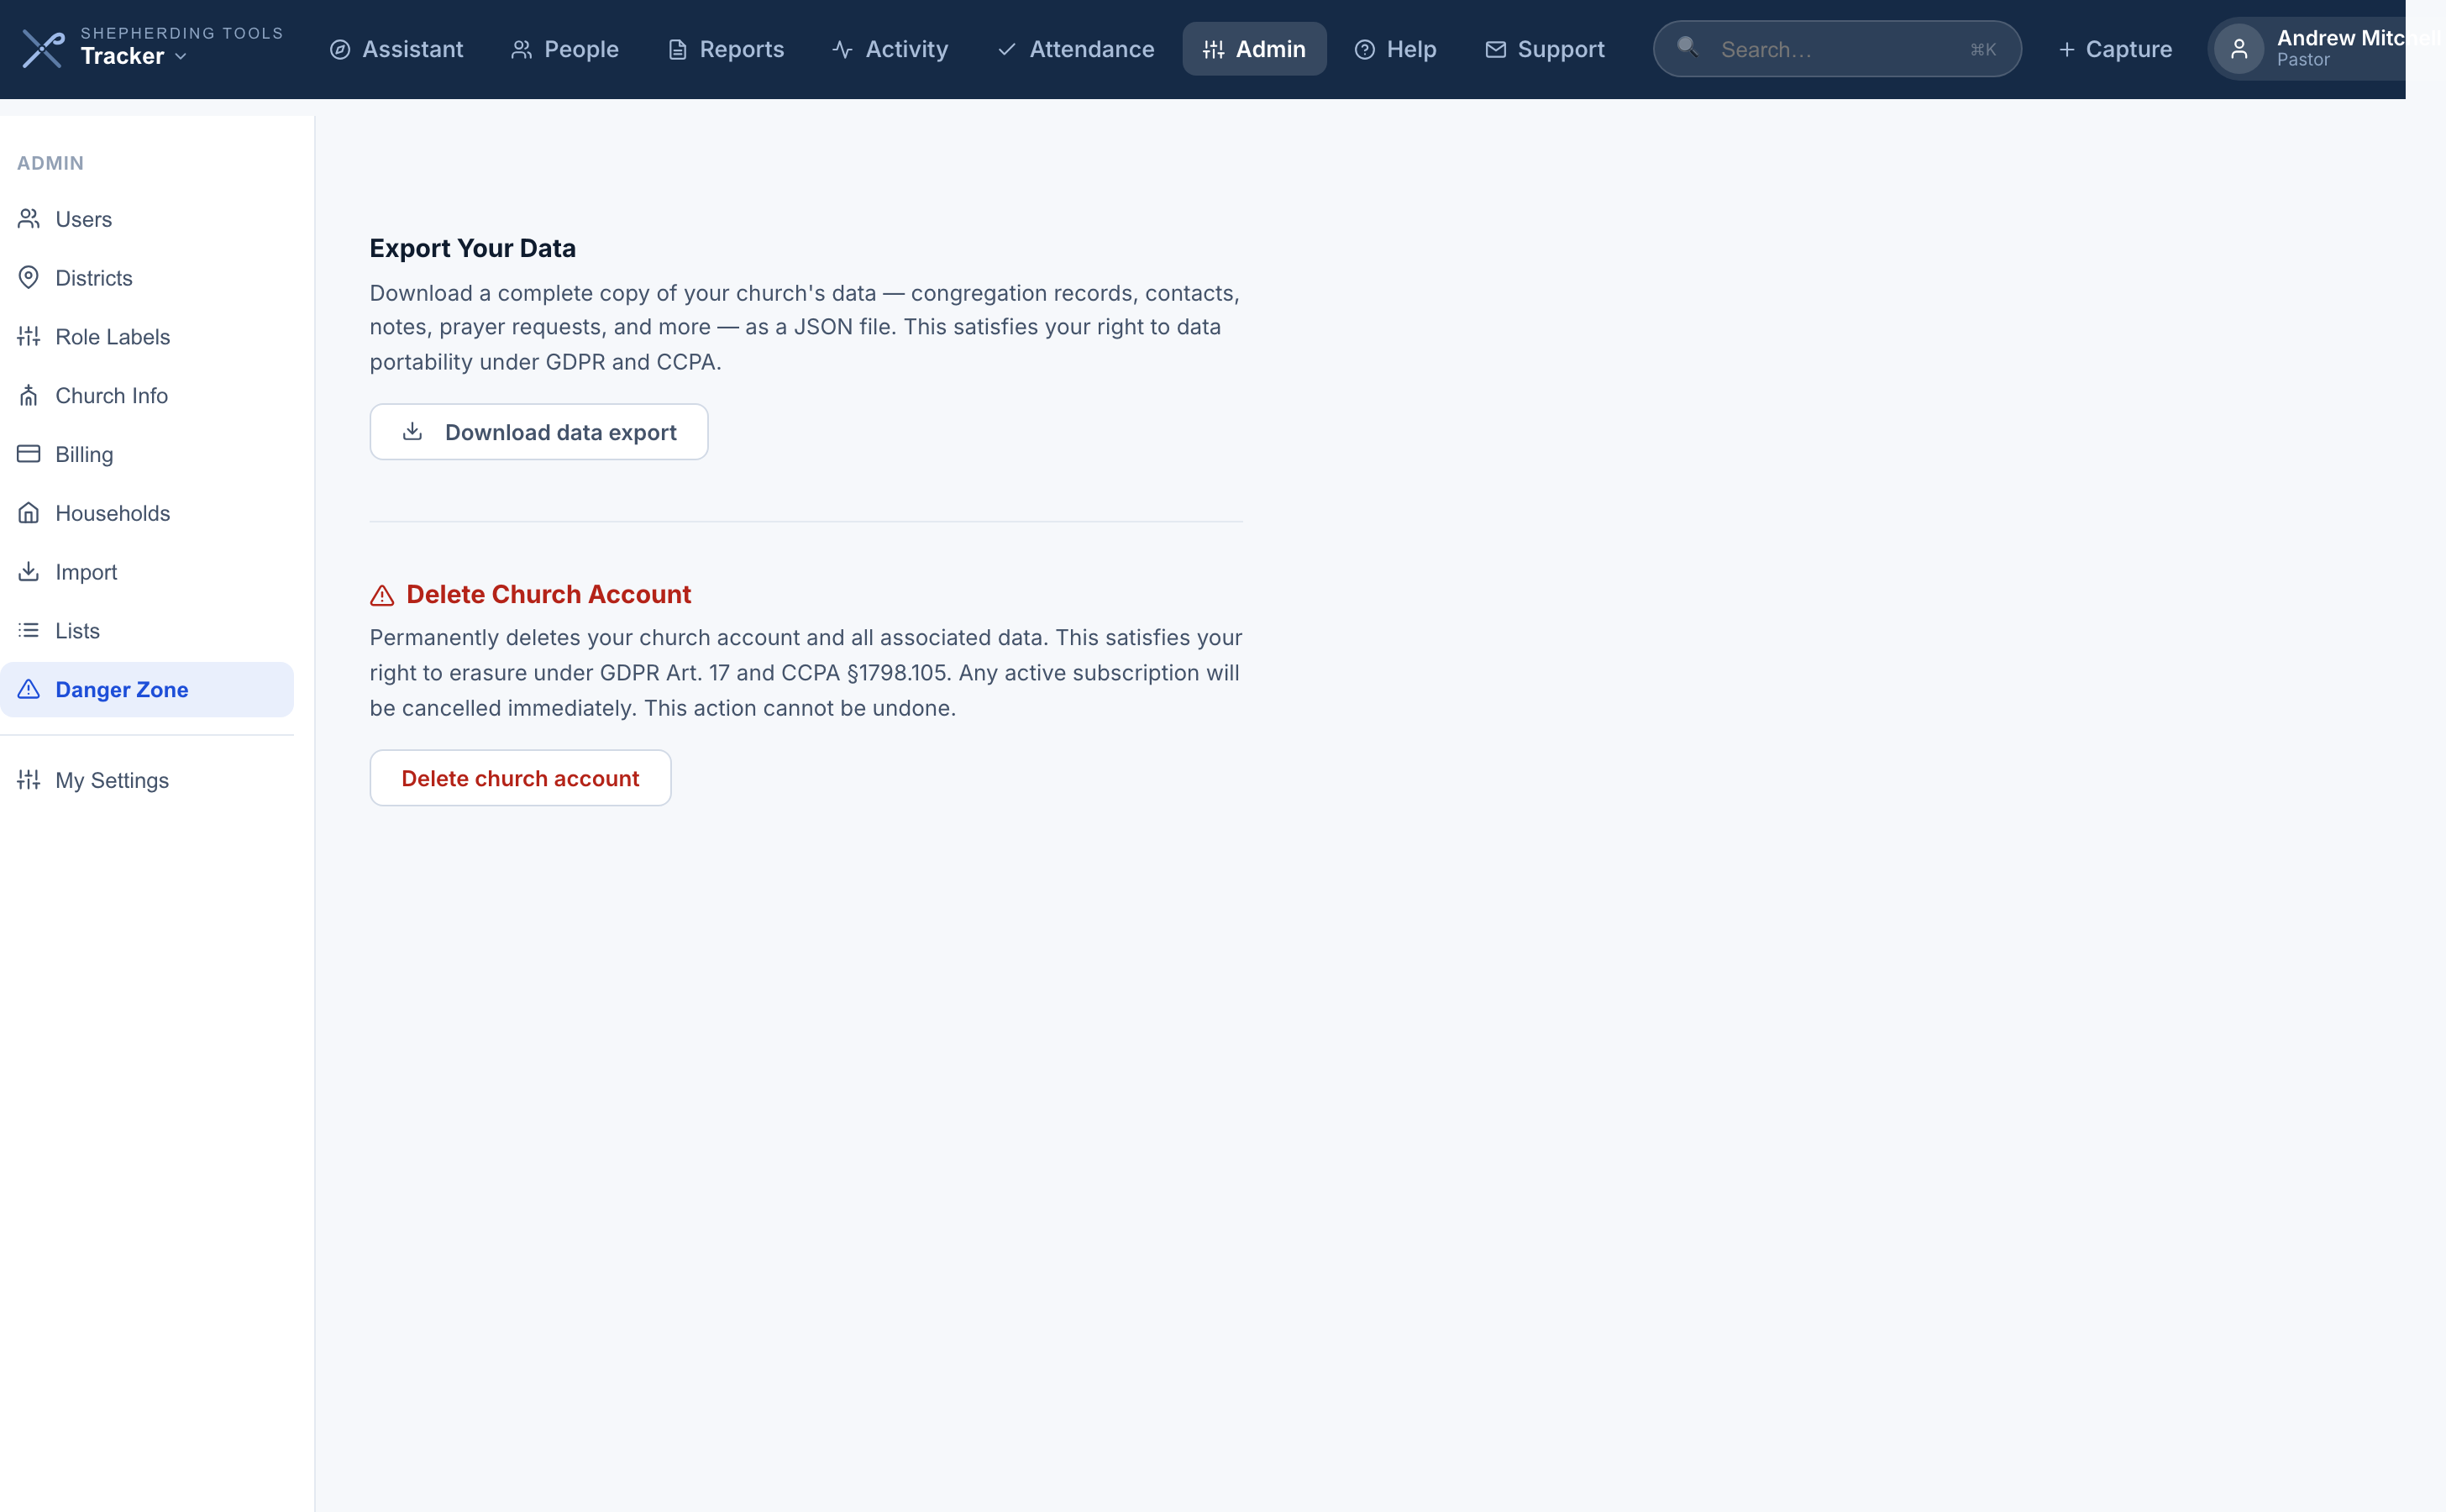
- Open Admin > Danger Zone.
- Click Download data export — it downloads a file immediately, no confirmation needed: households, members, contacts, notes, prayer requests and the rest. This is your right to data portability under GDPR and CCPA, and you do not have to ask us for it. (Web only. In the mobile app, this button explains that downloads aren’t available in the app and points you to shepherdingtools.com.)
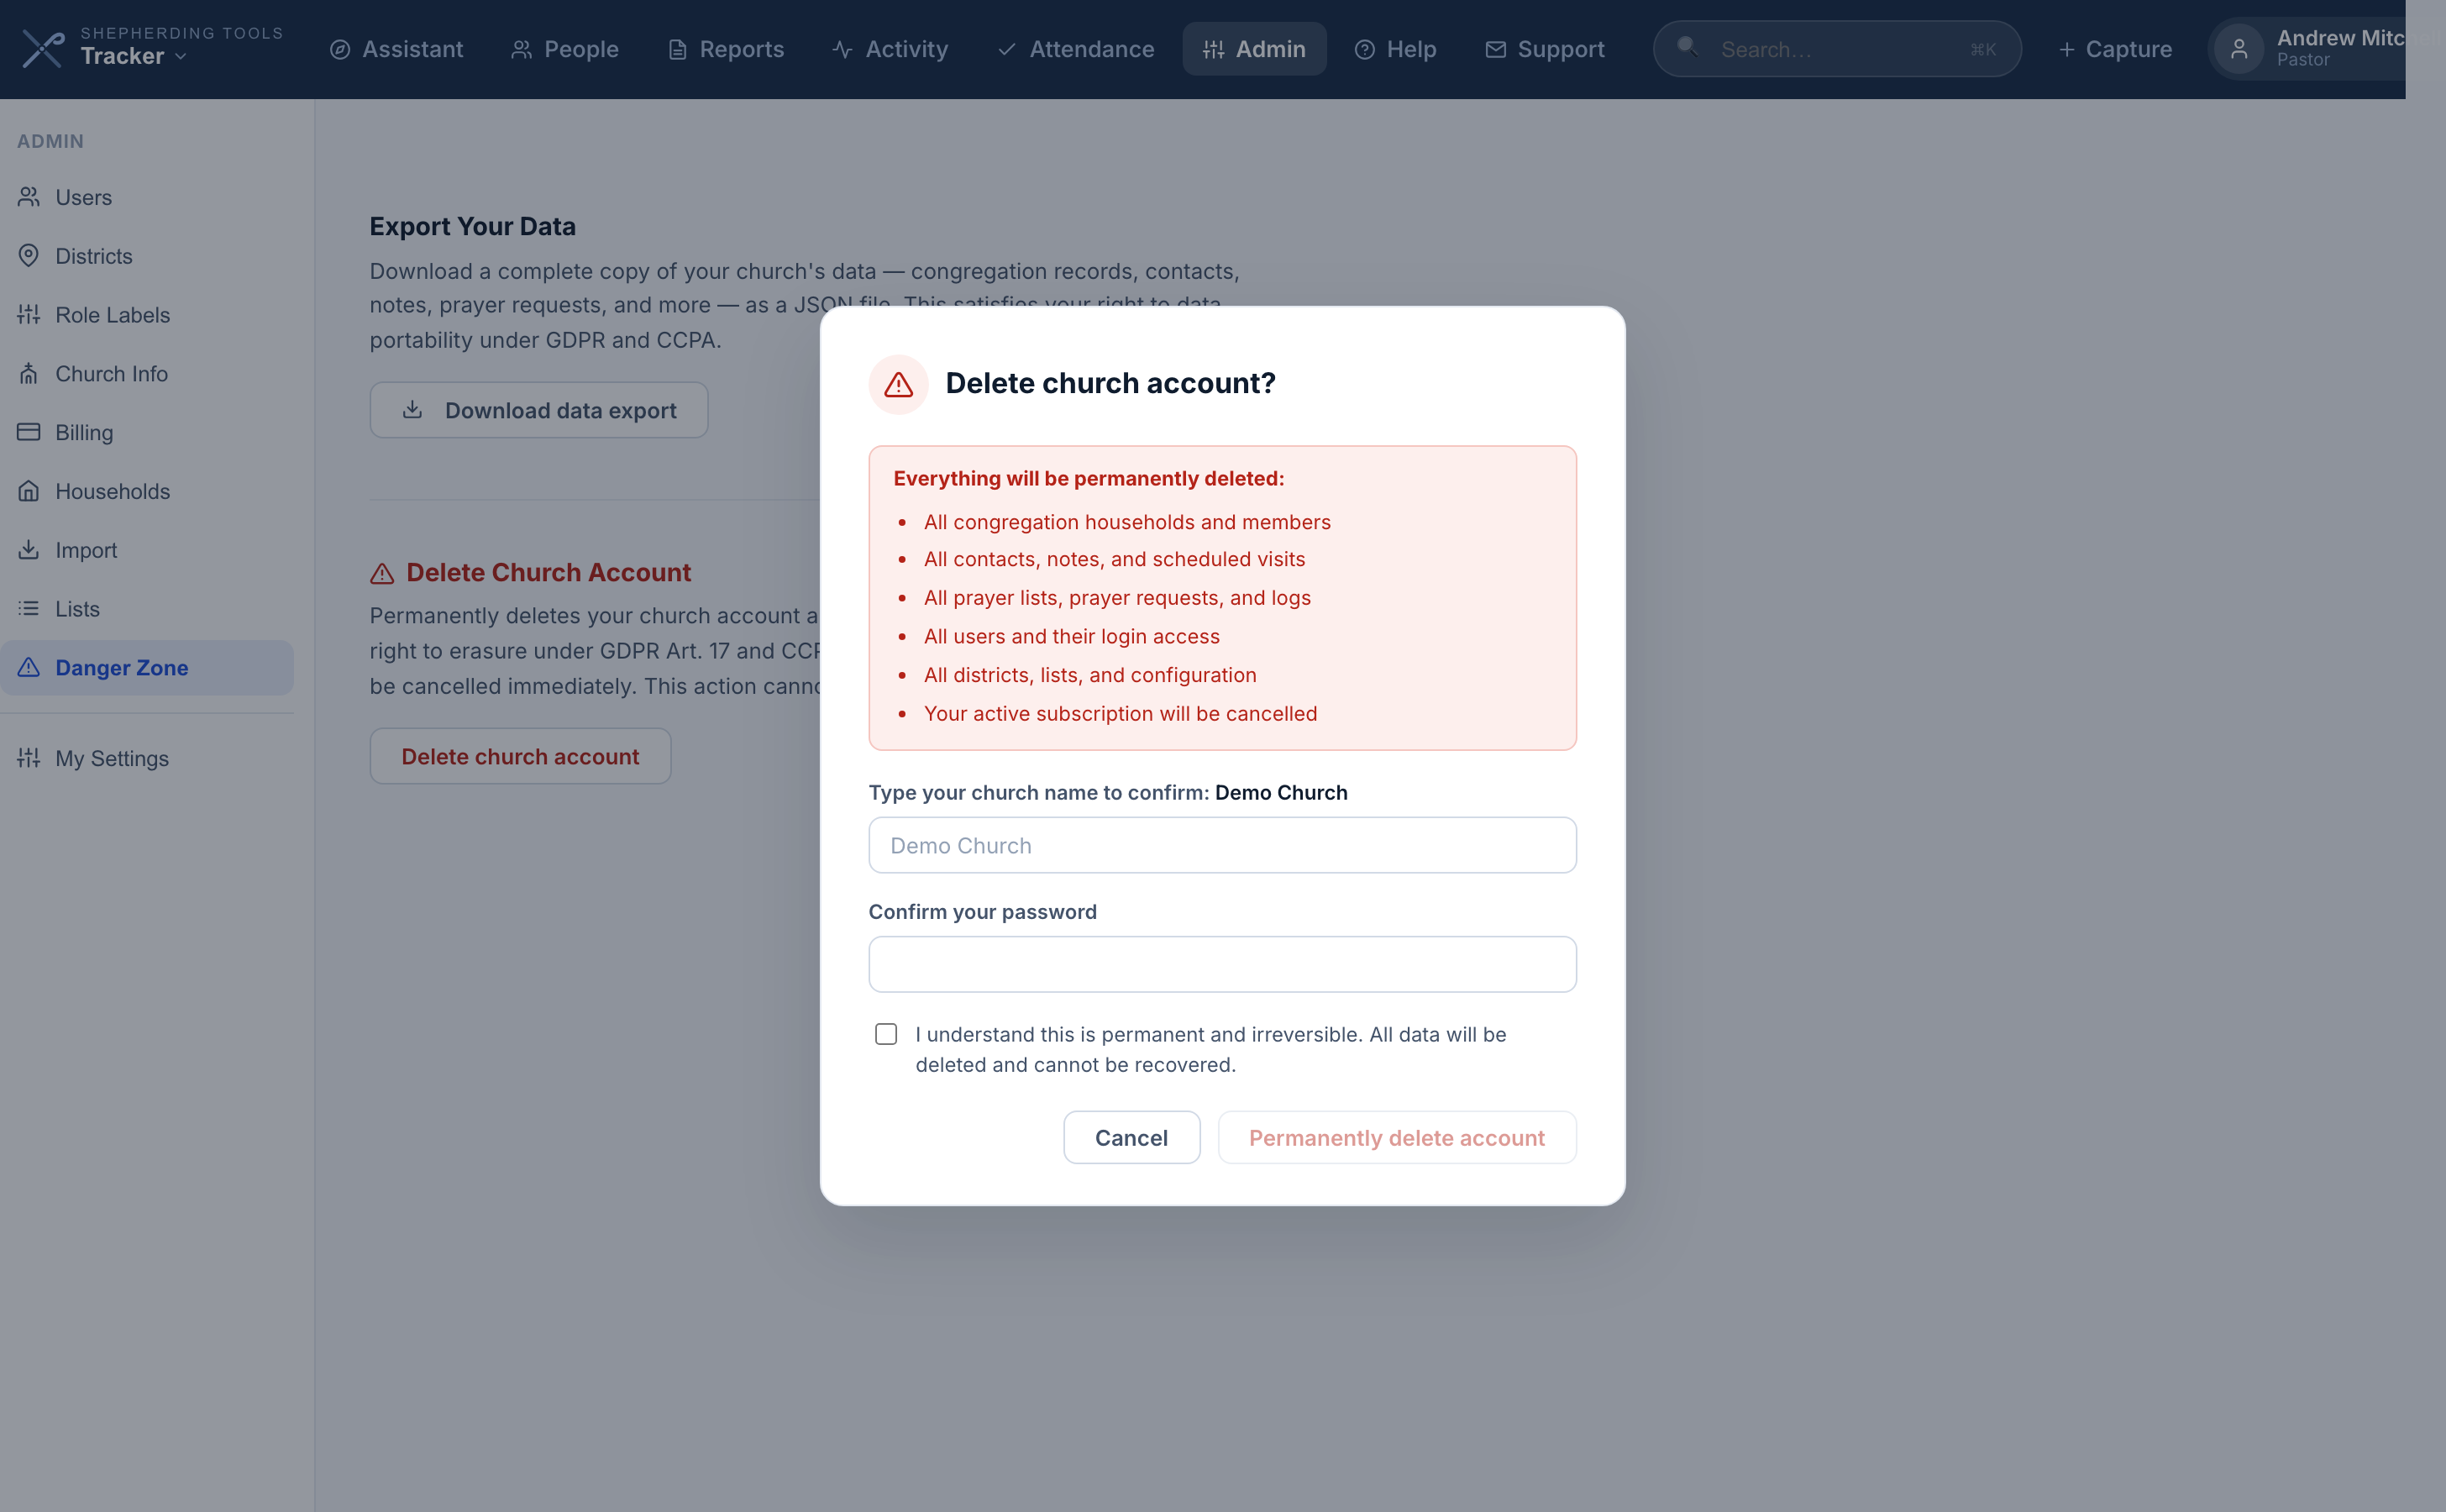
- Click Delete church account — opens a confirmation modal listing everything that will be deleted.
- In the modal: type your church’s name exactly as shown, enter your password, tick “I understand this is permanent and irreversible,” then click Permanently delete account.
Deleting erases everything permanently and cancels any subscription. There is no undo and no backup we can restore from. When it’s done, you’re redirected to the sign-in screen.
The confirmation modal’s checklist of what’s deleted uses your church’s own word for a district if you’ve set one under Role Labels.
My Settings
Everyone has this section, administrator or not. It holds your display name, your personal contact details, your BCC logging address, your alert preferences, and which of our occasional emails you want.
It is also where you turn the Pastoral Assistant on, set your time off, change your password, and manage your own private lists.
11. Archiving Households and Members
When someone dies, transfers to another church, or is removed from the rolls, you do not have to choose between leaving them in your active lists and deleting years of pastoral history. Archiving takes a household or an individual out of your working views while keeping every contact, note and scheduled visit attached to the record.
Archiving a household
From Admin:
- Open Admin > Households.
- Click Archive at the right-hand end of the household’s row.
- Choose a reason from the dropdown: Transferred membership (default), Deceased, or Dropped from rolls.
- Set the date (defaults to today; use the actual date of death or transfer if different).
- Click Archive to confirm, or Cancel to back out.
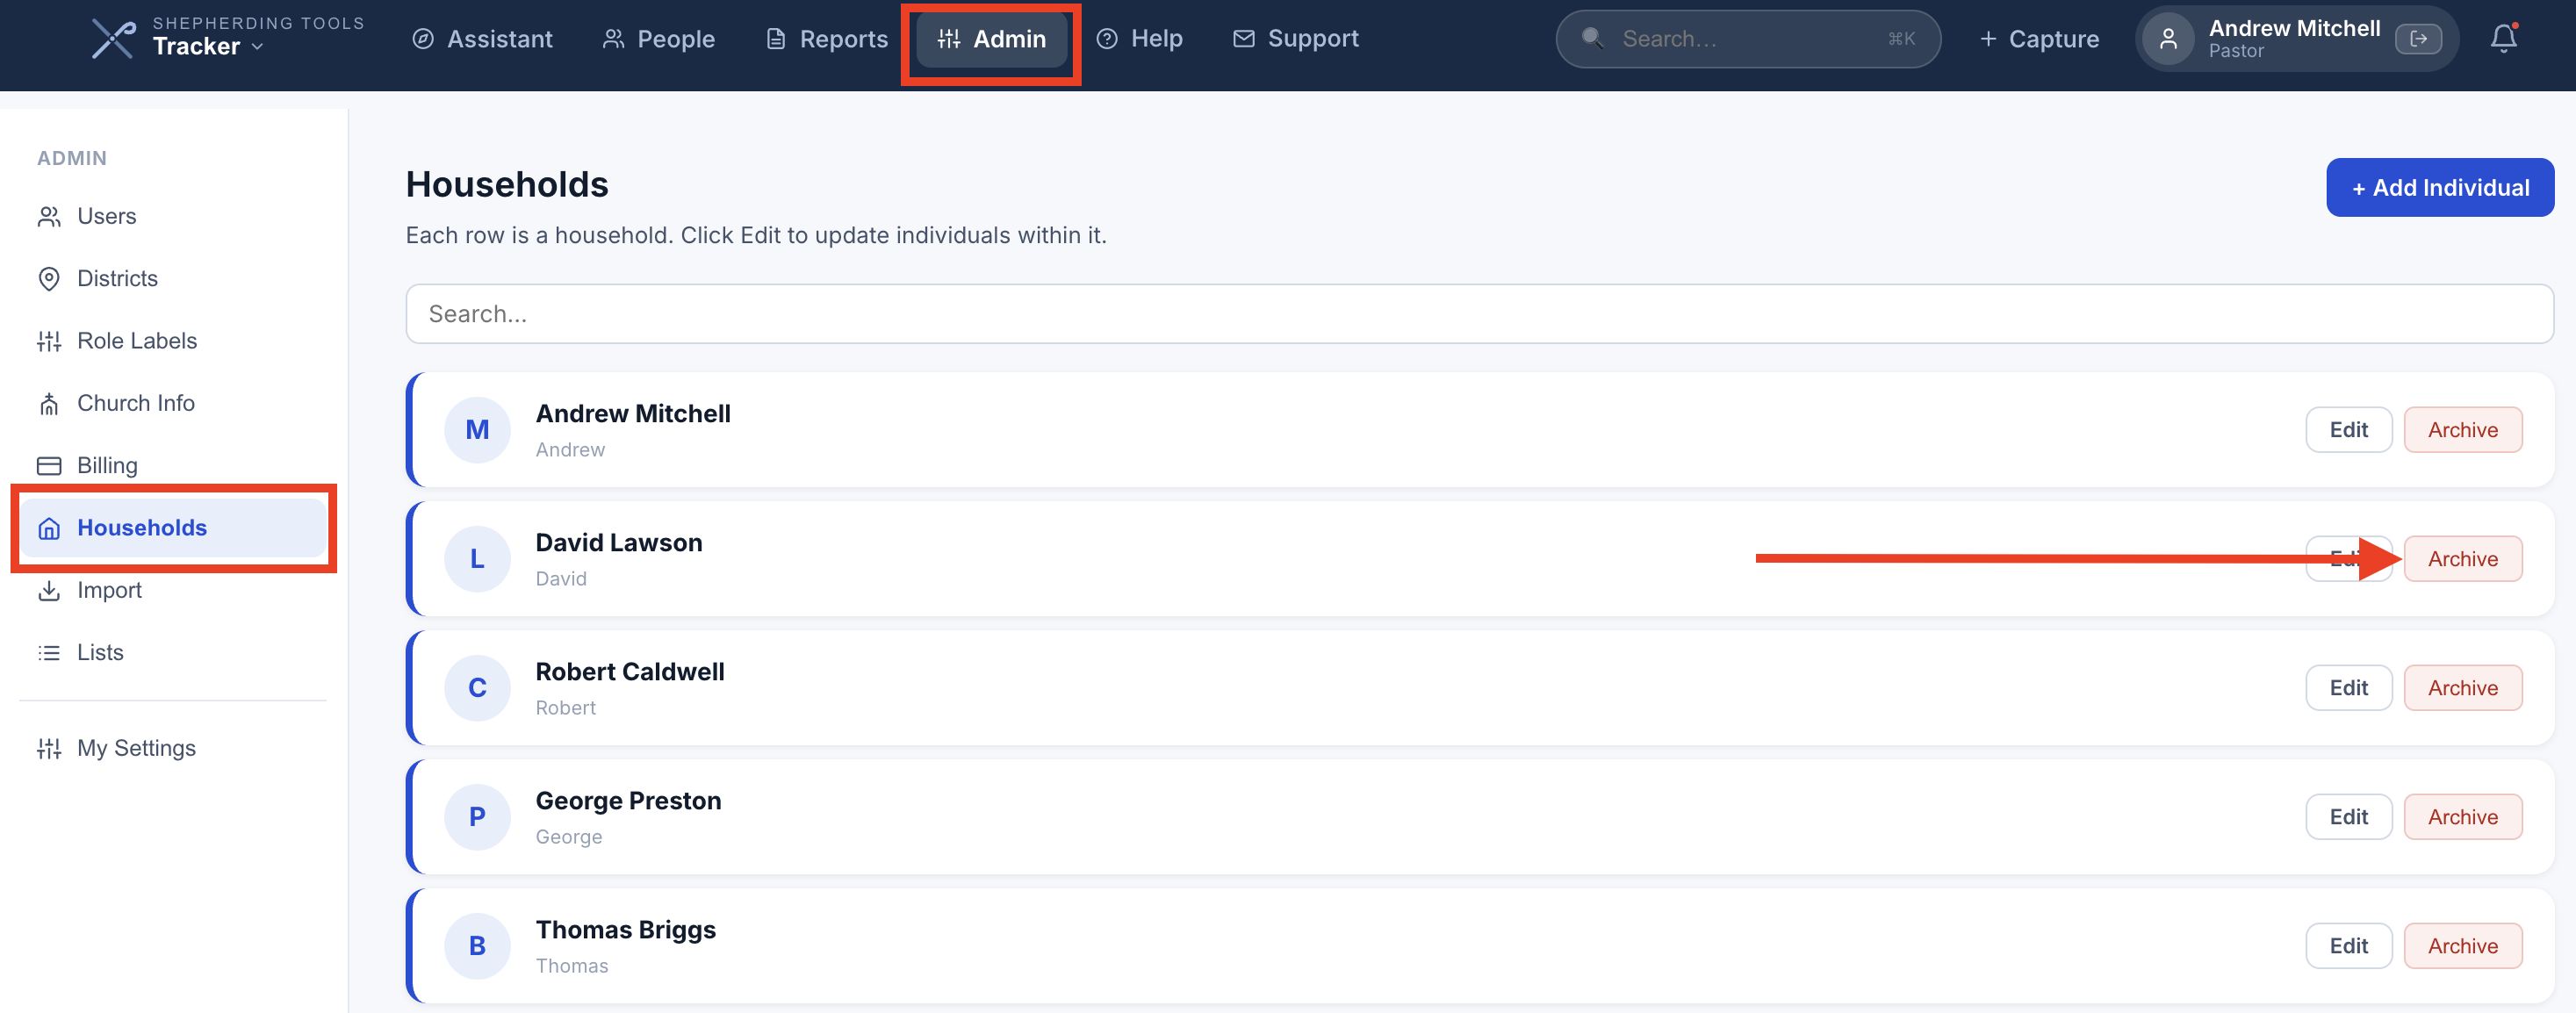
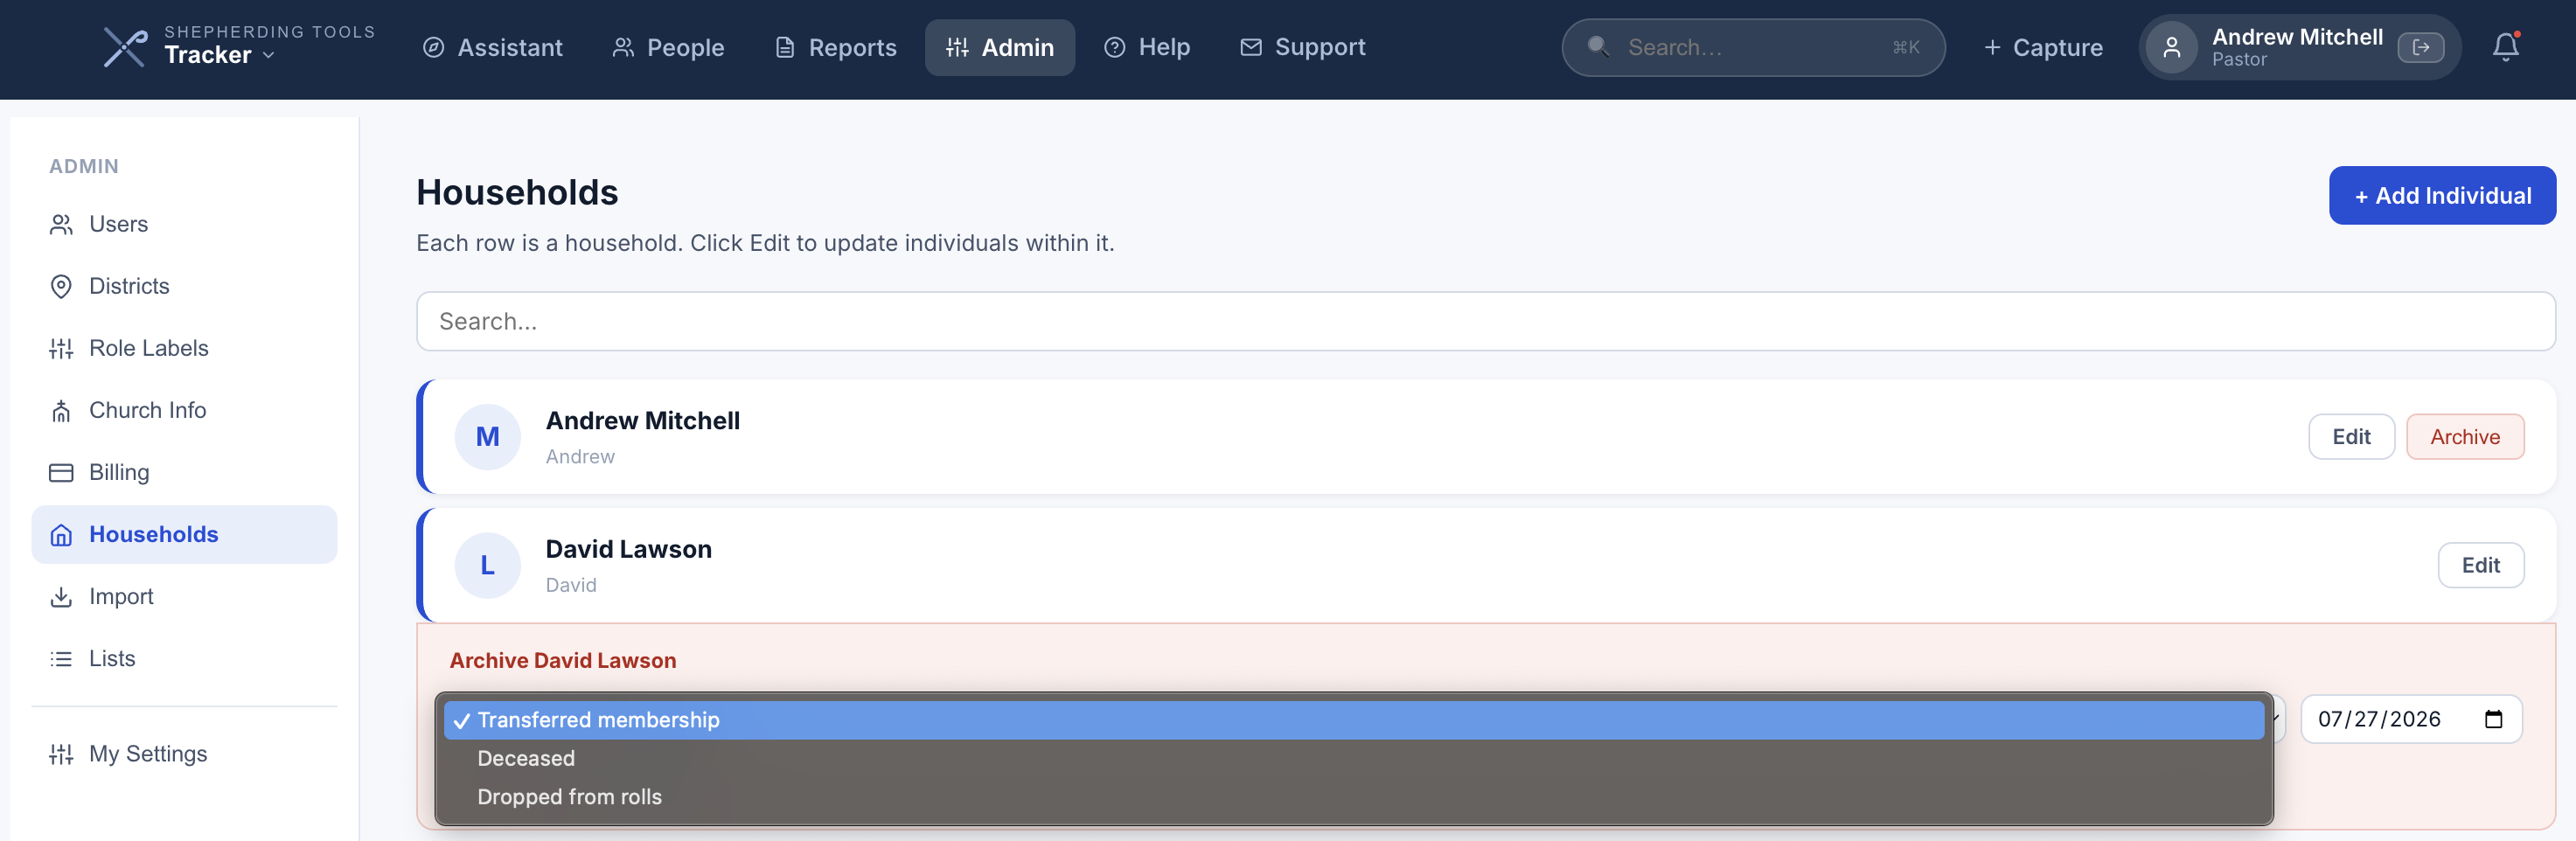
Alternative route: open the household’s own profile and click Archive in the button row at the top (pastors and administrators).
The household drops off the People page; if you chose Deceased and the bereavement sequence is on, Tracker offers to start it.
Archiving one person instead of the whole household
A widow should not disappear because her husband has died. The fastest route — from the profile:
- Open the household’s profile.
- Click that person’s name chip in the members row.
- Click Archive [name]…
- Choose a reason and date, same as archiving a household.
- Click Archive to confirm.
![Household profile, one member's name chip clicked open showing Archive [name]…](/docs/screenshots/tracker/archive-one-person.png)
Shortcut: Edit the household, then Record a death or departure… beside the member’s name jumps straight to the same panel. The same thing can also be done from Admin > Households by clicking Edit on a household and using the Archive button beside an individual member.
The household and its history stay exactly where they are; only that person’s chip now shows the archived reason.
Archiving a household does not archive the individual members inside it, and archiving a member does not archive the household. They are separate actions, so you can retire one without touching the other.
Recording that someone is widowed, divorced or separated
Archiving describes someone leaving your roll. It cannot say what has changed for the person who remains — and that is usually the person your officers most need to know about. A widow has not left the church; she is exactly who someone should be visiting.
Each person carries a separate Family Status, with an optional date.
- Open the household’s profile and click Edit.
- Find Family Status beneath that person’s other fields.
- Choose Deceased, Widowed, Divorced, Separated, or — none — to clear it.
- Click Save Changes.

The status shows beside that person’s name in the members row from then on. Leaving it blank is the normal state, and clearing a wrong entry is one action.
This is a fact recorded about a person who is still on your roll, and it is deliberately separate from archiving. Marking a woman widowed does not archive her, and archiving her late husband does not set it for her — you record it yourself, because only you know it.
What archiving actually changes
An archived household drops out of the views you work from every day:
- The People page, so it no longer shows as overdue for contact.
- Reports and statistics, so your contact-health numbers reflect your actual roll.
- Attendance, and the household counts on each district.
- The Assistant’s queue, its Coming Up list and its emails.
- Search. Archived records are reached through the archived list described below, not by searching for the name.
- BCC email logging, which refuses to file a contact against an archived household.
Archiving one person rather than the whole household takes him off every list he was on. He no longer appears in the list’s members or its count, a Prayer list linked to it stops including him, and an email or text sent to that list does not reach him. Messages to the whole congregation or a district skip him too. Bring him back and he is on those lists again.
Nothing is deleted. Contacts, notes and scheduled visits stay attached, the profile page remains viewable, and the archive itself is recorded in the Activity feed as Household Archived or Member Archived. If you choose Deceased and you have the bereavement sequence switched on, Tracker offers to start it for that family, so they are not simply filed away.
Finding and restoring an archived record
Under Admin > Households, a button reading Archived (n) appears once you have archived anything. Click it to open the Archived Households list, which has its own search box. Each row offers View to read the history and Restore to return the household to active status.
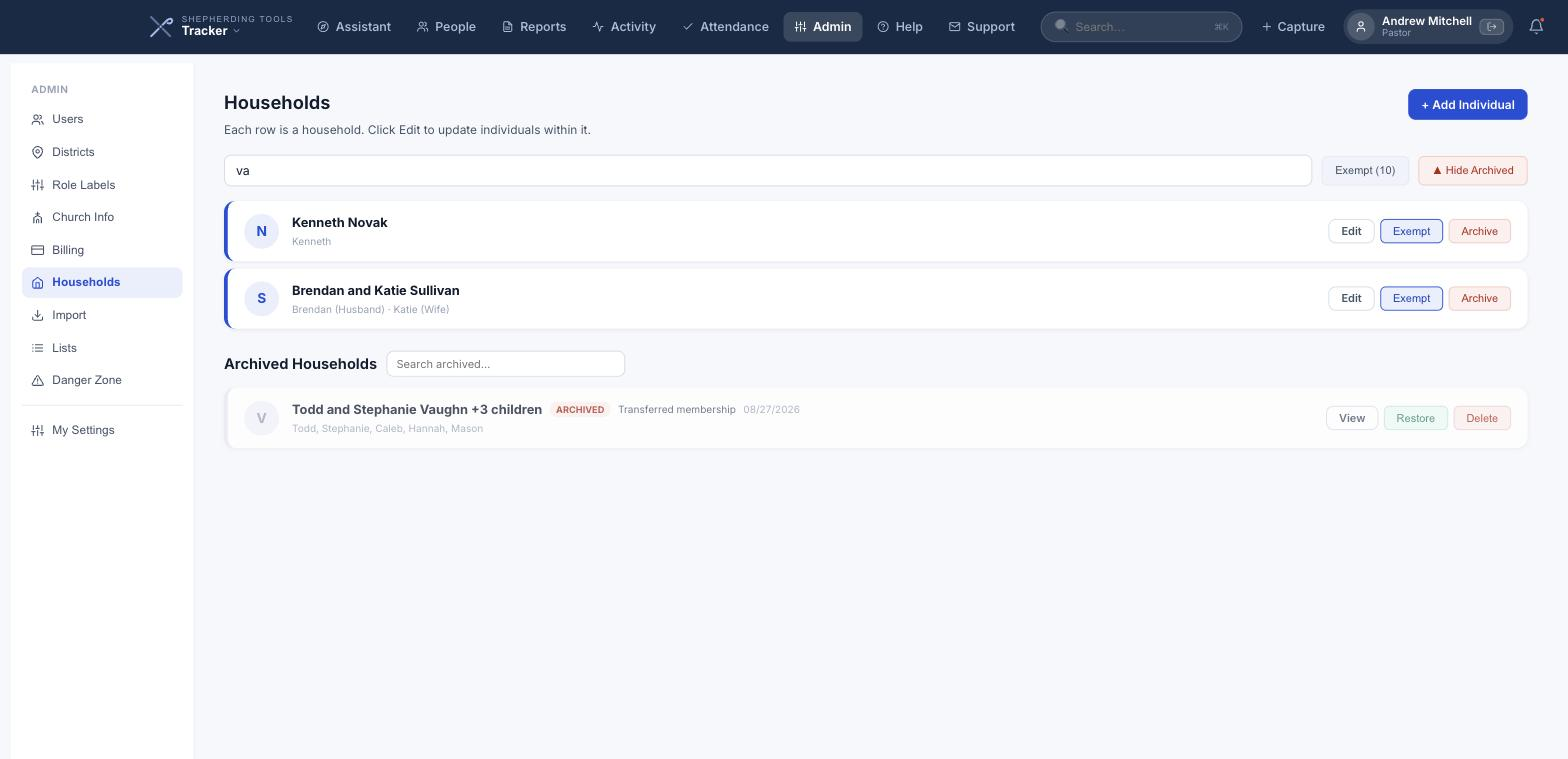
An archived household’s profile page also carries a banner showing the reason and date, with a Restore button for pastors and administrators; everyone else sees “History is read-only”. To restore an archived member, go to Admin > Households, click Edit on the household, and use Restore beside that person.
Exempt households and visitors
An exempt household stays on your books and stays searchable, but sits outside your coverage numbers. It covers someone who has started attending but has not joined, and logins like “Administrator” that were never a family at all. An exempt household can never reach full coverage, so counting it holds your whole church’s percentage down.
You do not mark a household exempt yourself, and there is no button for it. Two kinds of household arrive that way on their own: visitors added in Connections, covered below, and the Administrator login created with your church, which is exempt as an office account so it never sits in your coverage figures pretending to be a family.
Exempt households stay out of the ordinary list. On the People page, once your church has one, a Connections people chip and an Exempt chip appear above the rows, and they replace the list rather than narrowing it. Under Admin > Households the same households sit behind a button reading Exempt with a count beside it.
To put one back into your numbers — removing the exemption, the one actionable step here:
- Open the exempt household’s own profile; a banner reads Exempt — Connections (or the relevant reason) with the first visit date.
- Click Remove Exemption (administrators only).
- Click Yes, count them to confirm.
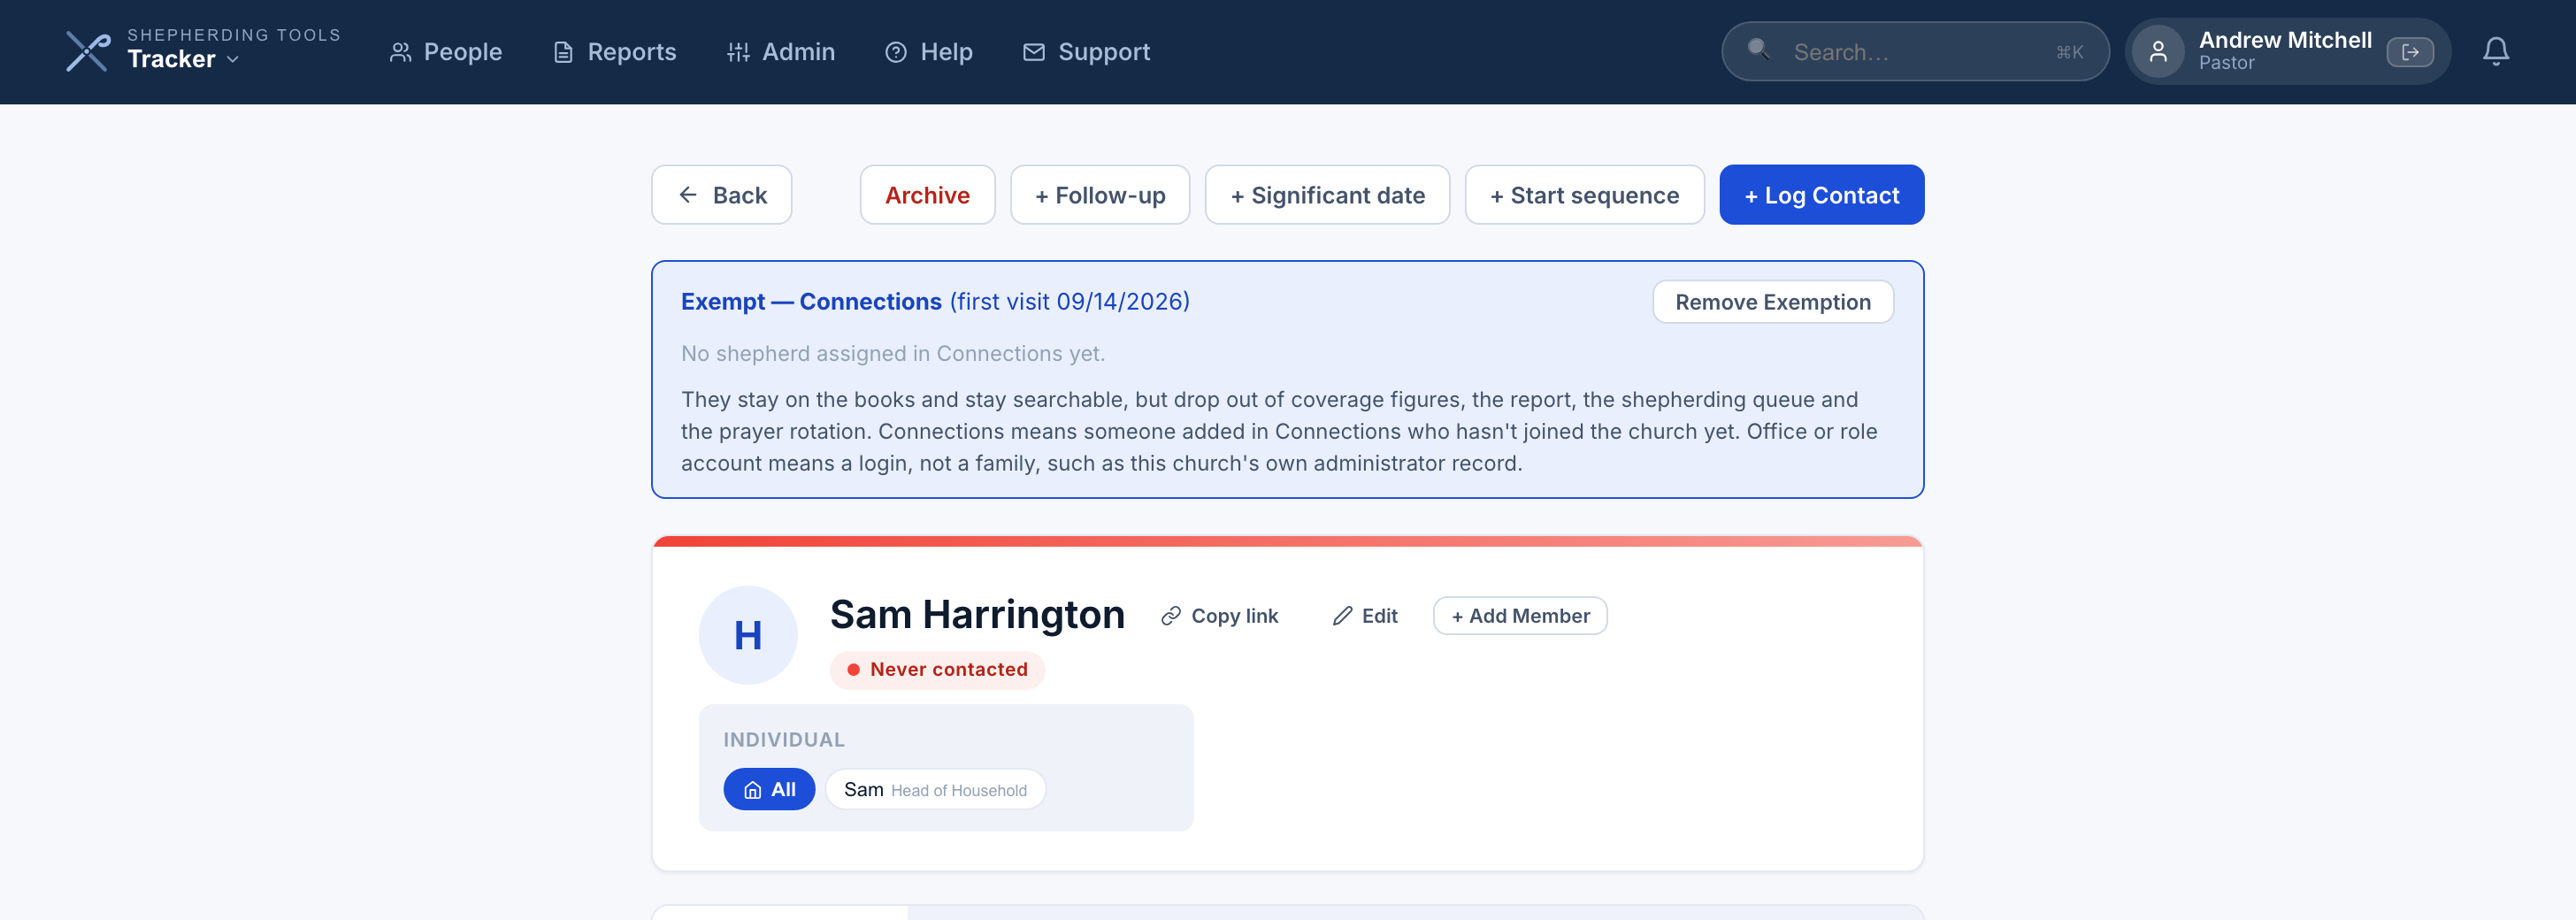
The household now counts in Church Status and appears in the ordinary People list rather than behind the Connections people and Exempt chips. Anyone else sees “Changed by an administrator” in place of the button. The same control sits on the row under Admin > Households once you have opened the exempt list there.
If your church uses Connections, a visitor you add there arrives here on his own, already marked exempt with the reason Connections, so you can see him alongside your members without him counting against your coverage. Anyone you list beside him in Connections, a wife or children, arrives in the same household, and a name you fix in Connections is fixed here too. When he joins the church, remove the exemption: there is no second record to merge and nothing to re-type. If your church syncs from Planning Center, Breeze or Elvanto, the sync may do it for you. Once that system lists him as a member under the same name, the next sync removes the exemption and names his household in its sync results. If Connections has assigned someone to follow up with him, that person’s name shows on the banner too, as his Connections shepherd. If you remove his contact from Connections instead, his household here is archived rather than deleted, and Restore brings it back. How this looks from the Connections side.
Archive, inactive, exempt, or delete?
- Archive. The record leaves your active views but keeps its history, its reason and its date. This is what you want for deaths, transfers, and members removed from the rolls.
- Inactive. A checkbox on the household edit form reading “Mark household as inactive”. The household leaves your coverage numbers and the People page, without a reason or a date, but stays searchable and stays in the Assistant’s queue, so an officer is still prompted to visit. Useful for a family that has stopped attending but has not left.
- Exempt. On the books and searchable, outside your coverage numbers, and not queued by the Assistant. For visitors and for accounts that were never a family. See above.
- Delete. Permanent, and it takes the contact history with it. Use it for a duplicate or a record entered by mistake, never for a member who has died or moved on.
Marking a household inactive
- Open Admin > Households, click Edit on the household.
- Near the bottom of the form, tick Mark household as inactive.
- Click Save Changes.
The household leaves the People page and your coverage numbers immediately, but stays searchable and stays in the Assistant’s queue. Untick the box and save again to bring it back.

Deleting a household permanently
- Open Admin > Households, click Edit on the household.
- Click Delete Household.
- Click Yes, delete permanently to confirm, or Cancel to back out.

This removes every member and all contact history for the household, and it cannot be undone. Use it only for a duplicate or a record entered by mistake — never for a member who has died or moved on. To delete one member instead of the whole household, use Delete beside that member on the same edit form.
You can’t delete a household you belong to, because that would remove your own sign-in. If anyone else in the household can sign in, the confirmation names them and says their sign-ins will be removed too.
If your church syncs with Breeze or Planning Center, people removed at that end appear in a pending removals banner where you can archive or delete them in one step. Archiving there records the reason as “Dropped from rolls” and today’s date.
12. Merge Duplicates
Sometimes the same family ends up entered twice — typed in by hand and then brought in again by a Breeze, Planning Center or Elvanto sync. Merge Duplicates combines two or more records into one: every contact, note, prayer request and list membership on the copy you remove moves onto the record you keep. Administrators and anyone with Edit Household Info can use it, found under Admin > Merge Duplicates.
A merge cannot be undone from this screen. Type the record’s name to confirm before anything is combined, and read that step carefully — see Confirming the merge below.
Possible duplicates
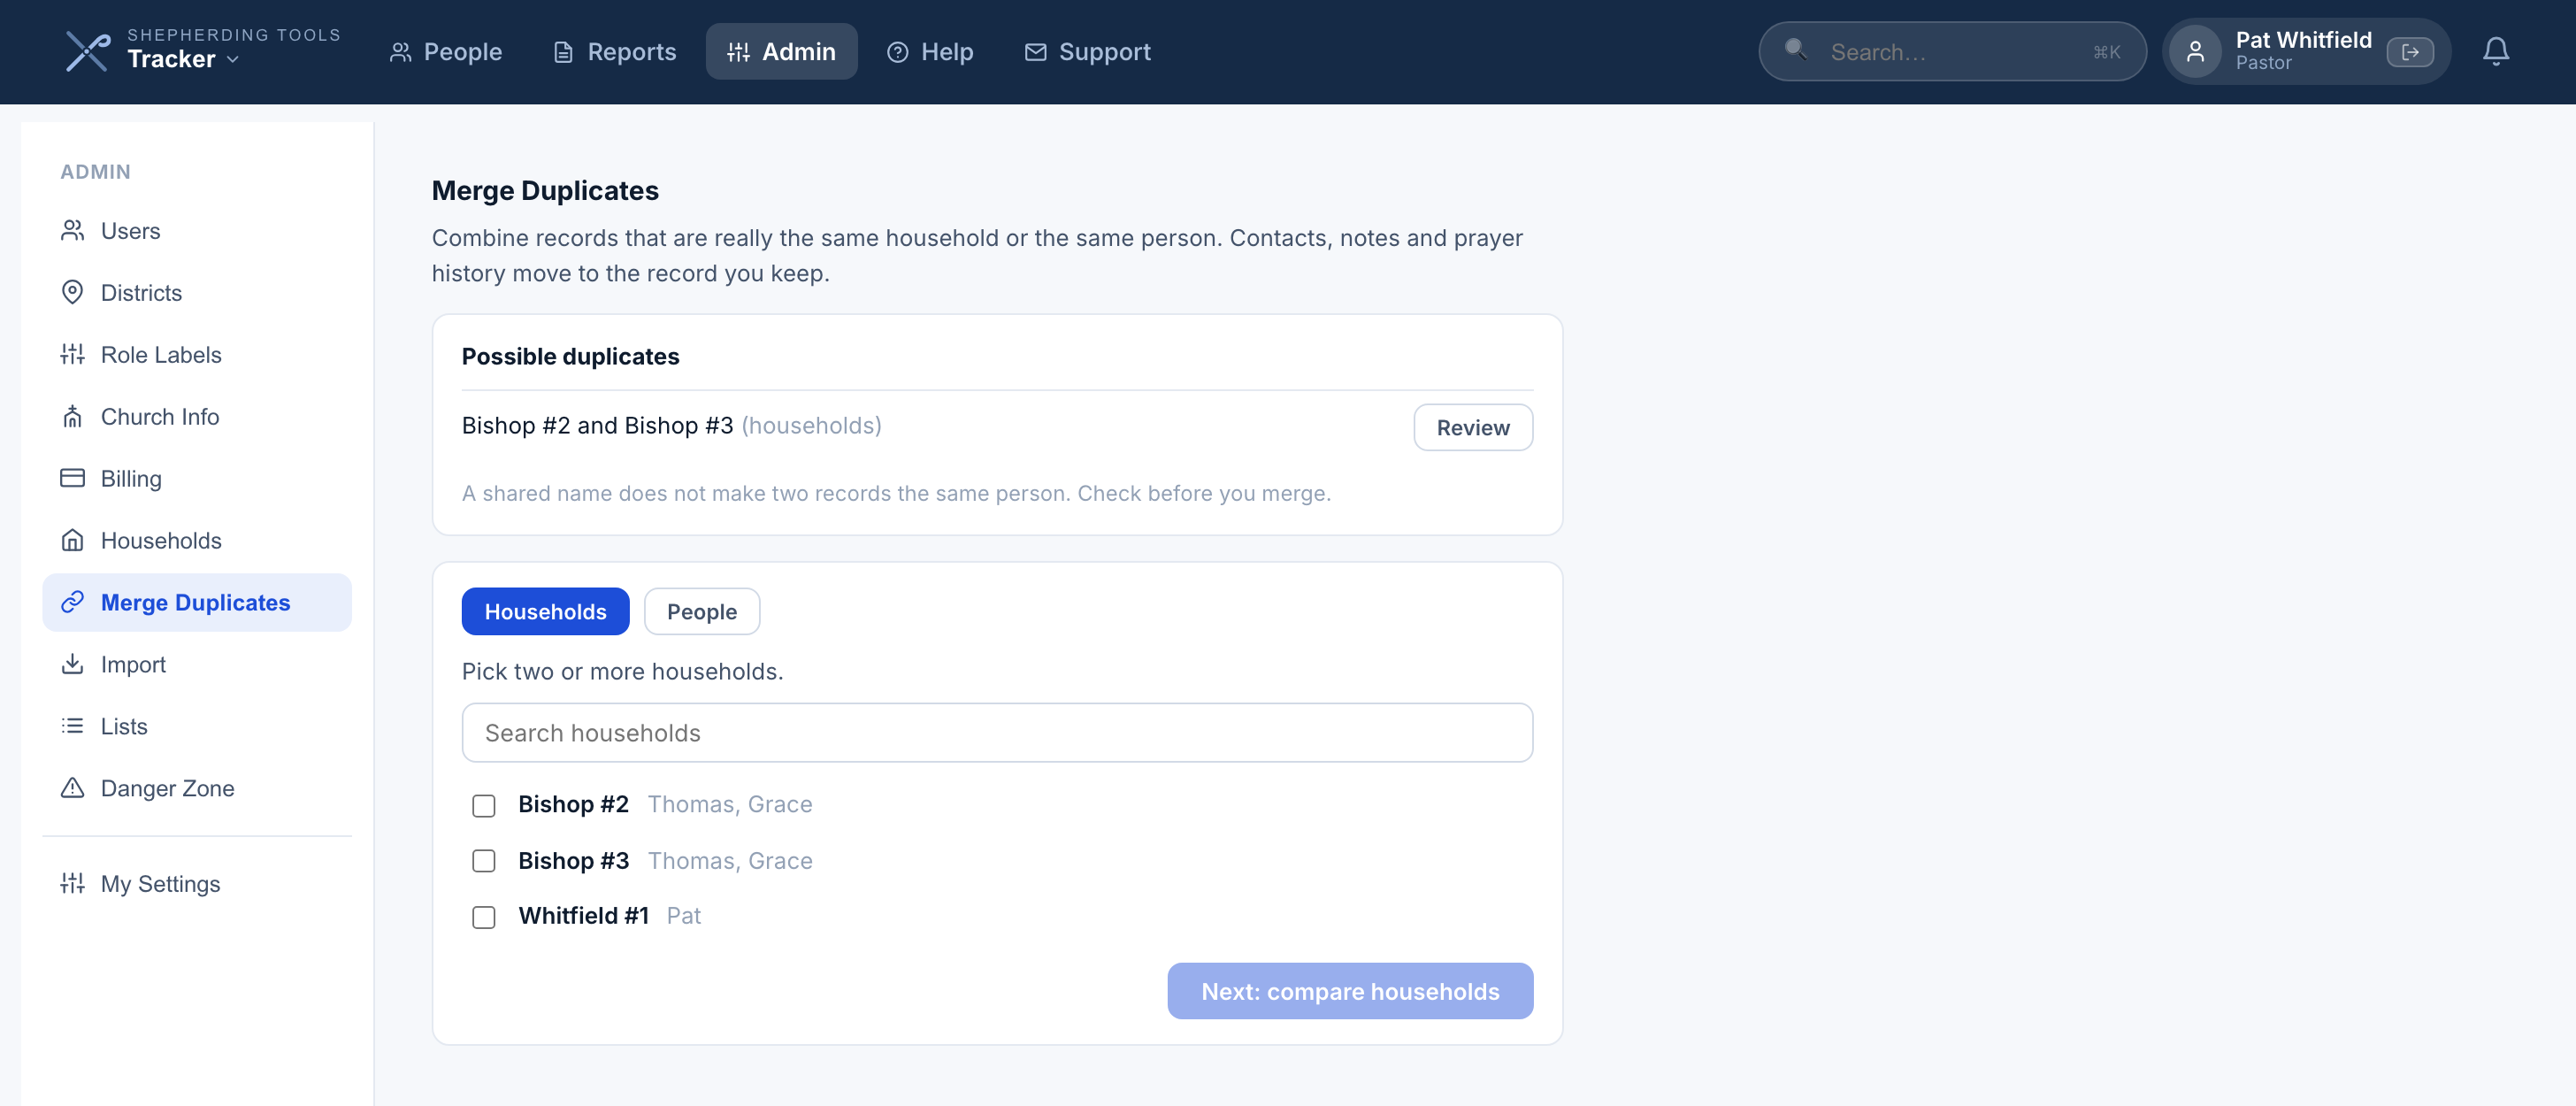
The page lists likely duplicates for you: two households, or two people in the same household, whose names match exactly. A pair where one side is already linked to your church management system is listed first, since that is the most common way a duplicate gets created. Click Review on a pair to open it straight into the merge.
A shared name does not make two records the same person. The list only suggests — nothing is combined until you review a pair and confirm it yourself.
Merging many families at once
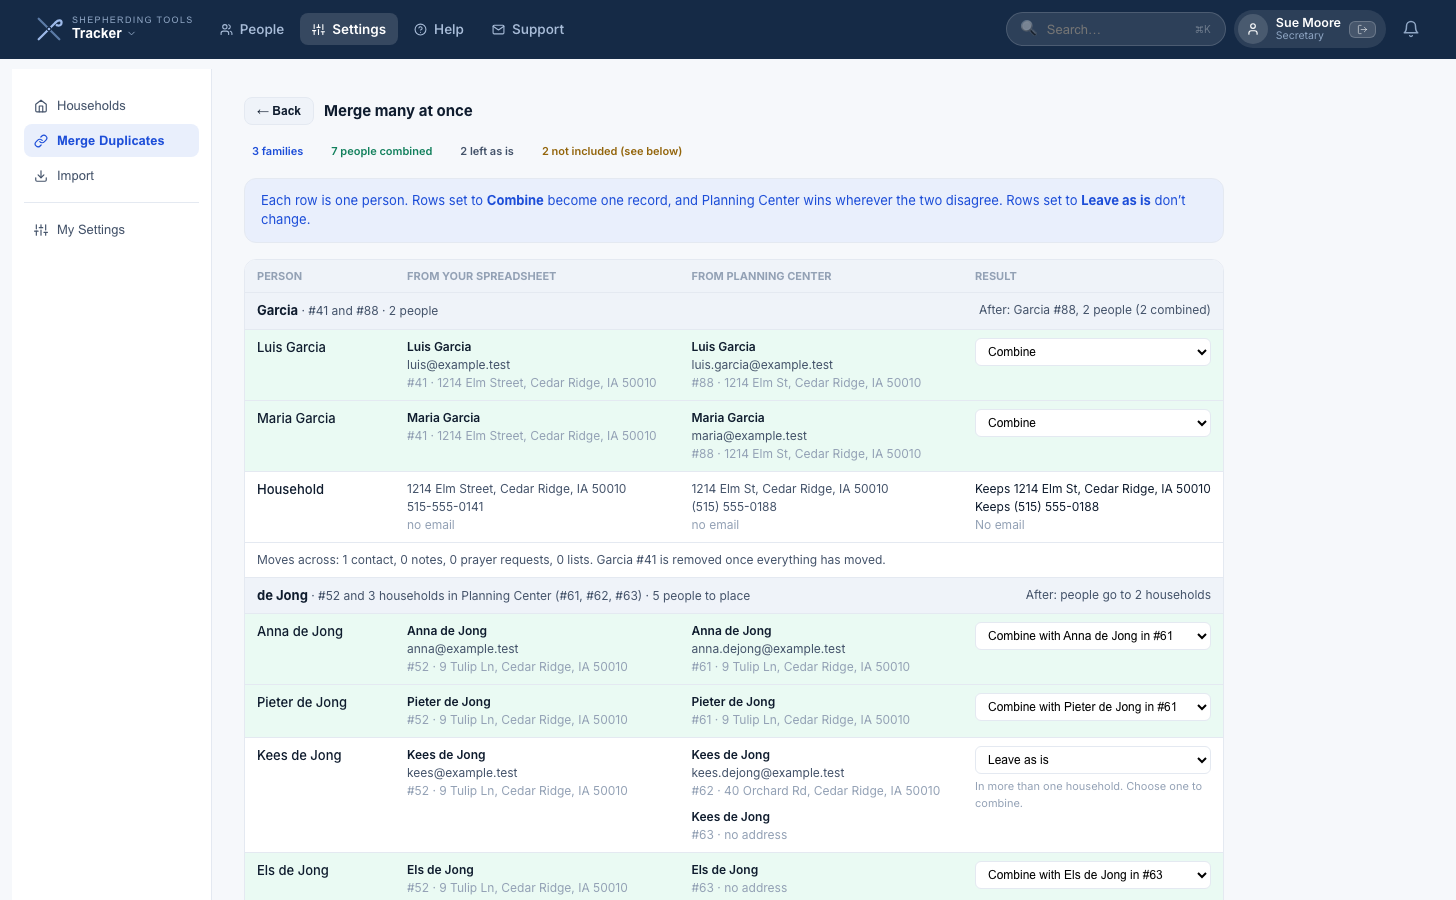
When some of your suggested pairs came from a church management system sync, a Merge many at once card appears above the list, still under Admin > Merge Duplicates.
It lays the pairs out one table per family. Each person gets a row: the name, what your spreadsheet has, what Planning Center has, and a Result to choose. A household row underneath each table shows the address, phone and email that will be kept. Rows being combined are shaded green.
The Result dropdown offers three choices:
- Combine, the default when a person has exactly one match.
- Leave as is, so nothing about that person changes.
- Combine with [name] in [household] — for example, Combine with Anna de Jong in #61. It appears when a hand-entered household’s people turn out to belong to several different families in Planning Center, and names exactly which record and household each match goes to. Anyone with more than one possible match starts on Leave as is, so you choose.
Where a spreadsheet record and a Planning Center record disagree, Planning Center wins — it’s the source of truth. Under each family, Tracker lists what moves across — contacts, notes, prayer requests and lists — and names anyone left behind, someone who doesn’t match any of the incoming records and stays exactly where he is.
Below the families, a Not included table lists the pairs it can’t combine in bulk, each with the people’s names and the reason. Those still get merged, just one at a time, the ordinary way.
- Open Merge many at once.
- Review each family and change any Result you don’t agree with.
- Click Merge N families.
- Type the number to confirm.
Each family is merged on its own, so one that fails doesn’t stop the others.
There is no undo button on this screen either. A copy of everything removed is kept, and Shepherding Tools support can restore it if a merge turns out to be a mistake — but that is a support request, not a click.
Selecting records to merge
- Open Admin > Merge Duplicates.
- Choose Households or People.
- Search and check two or more records. For people, pick two or more in the same household — to merge people from different households, merge the households first.
- Click Next: compare.
Resolving what disagrees
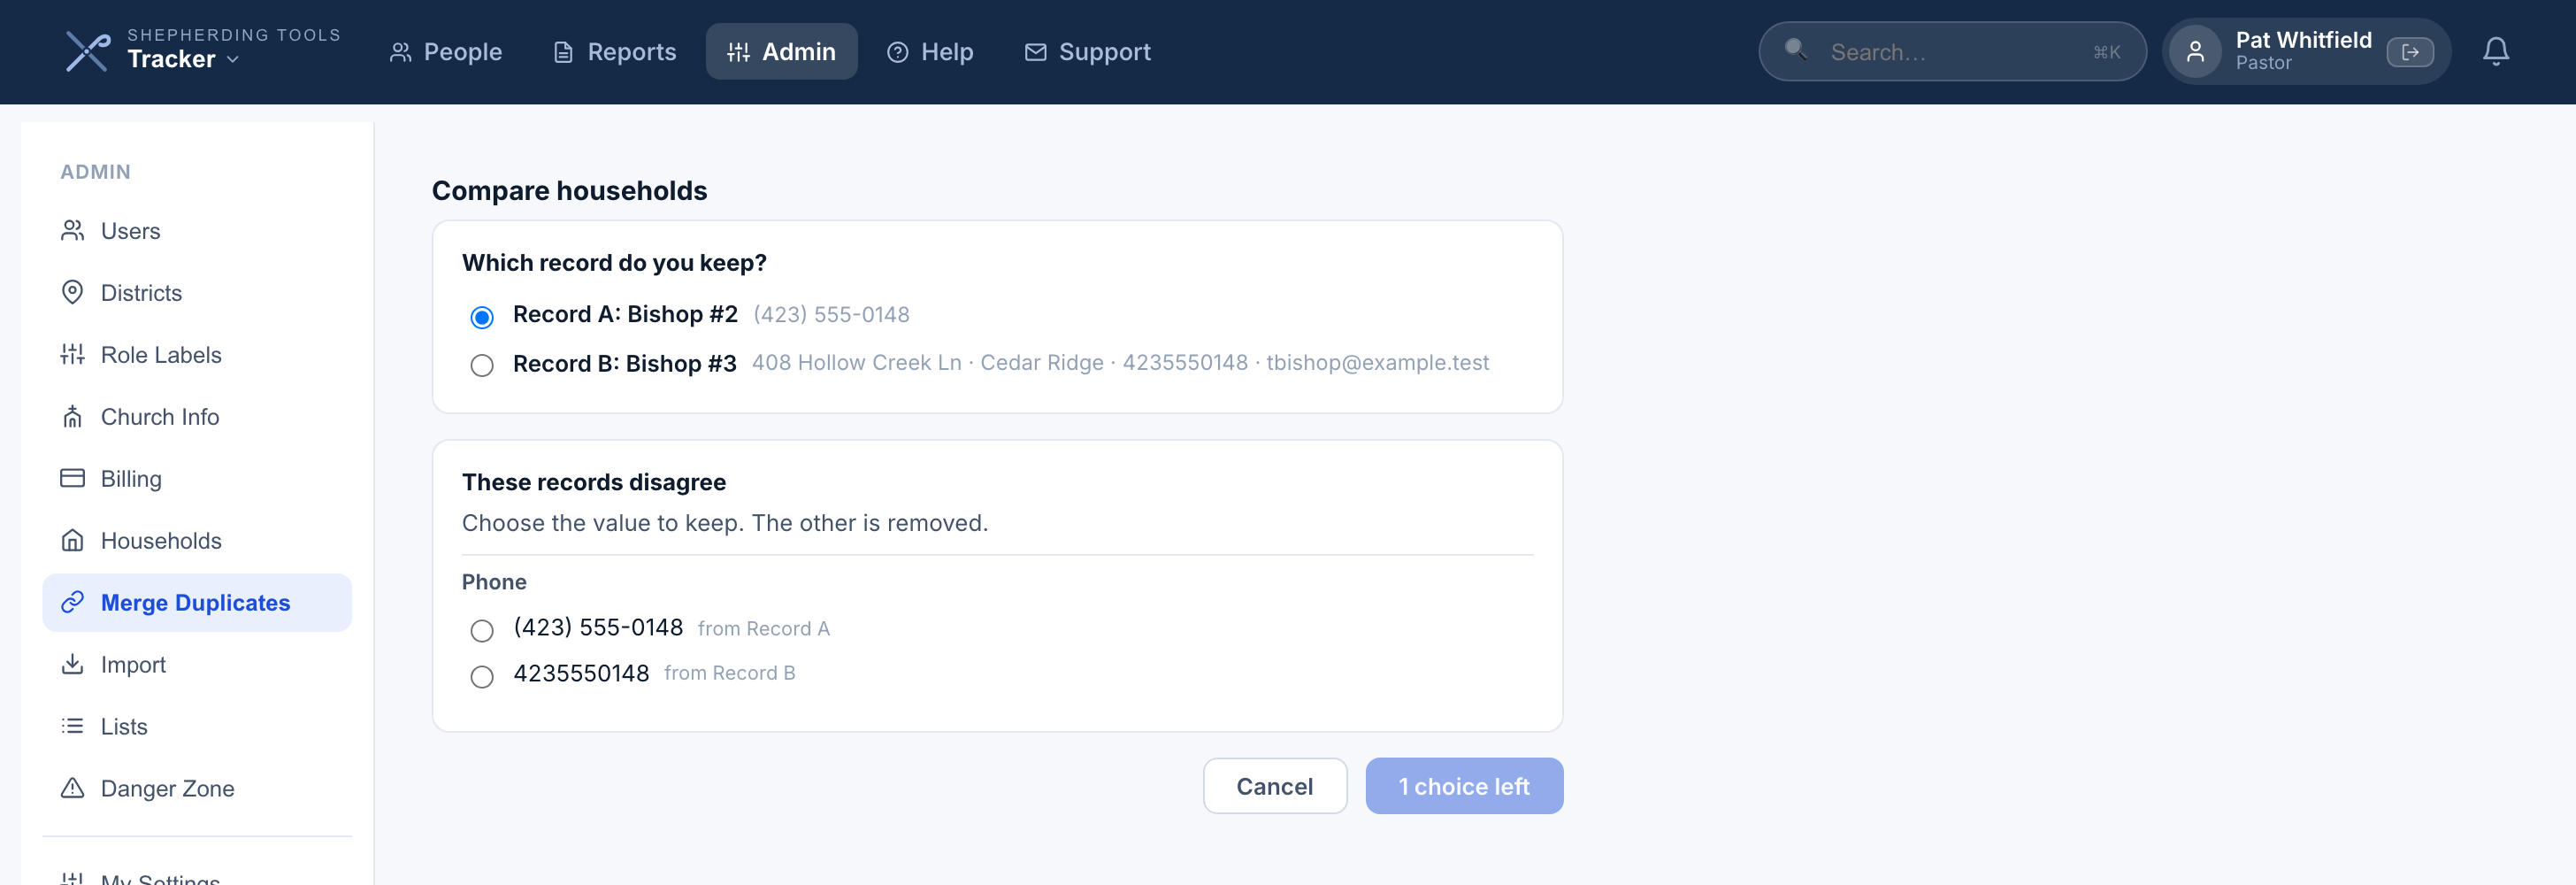
Where the records agree, or only one has a value, nothing is asked — that value carries over on its own. Where they genuinely disagree, each field is shown side by side so you choose which value survives; the other is removed rather than dropped silently. A church office and the district an officer leads are the exception: the record you keep always keeps its own, and an administrator sets an office afterwards if it needs to change.
If someone can sign in on more than one of the selected records, the merge refuses to run until you revoke the duplicate’s access. Combining two logins would mean choosing between two passwords, and Tracker won’t make that choice for you.
Confirming the merge
The last step lists exactly what will happen — which record is kept, which is removed, and how many records move across — and asks you to type the name of the record you are keeping before the button unlocks.
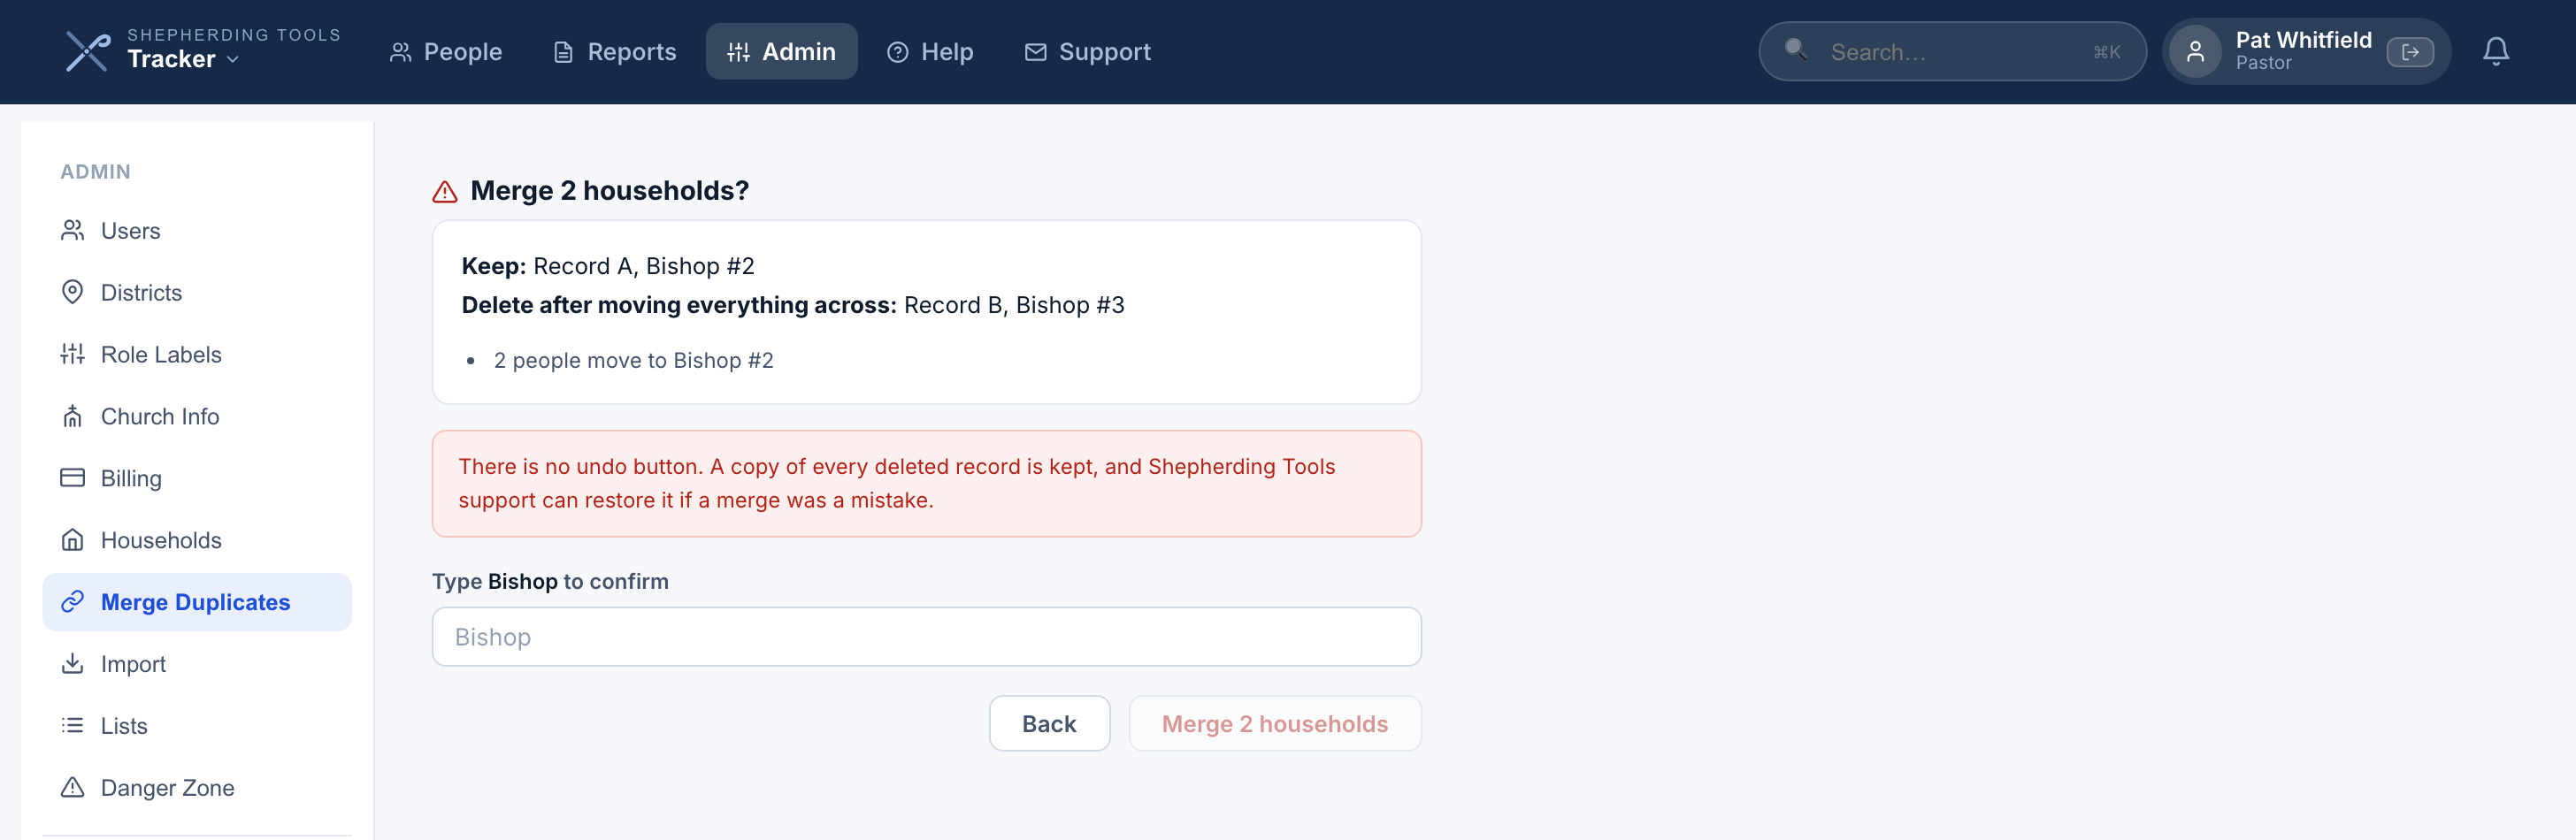
There is no undo button on this screen. A copy of everything removed is kept, and Shepherding Tools support can restore it if a merge turns out to be a mistake — but that is a support request, not a click. If either record is linked to Planning Center, Breeze or Elvanto, that link always survives onto the record you keep, so your next sync recognizes the family instead of recreating the duplicate. Two records linked to different people in your church management system cannot be merged — that is a sign they are not actually the same person.
Tips & Best Practices
- Log contacts right after a visit while the details are fresh. Even a brief note is better than none.
- Turn on the Pastoral Assistant and set an honest weekly number. A small number you keep beats a large one you abandon.
- Use Tried, didn’t connect for the calls nobody answered. The family stays in line and your work is still on the record.
- Record birthdays and anniversaries as you learn them. They come back to you two weeks ahead on Coming Up.
- Check My Todos & Reminders at the start of each week.
- Set a reminder for a household that needs following up in a few weeks. It stays hidden until the date arrives.
- Use private notes for sensitive pastoral matters. They are protected by role, and “Only me” means only you.
- Print the report for quarterly leadership meetings: set the period, pick the leaders, save as PDF.